Tag Archives: trick

Fake Food: Making Edible Replicas

They used to solve this problem in the breakfast scene of “The Duke of Killiekrankie” by having the food made of candy which would melt rapidly in the mouth, and so not interfere with enunciation. The hashed brown potatoes, for example, were nothing but spun sugar, browned, which looked substantial enough to the audience, but melted away almost as soon as they touched the tongue.

– The New York Times, April 1, 1906.

I have previously written about making inedible fake food. A props person may also have to make edible fake food. What is edible fake food? Say a character needs to eat a peanut butter sandwich, but the actress playing that character is allergic to nuts; you need an edible replica of peanut butter that contains no nuts.

Props people make edible replicas for a variety of reasons. Most common is the above-mentioned allergy issue; before planning a meal, you (or your stage manager) needs to find out what the actors are allergic to, and any special dietary needs. An actor may be vegetarian or keeps kosher. Besides allergies and diet, actors avoid other types of food while on stage; milk and cheese, or sugary drinks, tend to affect the vocal chords in ways which many actors dislike. A prop master’s greatest challenge is when he or she needs to serve a massive edible banquet, and an actor is vegetarian, allergic to gluten, and lactose-intolerant.

Another reason to make edible fake food is cost. Characters on stage may chow down on what appears to be hundreds of dollars of caviar in a single scene. You need a more cost-effective solution if you want to keep your budget under control. In a similar vein, certain foods may be time-consuming or complicated to prepare. Remember, your running crew needs to prepare the food before each show in addition to their other pre-show duties, and if your production has matinées, they may have an even tighter schedule between the two shows. It’s usually better to microwave a turkey substitute for thirty seconds than to roast a real turkey for four hours.

Third, the food on stage may require special properties which the real deal does not possess. A common example is when a director wants the characters to eat ice cream, but does not want to see the ice cream melt during the scene. It’s a tricky feat to pull off under those hot stage lights.

Finally, an actor may need to eat something which is normally not edible. Edible flowers are commonly called for, as well as paper notes. Be prepared for anything.

It is important to keep the food preparation area clean, which means separate from any work areas. If you keep a stock of preparation dishes and utensils, these should be kept separate from your regular stock of kitchen props; you don’t want to prepare your food in a dish that was painted with a toxic paint for the previous show. Likewise, the food needs to be stored properly in between shows, especially if you buy a whole bunch at once for multiple performances. It should also go without saying that you should not attempt to reuse uneaten food from one performance for the next one.

Creating edible food is a little bit sculpture, a little bit painting, and a whole lot of creativity. It’s good to develop a sort of “base” of materials which are readily available, easy to work with, and can mimic a great deal of foods. Bananas, breads, and food coloring have been some of the more popular bases for props artisans for well over a century.

Bananas can be mashed to imitate a great number of foods, such as cream or ice cream. With the right coloring and toppings, it can even substitute for meat or fish. When sliced lengthwise, you have a decent white meat substitute for chicken. Yogurt and cottage cheese work in a similar vein, but because of the milk content, they are less-commonly used.

Bread can take on a variety of shapes. Brown bread with the crusts removed and cut to the proper shape can simulate chops and roast meat. I saw the head of properties at the Walnut Street Theatre create a very convincing Salisbury steak each night with just a slice of pumpernickel covered in cold canned gravy. Switch the gravy with fruit glaze or some other red jelly and you have a slab of raw meat. A whole loaf with the crusts removed can be shaped into a number of different forms. If you use a loaf that is at least a day old, you can even carve it somewhat.

Tofu is another kind of base which can be built on for any number of fake edibles. It has the advantage of being vegan, and in some cases, gluten-free, so it’s a great choice for tricky eaters.

Food coloring adds greatly to your repertoire of faux food creation tools. It can be tricky to match the color and opacity of your intended goal; luckily, everything is edible, so you can eat your tests and samples. Specialty baking shops will stock a greater range of colors and sizes, so you don’t have to try to create every single color with those tiny bottles of red, yellow, blue and green. You can also find culinary colors in spray cans, which are a boon for the more artistically inclined.

Fruits are a friendly substitute for many foods, and can be tastier for the actors than old bread covered in cold gravy. I used a fresh grape and a dried apricot for my appetizers in Timon of Athens. I’ve also heard of shows which used half an apricot for an egg yolk and a pared apple for a raw turnip. Watermelon with some brown food coloring makes a convincingly juicy slab of raw meat. Dried fruits such as prunes and apricots can be cut up, shaped and squished to resemble a variety of things, and are especially handy when you have that large banquet scene that requires a variety of edible colors and textures to appear sumptuous.

Sausages and other imperishable meats serve a similar purpose as dried fruits. With the skin removed, they can be sliced and carved to mimic all sorts of appetizers and side dishes.

Fake edible food is a great exercise for students and interns because it forces them to distill an item (the real food) to its most recognizable characteristics, and then come up with a simple and economical replication of those characteristics. It makes them think about the constraints of a show, such as preparation time, cost per show, shopping time, etc. Finally, most people do not create fake food in their spare time, so they can’t fall back on familiar materials and methods, such as carpentry or foam carving.

A knowledge of cooking, baking, and food preparation is helpful, as it can help you learn how to thicken or thin various sauces and liquids, or give you clues how to cut and shape different foods. A trip to a culinary or baking store is great as well, as you can find all sorts of icing bags, cookie cutters and food-safe molds to help you out. I read about a production in 1906 which used a mold of a chicken to bake a sponge cake that could be carved and consumed on stage. Now that’s a tasty trick!

The Gore of Grand Guignol

The fan of both horror and theatre is sure to have heard of Grand Guignol. Though a producer of a variety of works, the infamous Parisian theatre is best known for its horror plays performed in the years leading up to World War II. Founded in 1894 by Oscar Méténier, Le Théâtre du Grand-Guignol offered up stories such as Le Laboratoire des Hallucinations, by André de Lorde: A doctor performs gruesome brain surgery his wife’s new-found lover. The man is turned into an insane zombie and plunges a chisel into the doctor’s brain. Anyone familiar with EC Comics will recognize the kind of plots this theatre performed.

When a theatre regularly displays amputations, burning in acid, eviscerations, stabbings and all other manner of violent actions, a prop person may ask: how realistic were these effects, and how were they pulled off?

Perhaps one of the best kept secrets of the Grand Guignol was their fake blood. Many sources speak in fascination that it would congeal after a few minutes like real blood. Mel Gordon, a theatre Professor at U.C. Berkeley and Grand Guignol expert, says that the base is made of a heated mixture of equal parts carmine and glycerin (Callboard magazine, April, 1996). Carmine is a bright red pigment made by boiling dried insects; you can find paints which use that pigment, though finding it in its pure form is more difficult and necessitates looking for specialty online stores. You can still buy glycerin at drug stores and online. It is often added to stage blood to give it a bit of sheen under the lights. Further justification for this theory is found in a Time Magazine article entitled “The Theater: Murders in the Rue Chaptal” from March, 1947:

The theater has a secret recipe for blood; when the stuff cools it coagulates and makes scabs. Thrill-hungry customers in the small auditorium get a dividend when they overhear the hoarse backstage whisper: “Vite [tr: quickly], Edmond! Warm up the blood.”

Edmond Beauvais was the chief propman of the theatre in the mid-1940s. The last director of the theatre, Charles Nonon, personally mixed nine different shades of blood daily (Time Magazine, November 30, 1962). We learn more about the possible ingredients of this fake blood from two articles about the tour of Grand Guignol which hit San Francisco in 1950. Director Robert T. Eley called on local druggist Barnes-Hind for a 2 percent solution of “methyd cellulose” (Five Star Final, April 10, 1950) and (Pace, Michael Farriday, March 1951). I’m going to make the assumption that both of these articles are actually talking about “methyl-cellulose”. It thickens in cold water and gels when heat is added. You can buy it in its pure form or find it in popular constipation medications; it was used to make the ectoplasm in Ghostbusters. Blood which did not need to flow could be made from currant jelly (“The Relationship between Le Théâtre du Grand Guignol and the Cinema 1897-1962”, Sean J. O’Leary, 2005).

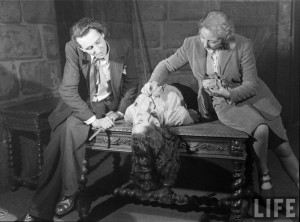
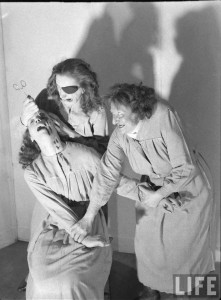
Eva Berkson applies blood to an actress' neck before a scene from "The Hussy". Photograph by Hans Wild, 1947

Nonon also made viscera from red rubber hose and sponges soaked in blood. Taxidermists supplied animal eyeballs, which he coated in aspic (a clear jelly made from meat stock) and stuffed with anchovies marinated in blood (Time, 1962). Sheep’s eyes were popular, but any animal would suffice because then the eyeball could bounce when dropped (Callboard, 1996). Edible eyeballs were made by a local confectioner’s shop (Pace, 1951). A tongue that was ripped out was made of rubber (Five Star Final, 1950) and (Pace, 1951). According to The Columbia encyclopedia of modern drama, Paul Ratineau, the stage manager, depended on the daily delivery of fresh animal parts by local butchers.

In order to deliver the goods, a variety of devices and trick props were required. These included rubber knives, concealed bladders, tubes and small, strategically located steam pipes (See Magazine, March, 1950), a dagger squirting “blood” from a vial hidden in an actor’s hand, quick flaming powders, a table with props hidden in upstage drawers (The New York Times Magazine, P.E. Schneider, March 1957). Daggers with retractable blades could also squirt blood from the handles; Mel Gordon explains that “a turkey baster, rubber ball, or an eye dropper could provide a good base for building a blood squirting knife” (Callboard, 1996).

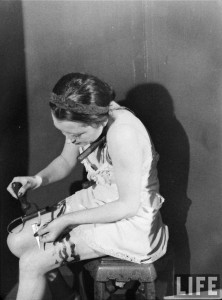
In the photograph below, we see how some trick knives are like the classic “arrow-through-the-head” gag prop, where the two halves are separated by a metal clasp which fits around the actor’s limb.

Simone Gérard demonstrates a trick knife. Photograph by Hans Wild, 1947

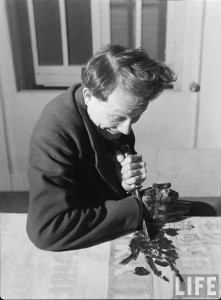
Gordon also explains how the Guignol-eurs chopped off a man’s hand:

An actor cuts off his hand. Photograph by Hans Wild, 1947.

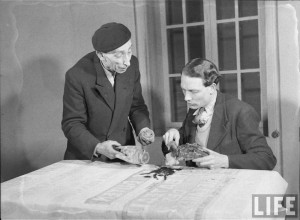
Cutting off a man’s hand is easier than it sounds. Stiffen a glove with glue water so it holds it’s shape and paint it like a real hand. The actor wearing the glove should still be able to move his fingers a bit. When the hand is chopped off the “chopper” removes the glove and the “chopee” moves his hand up into his cuff which is reinforced with a cardboard tube and fitted with a blood pack. The stiffened glove should hold it’s shape perfectly as the unwilling amputee writhes in pain (Callboard, 1996).

Edmond Beauvais, prop master, prepares a removable hand with the actor

Another eye-popping effect involves hiding a fake eye in the hollowed-out handle of a spoon. Conversely, an actress could wear a plaster or latex quarter mask which holds a fake (sheep’s) eye, lactose powder, and a blood capsule. If she wears her hair over that half of her face (“Veronica Lake” style), the effect would be quite flawless (Callboard, 1996). Mel Gordon describes a more complicated eye-gouging device:

The retractable blade of the knife moves into the handle which squirts blood when pressed against the victim’s face. Affixed to the end of the handle is a piece of adhesive “skin” (latex or lamb skin) with a slit to allow the blade to move through it. As the handle is pressed against the victims eye the sticky “skin” is pressed to the eyelid leaving a gory empty eye socket. When the knife handle is pulled away the blade is released back into position. The actor with the knife squeezes a air pump in the handle and a rubber eyeball on the end of the knife inflates. The eye appears to be impaled on the tip of the knife. Many magic shops sell an inflatable ball and pump mechanism that could work as a base for this prop (Callboard, 1996).

Crime in a Madhouse. Photograph by Hans Wilder, 1947

Much of the development of the theatre’s effects are due to the above-mentioned Paul Ratineau. Many of the tricks were secret; some were even patented. Most were devilishly simple though. Their power and Ratineau’s cleverness did not come solely from the tricks though. He overcame a number of challenges. First, the stage itself was only twenty feet by twenty feet large, with the audience close enough to shake hands with the actors (“Theatre du Grand Guignol,” The Drama Review. Frantisek Deak, 1974). Second, the tricks needed to work consistently, in full view of the audience, and while the actors performed in character with other actors in the height of often-crazed emotions.

It should be no surprise then, that Ratineau also developed much of the Grand Guignol’s characteristic lighting. Besides setting the mood, the lighting could hide the imperfections in the prop trickery as well as guide the audience’s eyes to where it was desired. Similarly, the arrangement of the scenery and objects on stage combined with the blocking served to direct or misdirect the audience’s attention (O’Leary, 2005). Sound effects (also pioneered by Ratineau) were critical in bridging the gap between what an audience sees and what they imagine they are witnessing. Finally, dramatic tension and the power of marketing helped sell the bloodshed portrayed on stage by warming the audience up to a heightened level of expectation. The mystery of the special effects themselves added to the legend surrounding the Grand Guignol. In other words, the actual trick props, while clever, might seem crude and unrefined when studied under normal light and out of the context of the performances.

When money became tight, the theatre would prefer to stab women rather than men, because their smaller costumes were cheaper to clean. For head wounds, men were the victims because their short hair was easier to wash (Schneider, 1957). Schneider goes on to recount some of the more serious mishaps and accidents:

Naturally, all this gruesomeness is sheer illusion, but the sham is not always devoid of risk. Once, during an actress’ simulated hanging, the protective device broke and she almost did get hanged. Another recently was burned by the flame of a revolver. In “Orgy in the Lighthouse,” the heroine suffered even more; on one night, she almost caught fire; on another, her male partner began to live his part a bit too much and beat her up in earnest, so that she was forced to go off to the country to nurse a nervous breakdown.

See? Gore and horror aren’t always happy fun times.

“The Book of Grace” Props

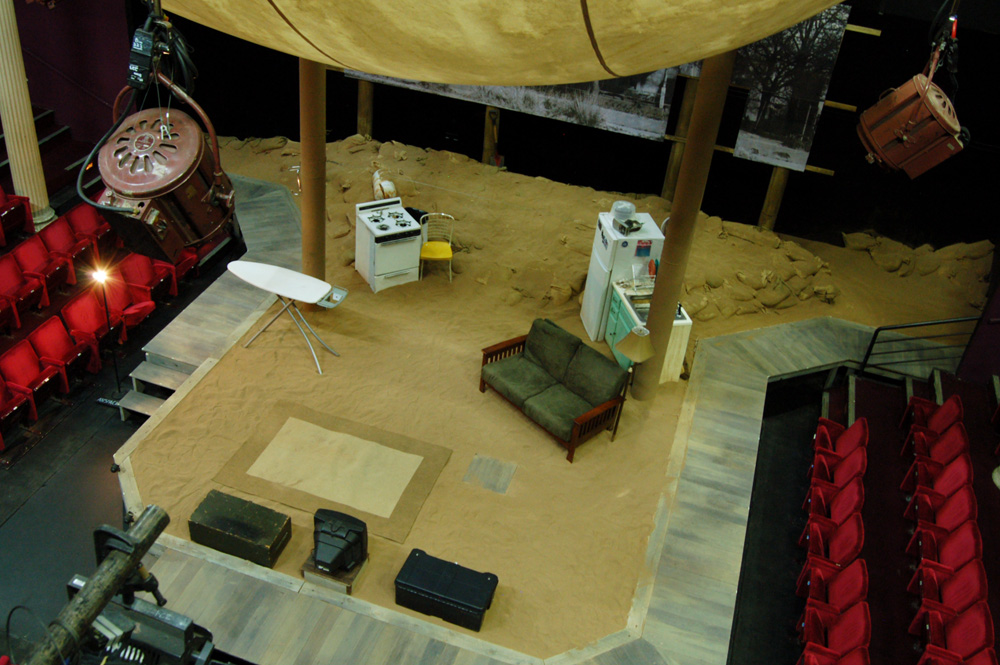
The Book of Grace, by Suzan-Lori Parks, closed yesterday here at the Public Theater, so I thought I’d write about some of the props. I’ll start with the set props and some of the tricks that may or may not have been apparent.

The set of "The Book of Grace"

This show had a lot of tricks. The iron actually ironed, the stove actually cooked eggs, and the sink actually ran water. Sometimes, the simplest of shows actually have the most complex of prop needs. It becomes less overwhelming if you break it down into simpler parts.

The Stove

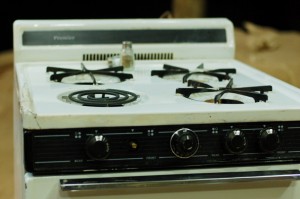
Top of the stove
Top of the stove

The stove was originally a gas stove. In order to make it cook an egg, I took a hot plate apart and placed the burner in place of the original burners. I ran the cord out the back, and it was all run by the light board.

The Fridge

Top of the Fridge
Top of the Fridge

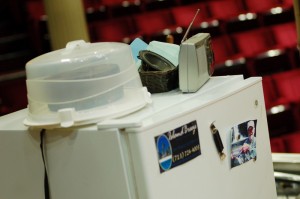
The refrigerator had a radio on top of it, which was played at one point. We needed to sneak a speaker in there somewhere; the fridge was actually from our prop shop, so we didn’t want to drill any holes or cut any parts out of it to hide the speaker. As you can see in the photograph above, by placing it in a basket and surrounding it with old mail and take-out menus, we kept it out of view from the audience.

The Sink

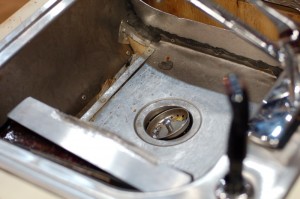
The sink had some of the toughest challenges. Making it run water was the easiest; since the Anspacher Theater has a sink directly backstage, we just needed to run a hose from it under the deck and to the faucet. The tricky part had to do with the end of the scene. The titular book of Grace was torn up by Vet, the father, thrown in the sink, set on fire, and then the charred pieces were pulled out.

The actual book was a custom scrapbook with many parts created and modified by the actress playing Grace. As such, we didn’t want them to tear it up and burn it every night. Second, if we burned an actual book, the ashes would float up and set the ceiling on fire. Finally, there would not be any way to consistently control what the charred pieces looked like after burning the book.

Interior of the sink

On the top of the photograph, you can see a pocket in the sink. Before tearing up the book, the actor grabbed a duplicate copy, which was similar but simpler. After tearing it up, he dropped the pieces down this pocket. Along the bottom of the picture, you can see a bar of metal which covered a trough filled with campfire gel. This is what the actor set on fire. On the left side of the photograph is another pocket. This one held the pre-charred scraps of paper which the actress pulled out at the end of the play.

Faking a Beer Can

For our upcoming production of The Book of Grace by Suzan-Lori Parks at the Public Theater, we need beer. Technically, we need about ten beers per night.

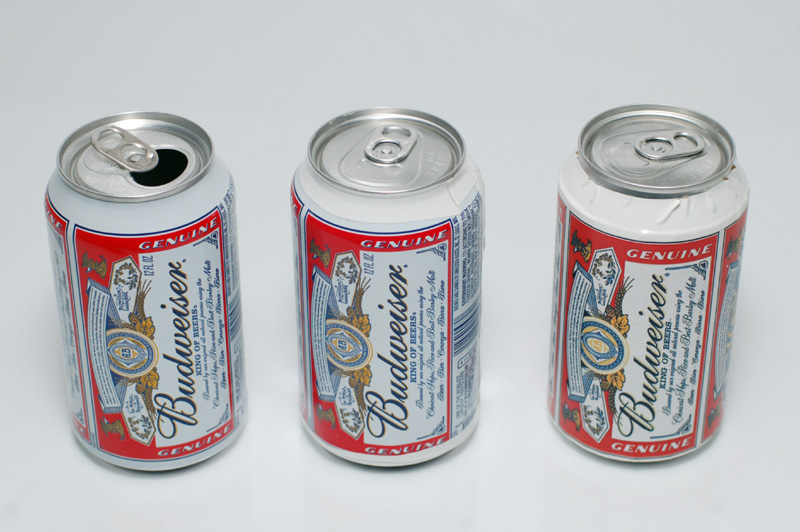
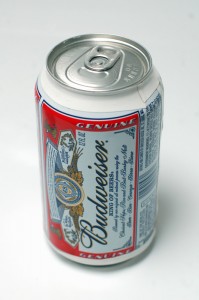
A real can, and two prop cans with fake labels

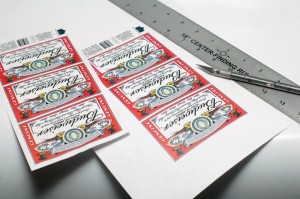
Unfortunately, in most legitimate theatres, you cannot have the actors drinking beer during a performance. You need to figure out a way to have a beer can filled with water or something equally innocuous. One way to do it is by emptying a beer can and refilling it. This can be tricky if you also want to crack the lid as part of the stage action; the sound is made because the contents are under pressure, and unless you re-pressurize the can when filling it, you’ll lose that satisfying crack noise. Your other option is to cover a can of non-alcoholic liquid with another label. You can either cut the label out of a real beer can, or manufacture one out of paper. We’ll take a brief look at both methods.

Cutting the top off of a can

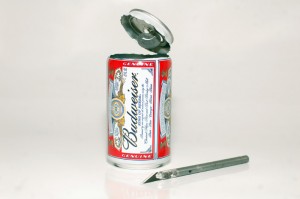
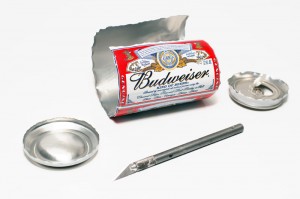
To cover one can with the label off another, you need to start by cutting off the top and the bottom. Aluminum cans cut easily with an X-Acto blade, snap-off blade, or box cutter. You don’t want to use a power tool like a band saw or jig saw, as the movement of the blade will shake the can and tear it uncontrollably. Once you remove the top and bottom, you can slice down the side to make a flat rectangle of metal.

A fully cut can label

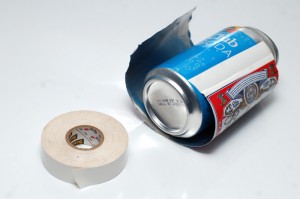
Once you have the label cut out, it’s time to attach it to your other can. Many actors prefer not to drink soda or anything too sweet during a show, as it snots up their throats. They may also have special diuretic needs that may preclude using certain drinks. Your best bet is canned carbonated water. Whether you choose seltzer, club soda, tonic water, or sparkling water depends on personal preference, but also on what the cans look like. The club soda I’ve used here has a very non-descript can that does not make itself known after it has been covered.

Wrapping the club soda with the beer label

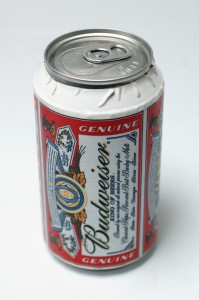
Budweiser cans have the advantage of using white as a background color; you can use white electrical tape to attach the label. If you use a different brand, you need to experiment with other types of tape. Clear packing tape is a great option if you want to avoid a colored line along the top and bottom. Make sure whatever tape you use is strong enough to keep the sharp edges of the aluminum from cutting through.

Finished can
Finished can

Wrapping a can of carbonated water with a paper label is another way to go. This is a good idea if your printing costs are less than the cost of acquiring beer cans. The most difficult part of this is generating the artwork. Photographing or scanning the labels can leave unrealistic shading. If you are uncomfortable using a computer graphics program to assemble and even build parts of the labels from scratch, this may not be the route for you.

Paper labels
Paper labels

You can use tape to attach the labels on the paper ones as well, or an adhesive on the back (please excuse the messiness of the tape job in the photograph below). You may find the paper label is a lot duller than an aluminum one, so you can spray it with your favorite glossy or semi-glossy clear coat.

A can covered in a paper label

Whichever method you decide depends on the specifics of your production. There are many variables which can effect the look of the can from the audience, such as the lighting or distance to the stage. The production may have other peculiar blocking that will affect your prop choice. If the actors crush the cans, you may not wish to cover it in a second layer of aluminum, as it may make it harder or even more dangerous to pull that off.

Just remember, whatever your show needs, you “can” do it!

Slave Shack hand props

A week and a half ago, I wrote about the set props for Slave Shack, a show I prop-mastered at the Algonquin Theatre. Now that the show has closed, I can talk about the hand props (the hand props give away several key plot points, which is why I held off until the show closed). There were several interesting challenges with the hand props for Slave Shack

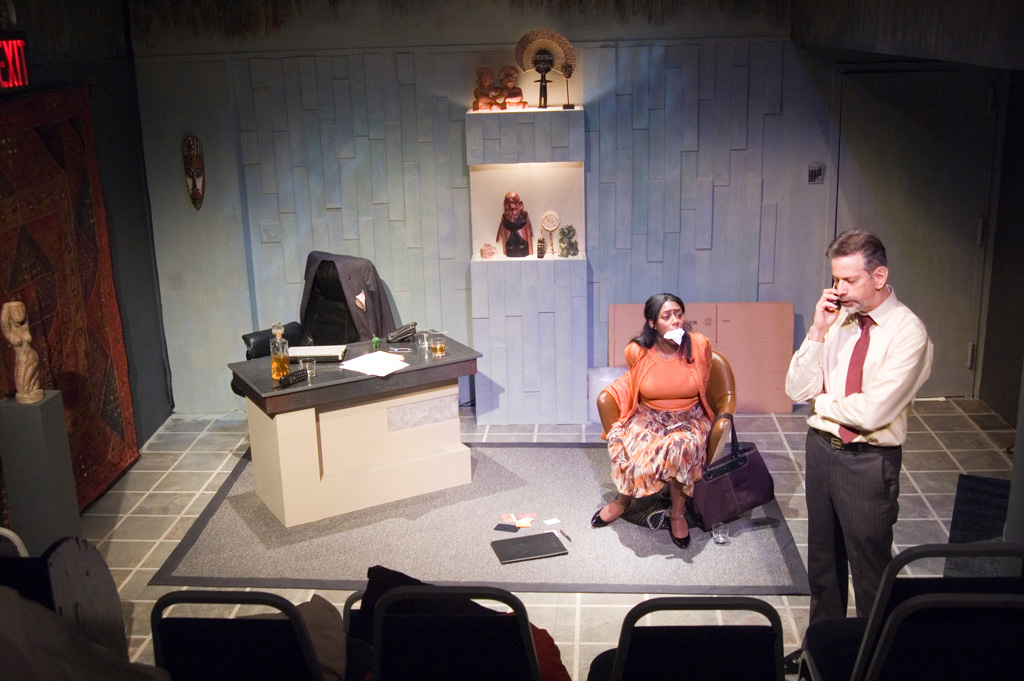
Slave Shack, end of Act One

Handcuffs

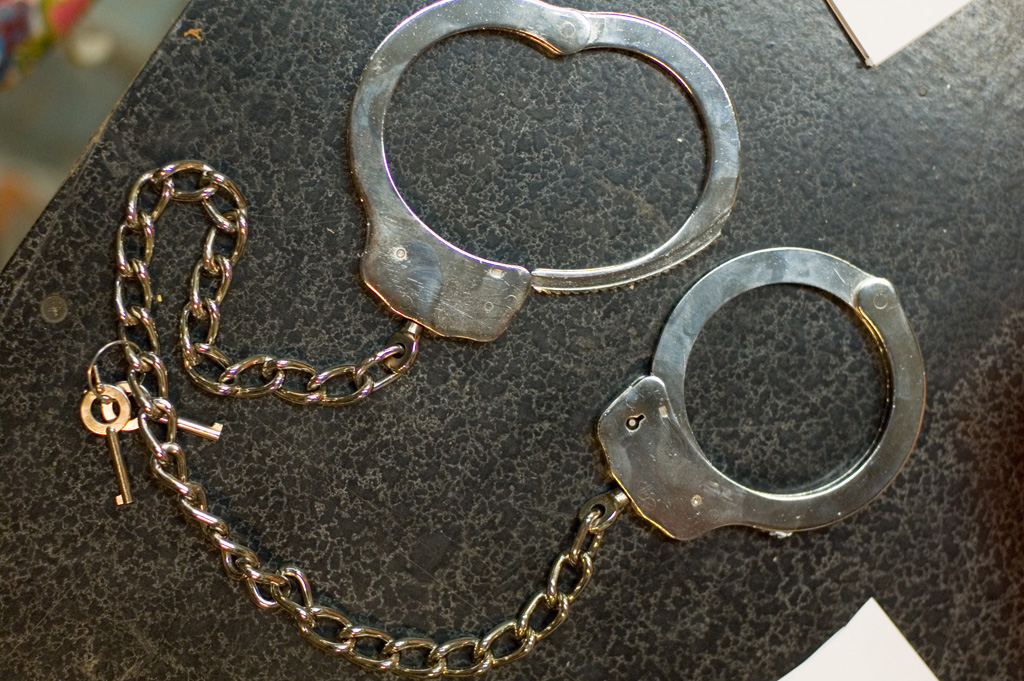
Leg Cuffs
Leg Cuffs

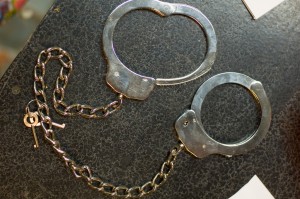
The “handcuffs” actually needed to be leg-cuffs, as you can see in the first photograph. They also needed to be trick cuffs, with the ability to come apart without a key at any time. We couldn’t find any leg cuffs with that ability, so we had to invent them. The first thing we tried was grinding down the teeth; this would allow  Candice LaGia Lenoir, the actress who played Janice, to pull the handcuffs apart as easily as they could be pushed together.

During the play, however, Janice jumps out of her seat a couple of times. When she did this, the handcuffs would pop open. My first idea was to rig some sort of latch on the handcuffs, which could hold the handcuff jaws together. This created more problems than it solved, as Candice needed to undo the handcuffs in the dark and get off stage at the end of Act One. It introduced a whole lot of fumbling whenever the handcuffs needed to come on or off.

I got another set of cuffs which still had un-ground teeth. I put the key in the hole and covered the slot so the key remained inside permanently. I then cut the end of the key off and replaced it with a less visible lever to operate it. Basically, I turned the leg-cuffs into a set of trick cuffs. This seemed to work for the most part.

Chair

Swivel chair on pedestal

The play called for a large sofa in the middle of the office. Jack handcuffs Janice’s leg to one of the sofa’s legs. There is a line about the sofa being so heavy “it took five guys to carry it up here.” The implication is that Janice cannot simply lift the sofa and slide the cuff out from underneath to free herself.

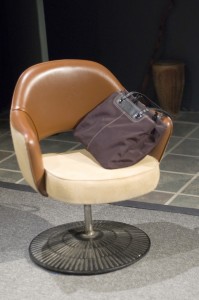
Unfortunately, the stage at the Algonquin is 12′ by 15′, and a sofa of any significant size would fill the entire set. Natalie (the set designer, and my wife) designed a swivel chair with a heavy pedestal as pictured above. Unfortunately, such a thing does not exist; the only chairs close are designer mid-century pieces which cost thousands of dollars.

We found the top part of the chair on Craigslist, and was able to get it delivered. It originally had a rolling base. I removed that and replaced it with the base you see above, which was taken from an outdoor pedestal table. It was extremely heavy, which was good, since we needed to sell the idea that Janice could not simply sneak off with the entire chair, and also so the chair would not tip over during the violent scufflings which occurred throughout the performance.

Monkey

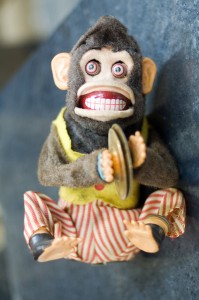
One of the major plot points of Slave Shack involves a racist monkey cartoon which appeared on a company brochure to depict Africa. Jack Blake, the main character was held responsible for it and forced to retire. During the play, Warren, his underling, gives Jack a going-away present – a stuffed toy which resembles the racist monkey cartoon described earlier. Debra Whitfield, the director, wanted something creepy-looking, like the cymbal monkey toys from the 1950s.

original monkey toy from eBay

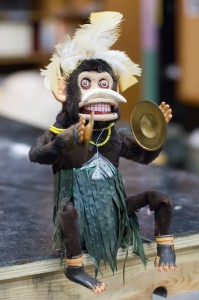
I found a significantly creepy version of this toy on eBay; it was fairly cheap, as the moving parts were broken. I removed the clothes and added a grass skirt, feather headdress, a bone in its nose, and some decor around his neck.

monkey toy used in Slave Shack

I had to add some additional fur as removing the clothes revealed the metal skeleton underneath.

Breakable Statue

You may recall my earlier post on how to make a breakable glass. When we tested it in the space, it was still too dangerous. The space is so small that any breakable item had the potential of throwing shards into the audience. The space was also completely enclosed, so no matter how you blocked the action, the pieces would eventually ricochet off a wall and head toward the audience.

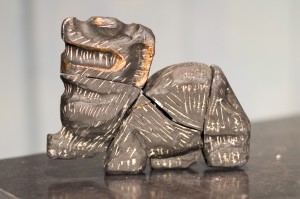
A breakable wooden statue

The only safe alternative on our budget (short of cutting the moment) was a wooden statue which could be pre-broken and reassembled with hot glue every night. Once again, Natalie decided to carve one herself rather than buy one. Though more labor-intensive, this gave us one distinct advantage. We cut the block of wood into five pieces and reassembled it with hot glue before carving it. This gave us nearly invisible break lines. If we cut a statue that had already been carved, the kerf, or thickness of the cutting blade, would have kept the seams from lining up completely.