Tag Archives: styrofoam

Miracle Materials

Though I’m knee-deep in Shakespeare in the Park at the moment (tech starts next week!), I’ve been looking forward to a slower pace this summer and a chance to experiment. Below is a list of some new materials I’ve come across lately that I’ve been wanting to play around with.

Inventables has a whole smörgÃ¥sbord of strange and interesting materials for props people. Squishy magnets, translucent concrete, aluminum foam, waterproof sand, rubber glass… I can go on and on, but the site begs you to just peruse everything for yourself.

Styrofoam has been a big boon to props artisans, but it brings with it a host of environmental concerns, both in its manufacturing (it is a petroleum-based product) and in its disposal (it will not bio-degrade for thousands of years). I’ve recently come across a foam made from mushrooms and bio-waste (technically, it’s made from the mushroom roots, which don’t contain spores and allergens). It seems promising as a potential replacement for some uses of foam, though I haven’t gotten my hands on a sample yet to test it out. Eben Bayer, one of the inventors and founders of the company, gave a TED Talk called “Are Mushrooms the New Plastics” where he goes into further details.

Along the same lines, researchers at the University of Nebraska-Lincoln are turning chicken feathers into plastic. It’s still a ways from being a usable product, but you can expect a whole host of non-petroleum-based and biodegradable plastics to be popping up over the next decade.

Shapelock is a new thermoplastic which becomes moldable at low temperatures (150°F). If you’ve ever used Friendly Plastic or Instamorph, this seems like similar stuff.

Finally, Sugru has been getting a lot of buzz lately. It seems similar to epoxy putty in its use and application, but it is a silicone, so it remains flexible, soft and waterproof.

Gnome Building

For the upcoming production of “Broke-ology” at Lincoln Center, I was asked to build a three-foot garden gnome. They had a prop from the original production at the Williamstown Theatre Festival, but it was starting to break and crack in certain places. The gnome undergoes a lot of abuse during each performance, so they needed a new one with a better interior structure. So for the past two weeks, my wife and I have been gnome building.

Structure

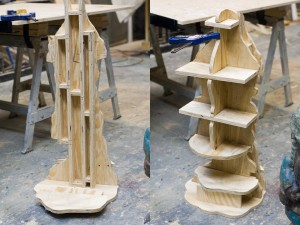
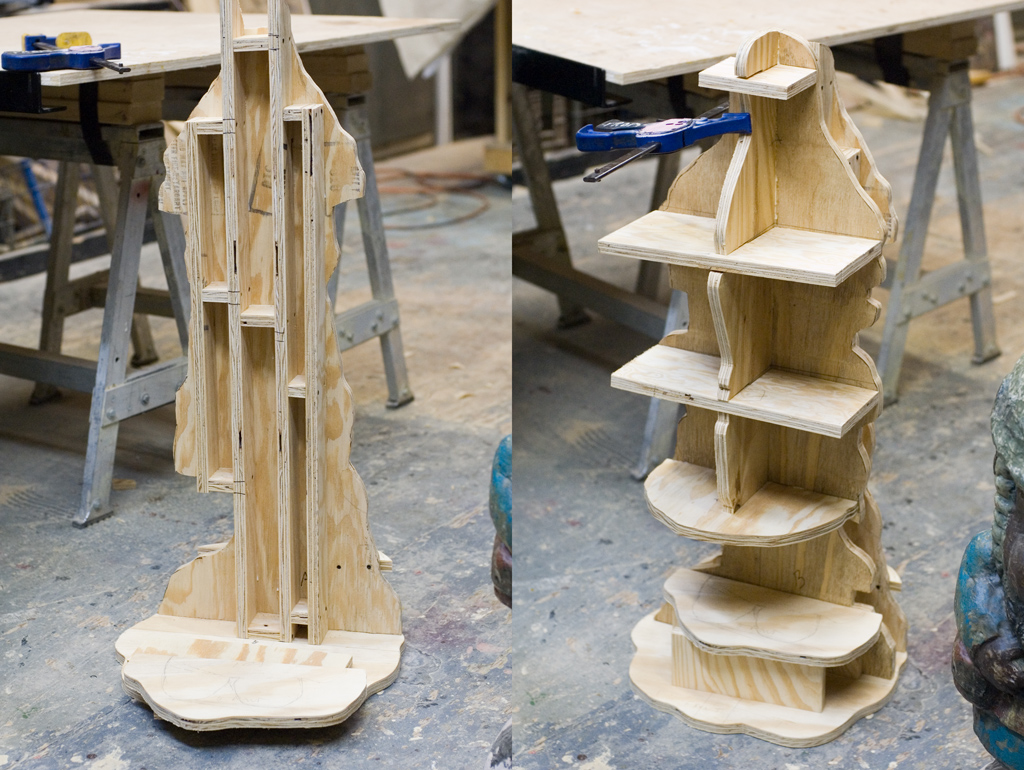
The interior plywood structure of the gnome

The original gnome was a solid chunk of foam, with weights added in the base. Since it gets fairly thin around the ankles, it was beginning to separate at that point. My major concern with the interior skeleton was making sure there were no weak points on the gnome.

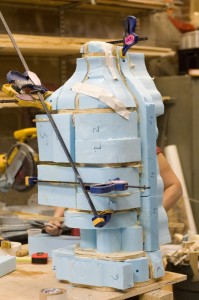
Additionally, while I had the original gnome with me, I took measurements and tracings directly off it to make several “slices” of the gnome’s shape to use as the structure. You can see what I mean in the photographs above. So the plywood would not only give me structure, it would also serve as a guide while adding and carving the foam.

Chunks of Styrofoam added to the skeleton

Carving

We couldn’t keep the gnome forever, so I took pictures of all four sides, plus the four in-between sides, as well as various views from above. It never hurts to have too many reference pictures. To remove large pieces of foam, we used either a knife or sometimes a reciprocating saw. If we needed a large amount of foam sculpted down quickly, we used a wire brush wheel hooked up to a cordless drill. We did the more precise and final carving and sculpting with a variety of rasps, knives, and sandpaper.  Sculpting and carving are very personal skills, so the best tools are often the ones you make yourself. Natalie made several tools just by gluing pieces of sandpaper to various shapes of wood.

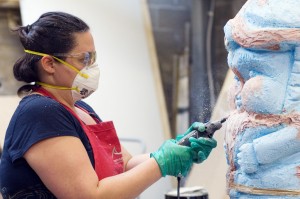
Natalie uses a Dremel to carve details

You can see in the photograph above that we added auto-body filler (or Bondo) to fill in gaps, cover mistakes, or build up areas where we took too much off. You need a respirator when using it, but it hardens very quickly. You can use a rasp or knife on it after about ten minutes, and you can sand it after about an hour. We also used a Dremel tool for quickly carving out details.

Coating

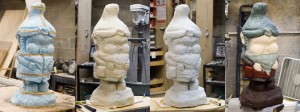
I pontificated in an earlier post about various ways of coating foam. First, we wrapped the gnome in muslin strips which were soaked in glue. The process is very similar to papier-mache. We tore the muslin strips to give them a ragged edge which could be smoothed down over the previous pieces. After this dried, we covered the whole thing in Rosco Foamcoat, which we laid on like stucco to give it a bit of worn and weathered texture. After a light sanding, we painted on the various base coats.

Step-by-step process of coating the foam sculpture

The final step was coating it with epoxy resin. This gave it a very hard, smooth, and water-proof shell. It’s also fairly pricey, very toxic, and requires a lot of set-up. The exterior of the gnome was fairly solid with just the muslin and Foamcoat coverings, so for lower-budget shows and shorter runs, you may want to forego the epoxy resin. It’s a somewhat complex process, so I’ll address it in more detail in a future post.

Final Painting

After the epoxy had cured over night, we added the final paint layer. We used acrylic paint. We also dusted it with some black spray paint to weather and age it, as well as some dulling spray to get rid of the shininess from the epoxy.

Gnome for "Broke-ology"

Coating Foam

My wife and I are currently working on a project for a new show which is essentially a Styrofoam sculpture. It got me thinking about the various ways to treat and coat foam.

You need to coat foam with something. If you tried to paint raw foam, it will eat all the paint up. If you tried to use anything with a solvent, such as spray paint, it will dissolve the foam. Finally, uncoated foam is just too fragile for many uses, especially in theatre.

Coating the foam with Gesso or joint compound will smooth it out and give it a paintable surface. If you mix the joint compound with glue, it will make give it a little more flexibility, as joint compound tends to crack and flake off. Though your Styrofoam will look nice with these kinds of coatings, they will still be fairly fragile.

At the display company I’ve worked at in the past, we made a lot of sculpted pieces out of foam. For the most part, we used Rosco Foamcoat on top of our pieces. Foamcoat goes on a little like joint compound, and creates a hard but flexible coating. It can be sanded and painted, but it doesn’t fall apart like joint compound. It gives a good amount of protection, though it will still dent if you hit it or drop it.

Another product we use at the display company is Aqua Resin. This takes a lot more time, but you are left with a very hard and very smooth surface.

You can use other types of resin on Styrofoam. Polyester resins will eat through the foam, but epoxy resins will give you a very hard, very smooth surface. These are normally used in conjunction with fiberglass or other composite fibers. You can use fiberglass or carbon fiber over foam to give it a lot of strength; this is how some surfboards and skateboards are made. At this point though, are you making a Styrofoam prop, or are you just using it as a form for the fiberglass?

For the project we’re currently working on, we’ve decided on the following compromise; we are going to cover the foam in muslin strips soaked in glue. After this dries, it will create a hard outer shell which can be painted. With a fibrous coating, the piece will resist cracking or crumbling. We will then coat the piece in Foamcoat to smooth it out and hide the texture of the muslin. Finally, we will cover the whole thing in epoxy resin to make it smooth, waterproof, and even stronger. I did a few tests, and this gave the best result for our timeframe and budget.

Finding out this kind of information online can be difficult, so most of what I’ve written here is based on my experience, experimentation, and some research. If anyone else out there ever sculpts in foam, I’d love to hear how you finish it off.