Tag Archives: opera

Making a Cast Iron Park Bench

First, I wanted to mention that I have redone and updated my online portfolio; it was in desperate need of an overhaul, especially now that I am freelancing again. I went with a free site at CarbonMade.com, because the thought of designing and coding yet another portfolio site was making me tired just thinking about it. I’ve seen some other prop makers who use that site to show their work, and so far, it seems to be working well. Let me know what you think!

Now then, let’s take a look at a bench I made back in 2006 at the Santa Fe Opera. I basically had to build the whole thing from scratch in less than a week, so it’s a bit rough.
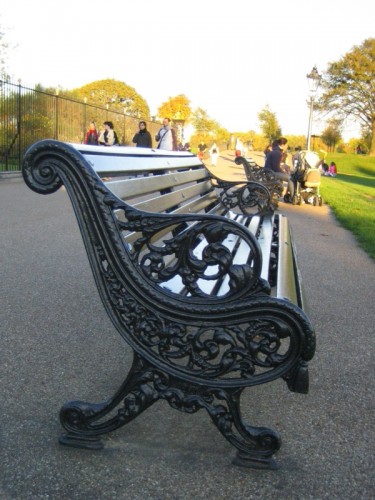
Research image
Research image

They wanted a cast iron park bench. The only real requirements were the size, so I had to find my own research image. I showed the above photograph to Randy Lutz, the prop master, and he agreed it was a good bench to duplicate.
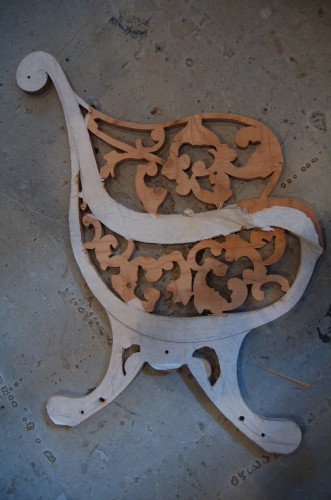
Basic layout of sides

I drew a full-scale layout of the side on a piece of paper and spray-glued it to a sheet of plywood. You’ll notice the decorative parts do not match the photograph exactly. What I decided to do was pull some decorative resin castings and carved wood pieces from stock—the opera has quite a good collection of these. I then arranged them to match the research as closely as possible. I traced them and cut away the extra plywood. You’ll see in a bit when I start gluing them on, it’ll all make sense.
Adding the back and seat

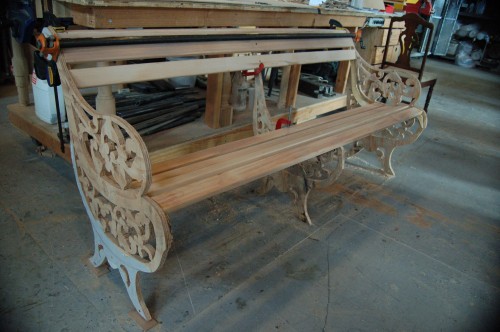
I cut out and added some support runners on the insides of the two ends and began to attach the slats which would make up the back and the seat. It needed some extra support, so I ran a rod along the bottom; you can see it in the next photograph.
Adding applied details

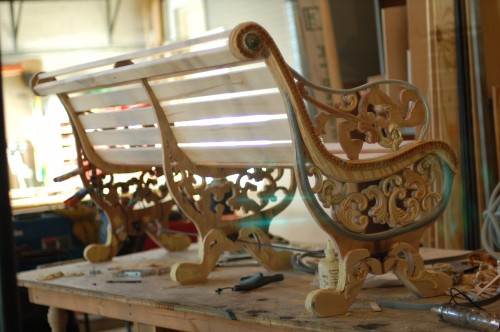
Now I began attaching the decorative resin bits. I also used some Ethafoam rod cut in half to make some curved half-round molding. I found a strip of upholstery fringe which added more texture.
Closeup of details
Closeup of details

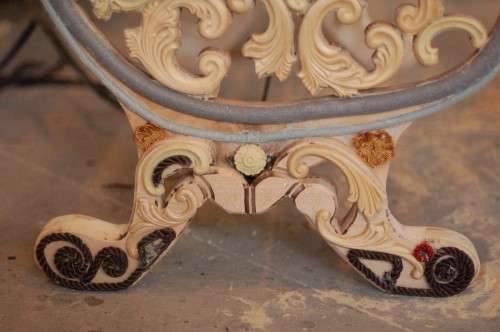
Here’s a closeup showing some of the resin bits and Ethafoam, as well as some rosettes and even bits of yarn. If you look really close, you can even make out a bit of hot glue design work; though it’s practically invisible here, once the paint goes on, it will add just that extra little bit of texture that will make the whole thing seem like a single piece of cast iron from the audience.
Paint job
Paint job

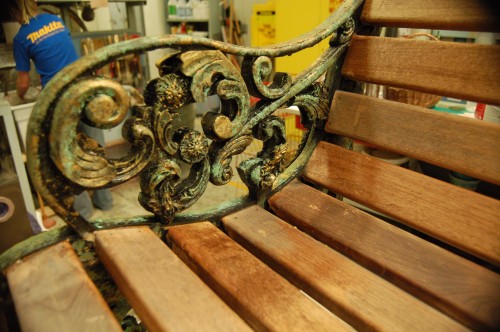
The paint job is what really helped marry all the different materials together and bring the whole thing to life. The painter of this bench worked as one of the other props carpenters for the beginning of the summer, so none of us knew how good he was at scenic art until he did this bench.
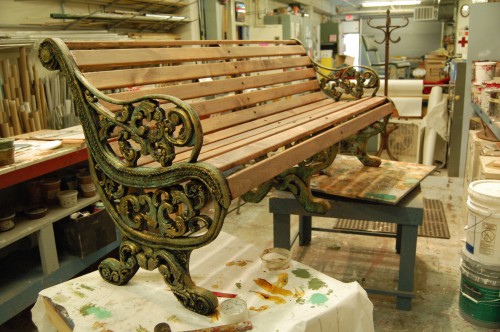
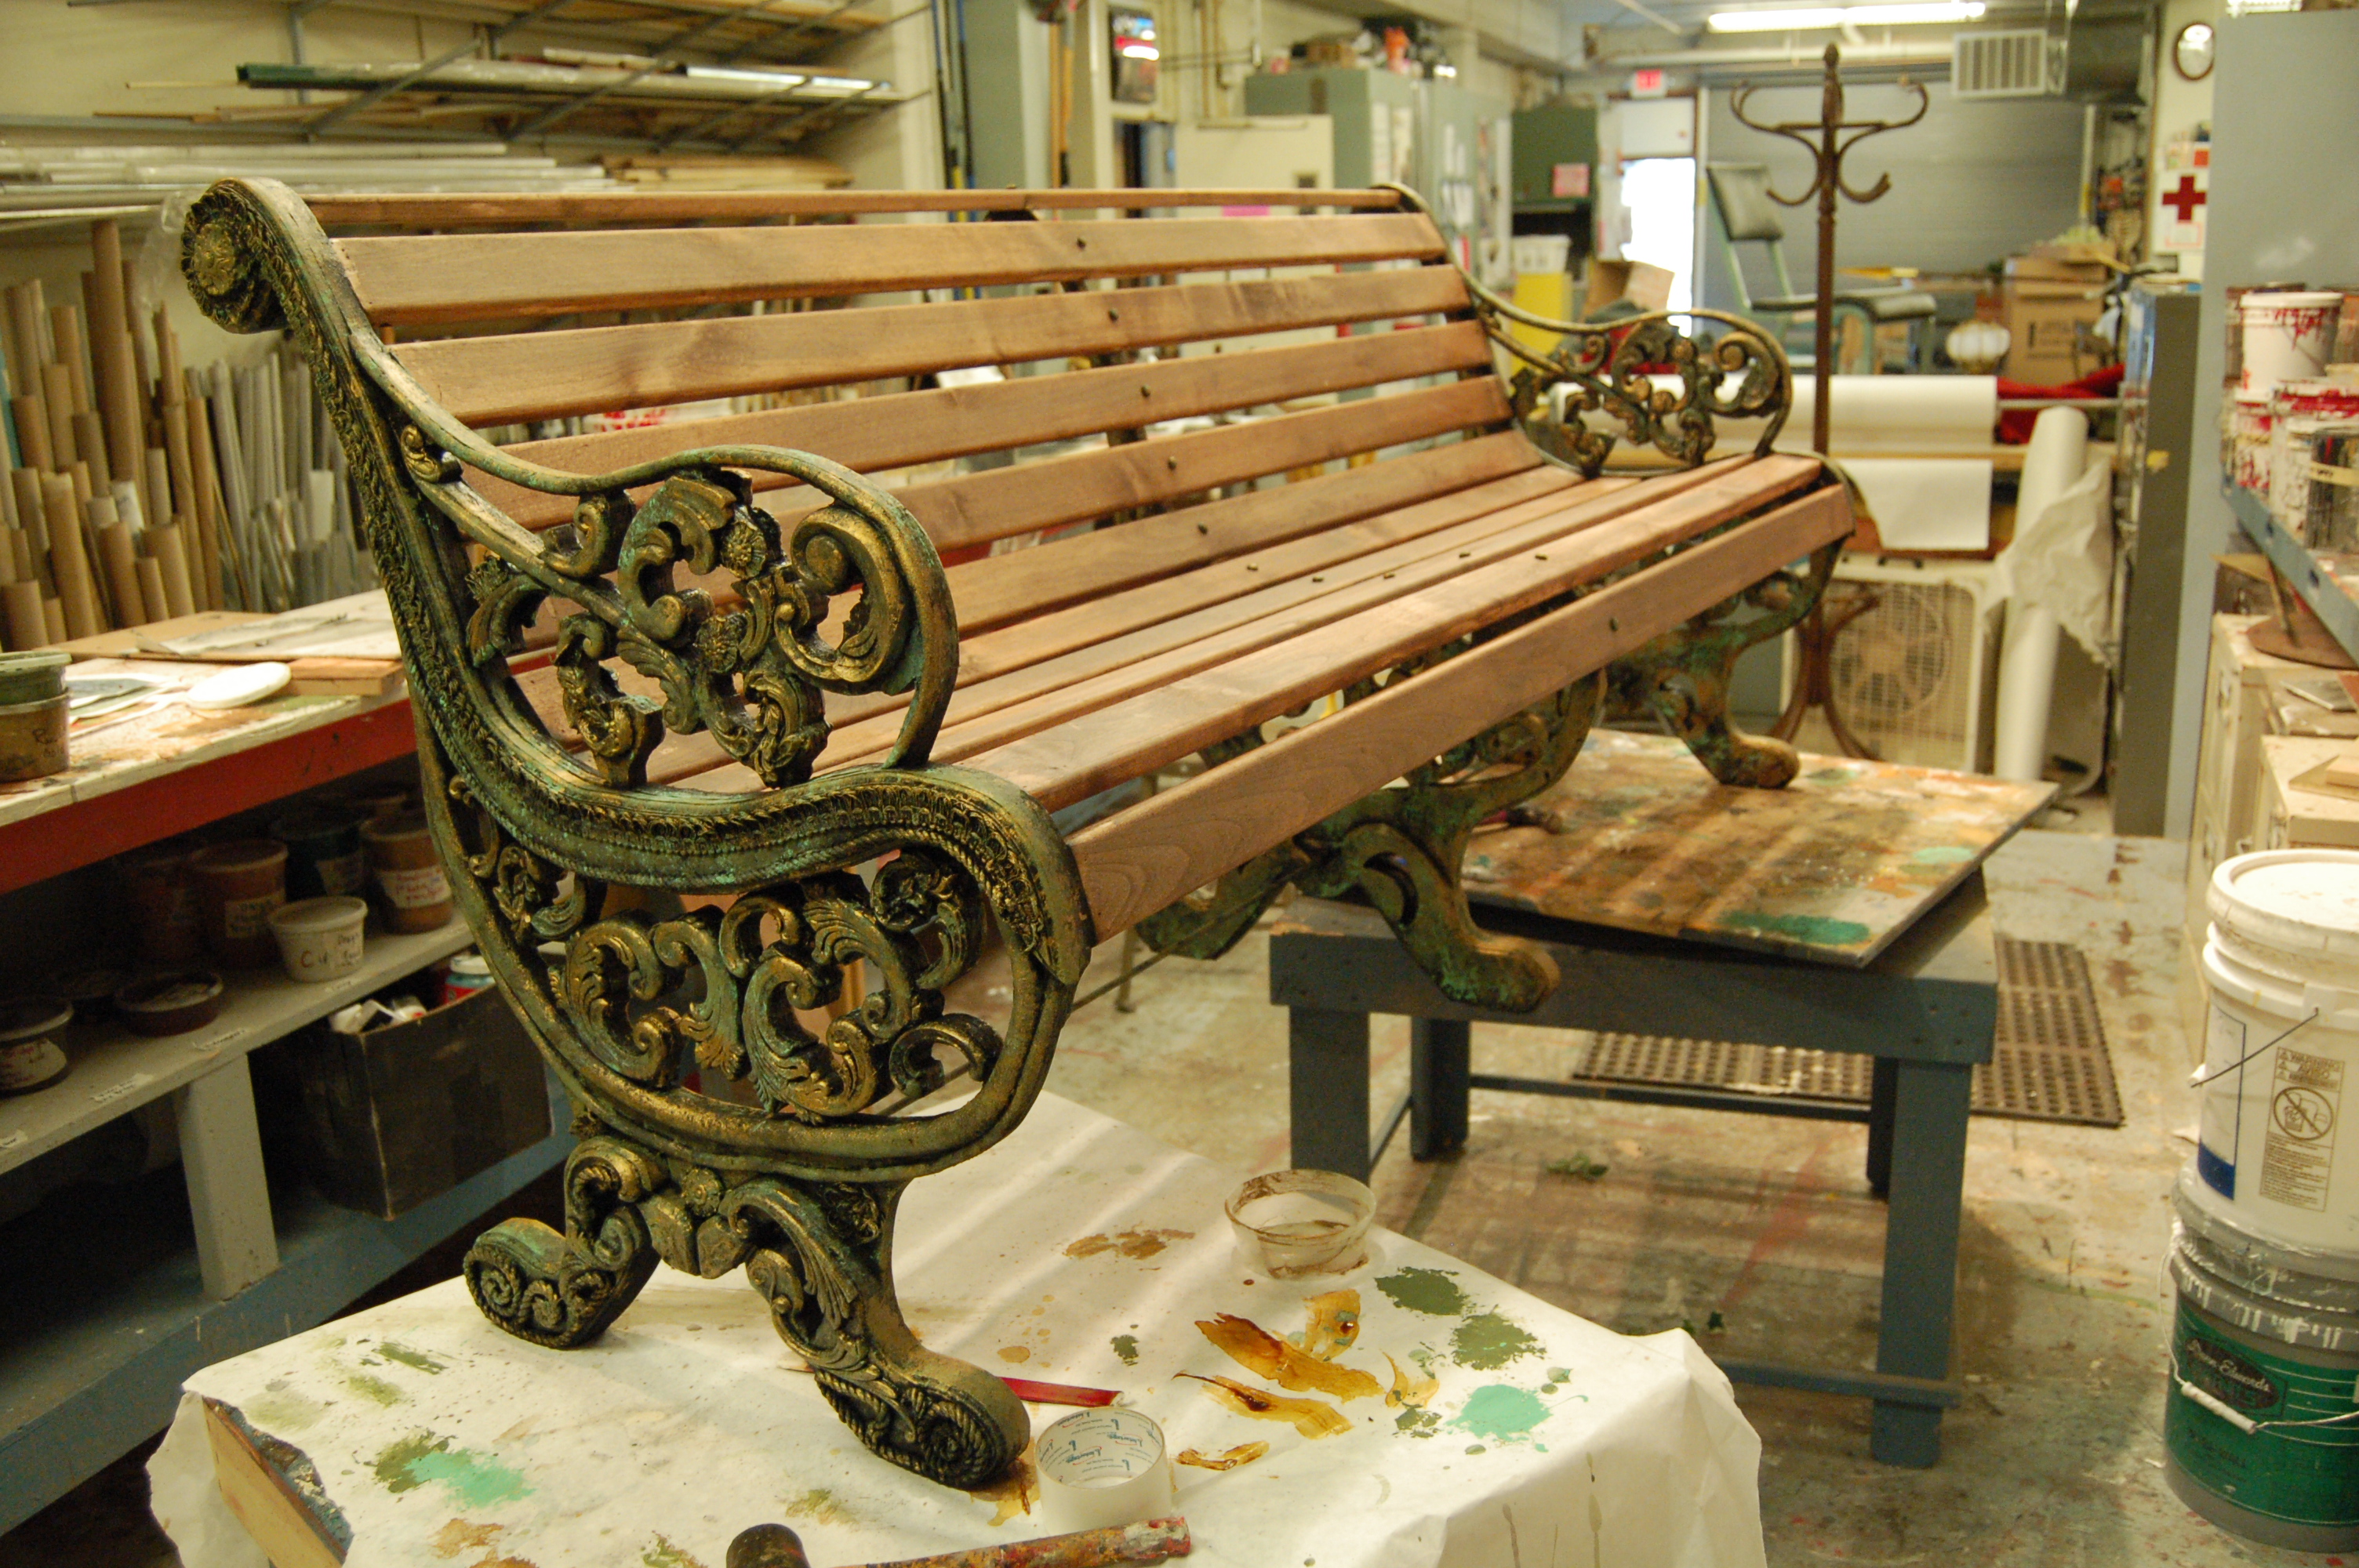
Completed bench
Completed bench

So here it is, ready to go on stage. I even added some round bolt heads running down the middle so it looked like the slats were bolted to the legs. Overall, it was a fun piece for the short time frame I had to build it in.

Chairs for Tea

Back in 2007 when I was working at the Santa Fe Opera, we were mounting a new opera called Tea: A Mirror of Soul. It had a heavy Asian influence, with scenes taking place both in Japan and in China. I was given a drawing of a chair, which they needed nine copies of.

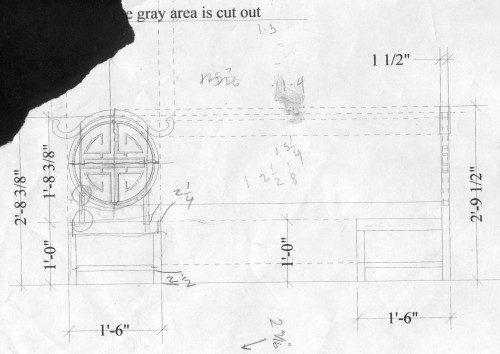
drafting of a prop chair

If you study the drawing, you’d notice a few things. First, it’s rather small. Normally, a chair is eighteen inches off the ground; this is only twelve. Second, the back stiles for the circular back are offset from the back legs (if you don’t know what a stile is, check out my “parts of a chair” diagram).  Wooden chairs usually have a single piece of wood running from top to bottom in the back for strength. Where the back meets the seat is the point where a lot of stress is placed on the chair, so relying on the strength of a joint rather than a solid length of wood is inviting trouble. Finally, you may notice that the back has pieces floating in the air. That’s always an engineering challenge.

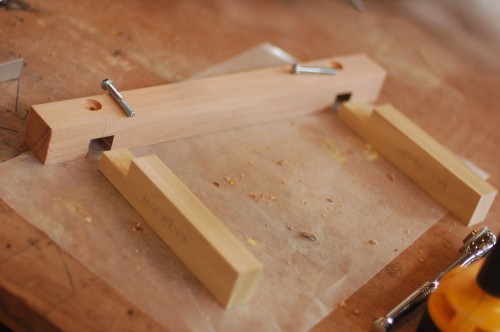
attaching the back stiles

The seat of the chair was two and a quarter inches thick. I decided to skin the top with a piece of quarter-inch plywood and the bottom with eighth-inch lauan, so the interior frame had to be one and seven-eighths inches thick. That gave me a nice big chunk in the back to attach my back stiles to. I also added some bolts through the joint for extra reinforcement.

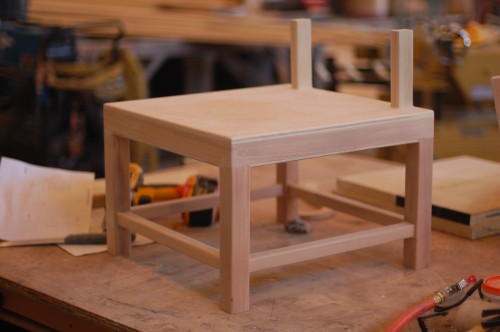
Bottom of the chair
Bottom of the chair

The rest of the joints were glued and doweled.

Next came the fun part: the back. We (the props master, master carpenter, and I) needed to figure out a way to make the back pieces appear to be floating. As I mentioned above, I was making nine of these chairs, so the process had to be repeatable as well. The master carpenter was also making a throne with this same cut-out design in it, so he began developing a jig so we could rout the design out of a solid piece of wood. We had discussed using plexiglass in the middle so the pieces would actually look like they were floating, but that would not be strong enough. Instead, we would hide a steel frame inside and have small pieces of steel connecting the pieces. Between the distance of the audience, the sightlines, and the smallness of the gaps, a few pieces of quarter-inch rod steel painted black would be as close to invisible as we could make it.

Dave making a routing jig

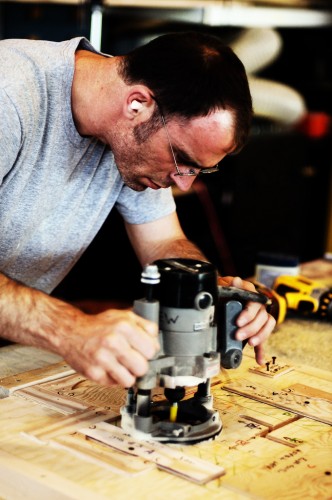
The photograph above shows David Levine, the master carpenter, working out the jig. Note that he’s not actually cutting yet, which is why his dust mask and goggles are off. It was a complicated, multi-piece jig with several steps involved, but the results were beautiful and consistent.

For the back ring, I sandwiched poplar boards on either side of a piece of quarter-inch plywood, with the grain of each side running perpendicularly to the other. In other words, I made a giant Oreo cookie out of poplar, with a creamy plywood center. The interior back pieces were cut out of a solid piece of poplar,  made by gluing several boards together. I put this in the jig and cut my design out.

steel reinforcement in the back

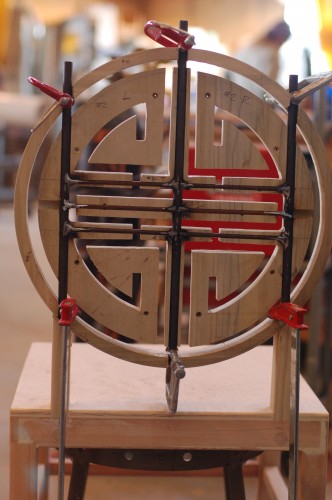
Before I had cut out the back pieces, I had routed the channels in where I would hide the steel rod. The channels were as deep as the diameter of the rod, so once they were in, the whole back could get a coat of Bondo and be sanded smooth, and no one would be the wiser. The steel rod continued sown into the stiles and up into the “horn” at the top so the whole back could be tied together with the same steel structure.

I cut the top horn piece out of a solid chunk of poplar, which I made by laminating two boards with their grains running in different directions.

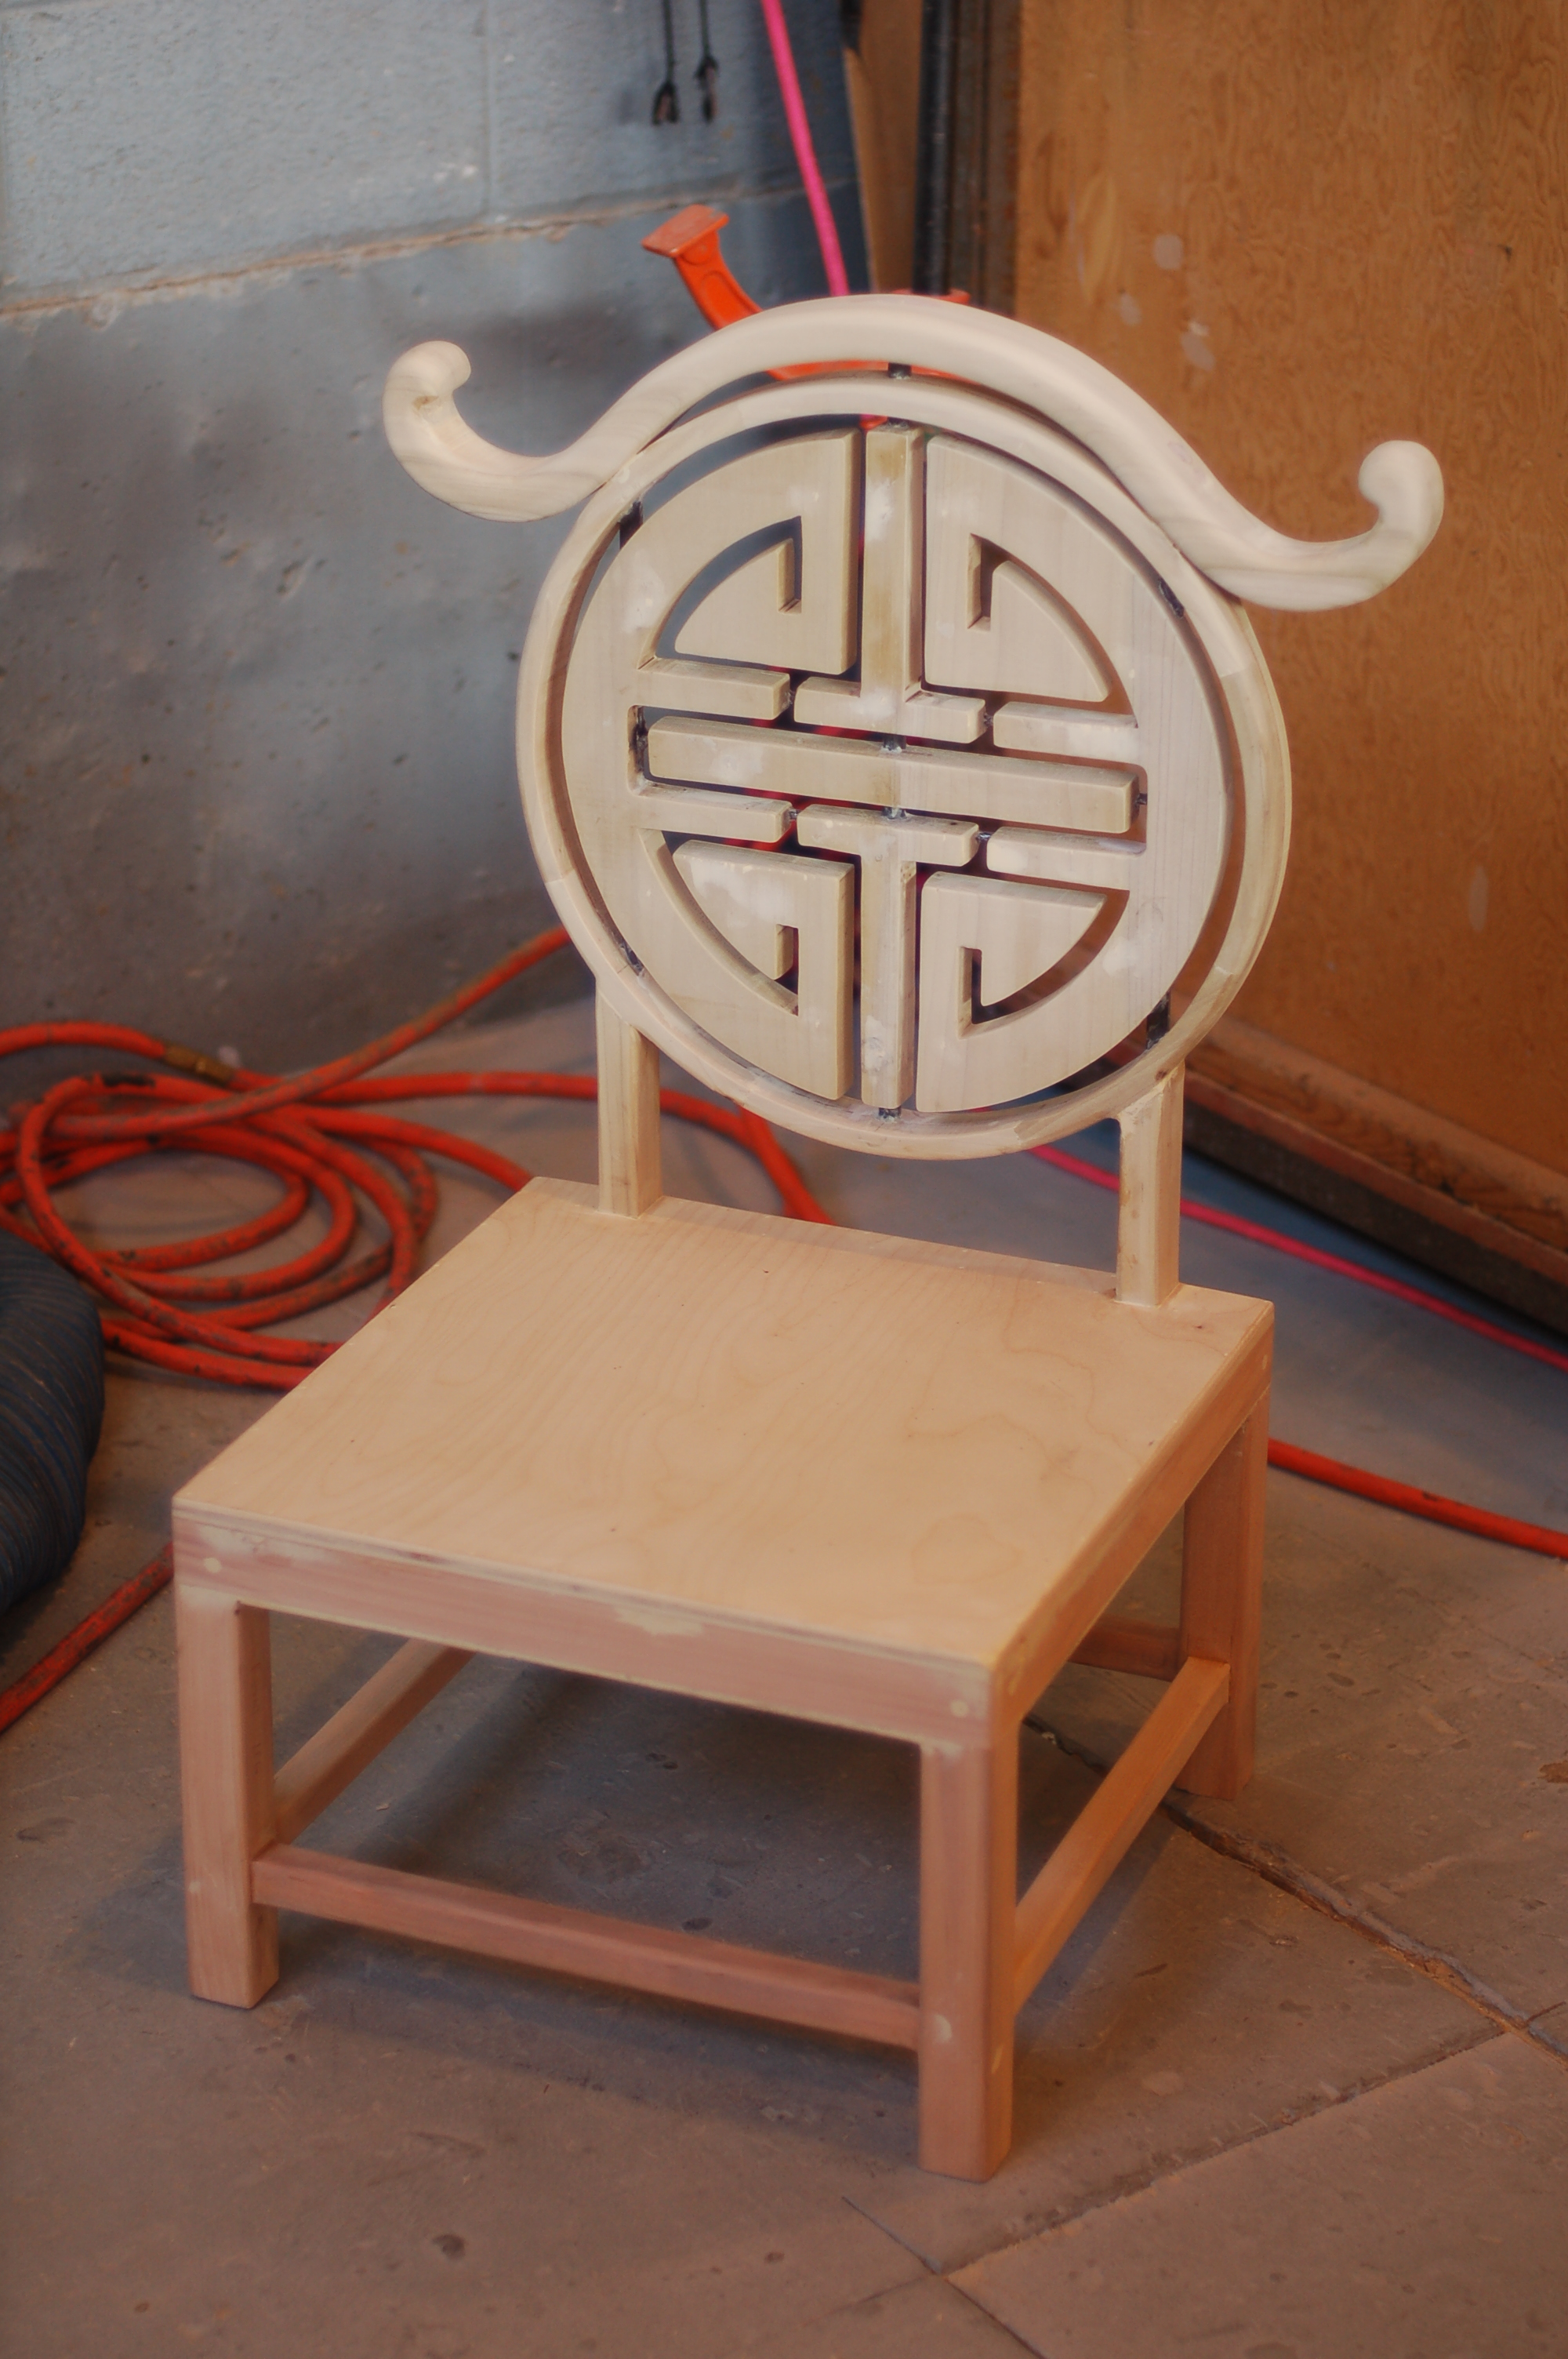
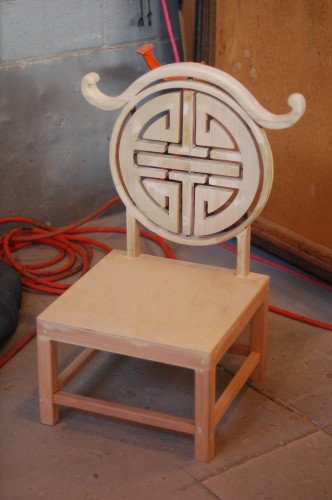
finished chair for Tea

Looking back, even as I write this article, I see a number of things I would do differently, or at least experiment with to see the results. As with any complicated prop, you learn a lot just by building it, but because you will never build the exact same prop again, it can be hard to assimilate that learning into your overall experience. As it turned out with this prop, I had only finished three of the nine chairs by the time they were cut from the show. It seems the stage was getting too cluttered, and the chairs were one of the more extraneous elements, so away they went.

That meant I got to keep two of the chairs, which let me test just how long my construction would actually hold up. The back on one of them did eventually break away from the seat, though not where I thought it would. I contemplated building more of a steel structure, but worried that the extra weight would either make it too heavy to carry, or even make it more likely to break; picture using a crowbar versus a stick of wood. The crowbar is extremely good at separating two pieces of wood from each other, where a stick of wood is just as likely to break itself before pulling the wood apart. Now look at a chair. The point where the back meets the seat is the focal point of a lever formed by somebody leaning back in the chair. If the stiles were metal (like a crowbar), it might tear the seat apart if you leaned back too hard.

But I digress and ruminate too much. Enjoy the pictures of the chair.

Behind the Scenes of an Opera House, 1888: Dangerous Effects

The following is an excerpt from “Behind the Scenes of an Opera-House”, written in 1888. The author, Gustav Kobbé, tours the backstage of the Metropolitan Opera in New York City. Be sure to check out the previous excerpts on building a singing dragon, technical rehearsals, constructing a giant “Talepulka” idol and introducting the series when you are finished here!

Behind the Scenes of an Opera-House, by Gustav Kobbé.

Two light-properties in “Faust”—the fire-cup and the spark-emitting sword of Mephistopheles—are worth describing. The fire-cup is a goblet in the bottom of which are chlorate of potash, red fire, and sugar. Above these is suspended a thimble three-quarters filled with sulphuric acid and so delicately balanced that a slight movement causes the acid to drip on the powders and to ignite them, the fumes of the sugar leaving an agreeable taste upon the lips of the singer.

The method of causing the sparks to fly from the sword is as follows: Two wire-gauze plates connected with electric wires are placed upon the stage at the points where Mephistopheles and Valentine are to stand. A metal socket is sunk into the heel of the right buskin of each of the singers, and a wire of the same color as their costumes is attached to each socket, wound around the leg and passed through the belt. Standing upon the gauze plates they, as they draw their swords, slip the ends of the wires into the hilts and, when the swords touch electrical connection is made.

The flash of Wotan’s spear when Siegfried cuts it through with one stroke of his sword is produced by an explosion of gun-cotton in the spear and ignited by electricity, the electric wire passing through the weapon.

First printed in “Behind the Scenes of an Opera-House”, by Gustav Kobbé. Scribner’s Magazine, Vol. IV, No. 4, October 1888.

Behind the Scenes of an Opera-House, 1888: A Singing Dragon

The following is an excerpt from “Behind the Scenes of an Opera-House”, written in 1888. The author, Gustav Kobbé, tours the backstage of the Metropolitan Opera in New York City. Be sure to check out the previous excerpts on technical rehearsals, constructing a giant “Talepulka” idol and introducting the series when you are finished here!

Behind the Scenes of an Opera-House, by Gustav Kobbé.

It is noteworthy in connection with this circumstance that the apparatus was devised by an Englishman and that Wagner employed an English property-master to design and make the dragon for the “Siegfried” performances at Baireuth. The English pantomime productions, which involve the manufacture of numerous mechanical and trick properties, have sharpened the ingenuity of English property-masters until they have come to be acknowledged at the head of their profession. “Siegfried” never having been given in England by any but a German company whose scenery and properties were brought from Germany, the combat with the dragon remained as ludicrous a feature of the performances of this work as it was conceded to have been at Baireuth, until the production of “Siegfried” at the Metropolitan Opera-House. For this a dragon was designed and manufactured which the German artists declare to be the most practical and impressive monster they have seen.

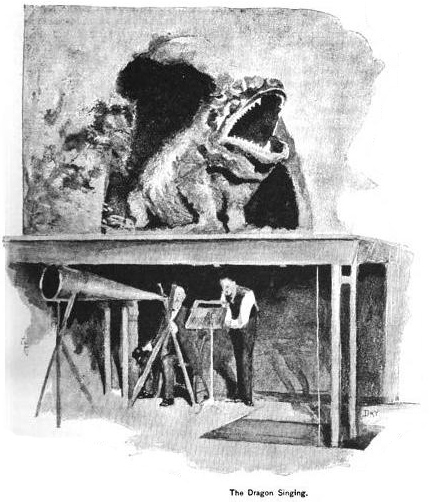
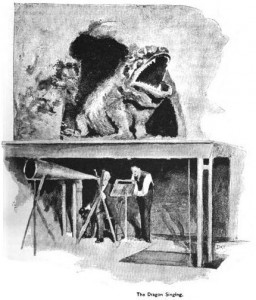
The singing dragon from "Siegfried"

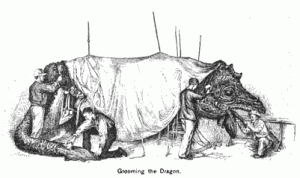
The head of this dragon is of papier-mache. The body, thirty feet long, is of thin wire covered with curled leather scales, which are bronzed and painted. This monster, in spite of its size, is worked by a boy who is the dragon’s front legs. He is dressed in a suit of canvas painted the color of the dragon’s hide and having curled leather scales on the trousers below the knees, his shoes being the huge clawed feet. He gets into the dragon behind its head, which conceals him from the waist up, his legs being the dragon’s front legs. With his hands he opens and closes its huge mouth and shoves its eyelids over its eyes when it expires. The steam which it breathes out is supplied through an elastic pipe which, entering at the tail, runs through to the throat. The scene lasts about forty minutes and is very exhausting to the front legs. In Germany the artist who sings the dragon’s part is inside the hide and sings through a speaking trumpet. At the Metropolitan Opera-House the artist sits under the raised bridge upon which the dragon is placed and sings through a speaking trumpet. His music is on a stand, a stage-hand throws the light of a lamp upon it, and the solo répétiteur gives him his cues from the wings. The voice sounds as though it issued from the dragon’s throat. The advantage of this arrangement is that it places in the monster a person whose attention is concentrated upon working this mechanical property in the best possible manner. The dragon when not in commission is stabled in mid-air under the paint-bridge. The day of the performance it is lowered by ropes, thoroughly groomed, and then allowed to stretch itself out upon the floor against the rear wall and lie there until the end of the first act.

Grooming the Dragon
Grooming the Dragon

First printed in “Behind the Scenes of an Opera-House”, by Gustav Kobbé. Scribner’s Magazine, Vol. IV, No. 4, October 1888.

Behind the Scenes of an Opera-House, 1888: Technical Rehearsals

The following is an excerpt from “Behind the Scenes of an Opera-House”, written in 1888. The author, Gustav Kobbé, tours the backstage of the Metropolitan Opera in New York City. Be sure to check out the previous excerpts on constructing a giant “Talepulka” idol and introducting the series when you are finished here!

Behind the Scenes of an Opera-House, by Gustav Kobbé.

The first feature of an operatic production to have the benefit of a rehearsal is the scenery. As soon as the scenic artist and the scene-painters have finished their work the stage-manager orders a scenic rehearsal. This might be called a performance of an opera without music. The scenes are set up and changed, light effects tried, and mechanical properties like Talepulka, the “Lohengrin” swan, and the “Siegfried” dragon “worked” and tested until all goes as smoothly as it should at a performance. This is a rehearsal for the men who set and change the scenes—the master-machinist and his subordinates—and for those who manage the light effects—the gas-engineer and the “gas-boys”—and for the property-master and his men. Before the scene can be set it is necessary to “run the stage,” that is, to get everything in the line of properties, such as stands of arms, chairs, and tables, and scenery, ready to be put in place. If there is a “runway,” which is an elevation like the rocky ascent in the second act of “Die Walküre,” or the rise of ground toward the Wartburg in “Tannhäuser,” it is “built” by the stage-carpenters; and for this purpose the stage is divided into “bridges”—sections of the stage-floor that can be raised on slots. Meanwhile the “grips,” as the scene-shifters are called, have hold of the side scenes ready to shove them on, and the “fly-men” who work the drops and borders are at the ropes in the first fly-gallery.

The scene set, it is carefully inspected by the scenic artist and stage-manager, who determine whether any features require alteration. A tower may hide a good perspective bit in the drop: it may be found that a set-tree at the prompt-centre second entrance will fill up a perplexing gap—but changes are rarely needed after the scene has been painted, because a very good idea of it was formed from the model. The length of a scenic rehearsal depends upon the number of the light-effects and mechanical properties. For instance, in the first act of “Siegfried” the light-effects are so numerous and complicated that it is a current saving in opera-houses that the success of this act is “all a matter of gas.” When all effects and contrivances of this kind have heen thoroughly tested, the stage-manager gives the order: “Strike!” The “grips” shove off the side-scenes, the flymen raise the drops, the “clearers” run off the properties and set-pieces, and the stage-carpenters lower the bridges. The scene of the second act is immediately set, and the time required for the change of scene noted. If the change is not so quickly accomplished as it should be, it is repeated until the weak spot in the work is discovered.

When all know their parts, the stage is at last given up to features of the productions other than the scenery. The work is performed with scenery, light-effects, properties, chorus, ballet, and supers, but without the principals and orchestra, the solo répétiteur being at the piano. There are two or three such “arrangement” rehearsals for drilling the chorus and supers in the stage “business.” These rehearsals are followed by two in which the artists take part; the final test being the general rehearsal with orchestra. Then at last the work is ready for production.

First printed in “Behind the Scenes of an Opera-House”, by Gustav Kobbé. Scribner’s Magazine, Vol. IV, No. 4, October 1888.