Tag Archives: guide

40 Styles of Chairs

This was originally published in the February 1907 issue of Popular Mechanics. As such, it does not include over a hundred years of chair evolution. Still, it’s a good starting point for narrowing down what kind of chair your production needs.

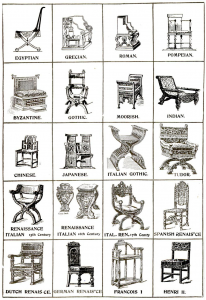
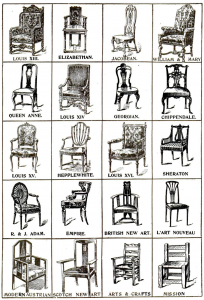
There are 40 distinct styles of chairs embracing the period from 3000 B.C. to 1900 A.D. — nearly 7,000 years. Of all the millions of chairs made during the centuries, each one can be classified under one or more of the 40 general styles shown in the chart. This chart was compiled by the editor of Decorative Furniture. The Colonial does not appear on the chart because it classifies under the Jacobean and other styles. A condensed key to the chart follows:
40 styles of chairs
Click for a larger view

Egyptian — 3000 B.C. to 500 B.C. Seems to have been derived largely from the Early Asian. It influenced Assyrian and Greek decorations, and was used as a motif in some French Empire decoration. Not used in its entirety except for lodge rooms, etc.

Grecian — 700 B.C. to 200 B.C. Influenced by Egyptian and Assyrian styles. It had a progressive growth through the Doric, Ionic and Corinthian periods. It influenced the Roman style and the Pompeian, and all the Renaissance styles, and all styles following the Renaissance, and is still the most important factor in decorations today.

Roman — 750 B.C. to 450 A.D. Rome took her art entirely from Greece, and the Roman is purely a Greek development. The Roman style “revived” in the Renaissance, and in this way is still a prominent factor in modern decoration.

Pompeian — 100 B.C. to 79 A.D. Sometimes called the Grecian-Roman style, which well describes its components. The style we know as Greek was the Greek as used in public structures. The Pompeian is our best idea of Greek domestic decoration. Pompeii was long buried, but when rediscovered it promptly influenced all European styles, including Louis XVI, and the various Georgian styles.

Byzantine — 300 A.D. to 1450 A.D. The “Eastern Roman” style, originating in the removal of the capital of the Roman Empire to Constantinople (then called Byzantium). It is a combination of Persian and Roman. It influenced the various Moorish, Sacracenic and other Mohammedan styles.

Gothic — 1100 to 1550. It had nothing to do with the Goths, but was a local European outgrowth of the Romanesque. It spread all over Europe, and reached its climax of development about 1550. It was on the Gothic construction that the Northern European and English Renaissance styles were grafted to form such styles as the Elizabethan, etc.

Moorish — 700 to 1600. The various Mohammedan styles can all be traced to the ancient Persian through the Byzantine. The Moorish or Moresque was the form taken by the Mohammedans in Spain.

Indian — 2000 B.C. to 1906 A.D. The East Indian style is almost composite, as expected of one with a growth of nearly 4,000 years. It has been influenced repeatedly by outside forces and various religious invasions, and has, in turn, influenced other far Eastern styles.

Chinese — 3500 B.C. to 1906 A.D. Another of the ancient styles. It had a continuous growth up to 230 B.C., since when it has not changed much. It has influenced Western styles, as in the Chippendale, Queen Anne, etc.

Japanese — 1200 B.C. to 1906 A.D. A style probably springing originally from China, but now absolutely distinct. It has influenced recent art in Europe and America, especially the “New Art” styles.

Italian Gothic — 1100 to 1500. The Italian Gothic differs from the European and English Gothic in clinging more closely to the Romanesque-Byzantine originals.

Tudor — 1485 to 1558. The earliest entry of the Renaissance into England. An application of Renaissance to the Gothic foundations. Its growth was into the Elizabethan.

Italian Renaissance, Fifteenth Century — 1400 to 1500. The birth century of the Renaissance. A seeking for revival of the old Roman and Greek decorative and constructive forms.

Italian Renaissance, Sixteenth Century — 1500 to 1600. A period of greater elaboration of detail and more freedom from actual Greek and Roman models.

Italian Renaissance, Seventeenth Century — 1600 to 1700. The period of great elaboration and beginning of reckless ornamentation.

Spanish Renaissance — 1500 to 1700. A variation of the Renaissance spirit caused by the combination of three distinct styles—the Renaissance as known in Italy, the Gothic and the Moorish. In furniture the Spanish Renaissance is almost identical with the Flemish, which it influenced.

Dutch Renaissance — 1500 to 1700. A style influenced alternately by the French and the Spanish. This style and the Flemish had a strong influence on the English William and Mary and Queen Anne styles, and especially on the Jacobean.

German Renaissance — 1550 to 1700. A style introduced by Germans who had gone to Italy to study. It was a heavy treatment of the Renaissance spirit, and merged into the German Baroque about 1700.

Francis I — 1515 to 1549. The introductory period when the Italian Renaissance found foothold in France. It is almost purely Italian, and was the forerunner of the Henri II.

Henri II — 1549 to 1610. In this the French Renaissance became differentiated from the Italian, assuming traits that were specifically French and that were emphasized in the next period.
40 styles of chairs
Click for a larger view

Louis XIII — 1616 to 1643. A typically French style, in which but few traces of its derivation from the Italian remained. It was followed by the Louis XIV.

Elizabethan — 1558 to 1603. A compound style containing traces of the Gothic, much of the Tudor, some Dutch, Flemish and a little Italian. Especially noted for its fine wood carving.

Jacobean — 1603 to 1689. The English period immediately following the Elizabethan, and in most respects quite similar. The Dutch influence was, however, more prominent. The Cromwellian, which is included in this period, was identical with it.

William and Mary — 1689 to 1702. More Dutch influences. All furniture lighter and better suited to domestic purposes.

Queen Anne — 1702 to 1714. Increasing Dutch influences. Jacobean influence finally discarded. Chinese influence largely present.

Louis XIV — 1643 to 1715. The greatest French style. An entirely French creation, marked by elegance and dignity. Toward the end of the period it softened into the early Rococo.

Georgian — 1714 to 1820. A direct outgrowth of the Queen Anne, tempered by the prevailing French styles. It includes Chippendale, Hepplewhite and Sheraton, but these three great cabinetmakers were sufficiently distinct from the average Georgian to be worthy separate classification.

Chippendale — 1754 to 1800. The greatest English cabinet style. Based on the Queen Anne, but drawing largely from the Rococo, Chinese and Gothic, he produced three distinct types, viz.: French Chippendale, Chinese Chippendale and Gothic Chippendale. The last is a negligible quantity.

Louis XV — 1715 to 1774. The Rococo period. The result of the efforts of French designers to enliven the Louis XIV, and to evolve a new style out of one that had reached its logical climax.

Hepplewhite — 1775 to 1800. Succeeded Chippendale as the popular English cabinetmaker. By many he is considered his superior. His work is notable for a charming delicacy of line and design.

Louis XVI — 1774 to 1793. The French style based on a revival of Greek forms, and influenced by the discovery of the ruins of Pompeii.

Sheraton — 1775 to 1800. A fellow cabinetmaker, working at same time as Hepplewhite. One of the Colonial styles (Georgian).

R. & J. Adam — 1762 to 1800. Fathers of an English classic revival. Much like the French Louis XVI and Empire styles in many respects.

Empire — 1804 to 1814. The style created during the Empire of Napoleon I. Derived from classic Roman suggestions, with some Greek and Egyptian influences.

New Arts — 1900 to date. These are various worthy attempts by the designers of various nations to create a new style. Some of the results are good, and they are apt to be like the “little girl who had a little curl that hung in the middle of her forehead,” in that “when they are good they are very, very good, but when they are bad they are horrid.”

How to Make Stage Blood

Asking how to make fake blood is kind of like asking how to make food. Sometimes you need a light breakfast, sometimes a heavy dinner. You need to ask yourself what the blood needs to do. While trying out new recipes can be fun, it is not terribly useful unless you know what you are trying to achieve. So when dealing with making stage blood, I will first look at the preparation you must do, than introduce some of the basic chemistry which can lead to some blood recipes for you to try.

Preparation

The three aspects of preparation are research, planning, and experimentation. You need to research what the effect will look like. Even if you are not going for a realistic effect, you want a reference image or images which you’ve shared with the director and the rest of the production team so you are all on the same page. The last thing you want is to show the director the results of your hard work and have her go, “That’s not what I was picturing at all.”

Planning is also vital. There are hundreds of blood recipes with countless variations, all designed for specific needs. What does your blood need to do? Does it get in the actor’s mouth? Does it need to be washed out of the costumes? Does it run freely or pool up into puddles? Is it just a liquid or does it have chunks in it? If you can plan out what the blood needs to do, you may find that you can use different recipes for different effects, or fake some parts with less expensive paint or dye. Do a break down of all the effects in the show and determine what each needs to do individually.

The final step is to experiment. No matter how great your blood recipe is, there are just too many variables in a show to not test out a number of options. The stage lights will affect the color of your blood; it may look great in the shop, only to appear purple once on stage. The color of the costumes or set may also require some tweaking to the blood’s color. As with any prop, you often want to present your director with a number of options to choose from.

Recipes

There is no one-size-fits-all recipe for stage blood. Many theatres and prop people have developed their own formulas and keep their secrets jealously guarded. There are a number of recipes you can find to use as a starting point. With a bit of knowledge of chemistry, you are armed with a repertoire of techniques which can be expanded as you gain more experience.

Essentially what you need is a thick, gooey base with a colorant added. The most basic recipe is corn syrup (Karo Syrup in the USA, or Golden Syrup in the UK) and red food coloring. You can add a bit of blue or even green food coloring to refine the color. This recipe is edible, which is good if the blood is used around an actor’s mouth, but since it is organic, it can attract insects and vermin, and will rot after a time. It is also sticky, messy, and will stain clothes and skin.

If you want to avoid stains, you will need to add some form of soap to the blood mixture. This will help limit the colorant from attaching to the fibers of the clothing. Liquid color-safe bleach or dish soap work well. You can use a “no-tears” baby shampoo if the blood has the possibility of getting near anyone’s eyes. You can experiment with colored soaps too. Green or blue dish soap, or Simple Green, can be used to tint the red food coloring. It is essential to work with your costume department whenever the blood is coming into contact with costumes. They can scotch guard the areas that will receive blood beforehand. They can also throw the costume into a bath of cold water with lots of stain remover as soon as it gets off stage. You may still need two or three backup costumes. The other problem with any soap-based blood is that it will lather if you rub it too much.

If you want to limit the potential for staining further, you need to look at your colorant. Different brands and types of food coloring have different staining potentials. As an alternative, you can substitute children’s non-toxic poster paint, or other washable art products.

Powdered gelatin, instant pudding, or cocoa powder can be used as thickening agents in lieu of or in addition to corn syrup. Corn starch or flour will also thicken your mix. Creamy peanut butter will both thicken and darken your mix. Interestingly, the protein in the peanut butter makes it easier to wash out.

If you want your blood to congeal or clot during the scene, there are a number of ways to do that. The instant pudding mentioned above will coagulate like real blood. KY jelly will make it clot after a period of time as well. If you thin the blood with cheap vodka or other alcohol-based products, it will congeal over time. A little unflavored gelatin will turn your blood into scabs.

A touch of mineral oil will give it some sheen and help catch the lights. Adding glycerin on top will also give it a fresh and shiny appearance and improve the surface tension.

Further Reading

There is a lot more reading to be found across the internet, with recipes utilizing any number of ingredients for various effects. As long as you do your homework beforehand, you should have no problem coming up with the right recipe for your effect.

Animatronics and Automata

I like things that move on their own. An automaton is a self-operating machine, usually through mechanical means. Animatronics is a more specialized type of automaton; it is a form of mechanized puppet. Neither of these should be confused with a robot, which is an object which can sense and/or react to its environment. Here are some starter links if you are interested in making or learning more about animatronics and automaton.

photograph by Compound Eye

How Animatronics Works“, by Jeff Tyson. A look at how Stan Winston Studios creates a full-scale animatronic Spinosaurus. In addition to describing the animatronic parts, it’s an interesting look at how to sculpt, cast, and fabricate a full-size dinosaur.

Instructables has a number of guides on creating animatronics of varying complexity:

  • Grim Reaper Animatronic is one of the simplest; it uses an oscillating fan for its movement. It shows how you can simplify things by using already existing parts and mechanisms if you can look at their possibilities. This is true of all props.
  • Halloween Animatronics is a nice introduction to computer-controlled movements. It uses a USB interface to connect the parts directly to your computer for manipulation. My how far we’ve come.
  • How to create simple animatronics – Part one: using the MAKE controller. Using a controller board allows your animatronics to be self-contained, since the controller board takes the place of your computer. You still set up the board with your computer. This tutorial also involves hooking up sensors to control the movement, much like in the first link, where Stan Winston Studios uses arm-length gloves to control the Spinosaurus’ arms.

In a posting called, “Robots, Artificial Intelligence, Steam Power, and Sound Effects“, Michael Addicott describes a number of marvelous contraptions and mechanical devices in use since the Ancient Greeks. He includes such inventors as Hero (one of Bland Wade‘s favorites), and devices like the mechanical singing birds of Theophilus.

For Automaton, the Automata/Automaton Blog is the greatest place to start. Not only does it continually update with photographs and information about both antique and contemporary automaton, but it’s the perfect starting place for further exploration of information.

A body for Bacchae: Part Two

In part one of “making a body for Bacchae“, we developed a series of samples and prototypes of dead body parts out of spray foam, Foam Coat, and Dragon Skin. Since then, we’ve been able to show the pieces to the whole production team; John Conklin, the scenic designer, and JoAnne Akalaitis, the director, gave us the go-ahead to continue on with the actual body pieces.

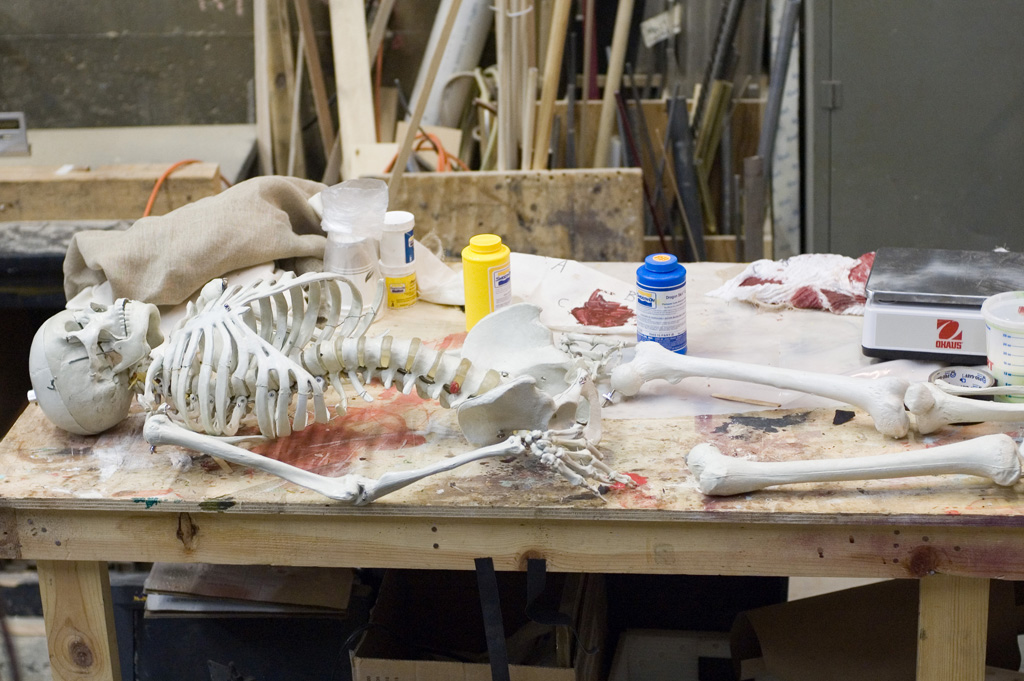
We started with a skeleton. We were originally going to get a skeleton from a medical supply store, but I found a corpsing tutorial at “Skull and Bones.com” which shows that you can get a “4th quality” skeleton from certain companies for a lot cheaper. It may be missing some hardware and fasteners, and the overall quality will be less, but all the pieces are there, and for our purposes, it was perfect.

The full skeleton laid out on a table

We broke the skeleton apart into several pieces. In the play, King Pentheus is killed through sparagmos, and we had to make the end result. The legs and skull were three separate pieces. We left one shoulder blade and upper arm on the torso, which left us with one complete arm, and one forearm.

The first steps in adding muscle to the bones

Like the sample pieces, we built the muscle up by spraying expanding foam onto the bones, carving it into muscles, and coating everything with Rosco Foam Coat.

Continue reading A body for Bacchae: Part Two

A body for Bacchae: Part One

For the upcoming production of The Bacchae at Shakespeare in the Park, we have to make a ‘meat suit’. In the play, King Pentheus is dismembered and has pieces of his flesh torn off by the Bacchants (the party-goers). This happens off-stage, but his torn-apart body is wheeled onstage, where his mother, Agavë, attempts to reassemble him.

The director envisioned a corpse covered in meat. We in the props shop needed to find a way to mimic that look. It also needed to hold up under the weather, as the Delacorte is an outdoor theatre.

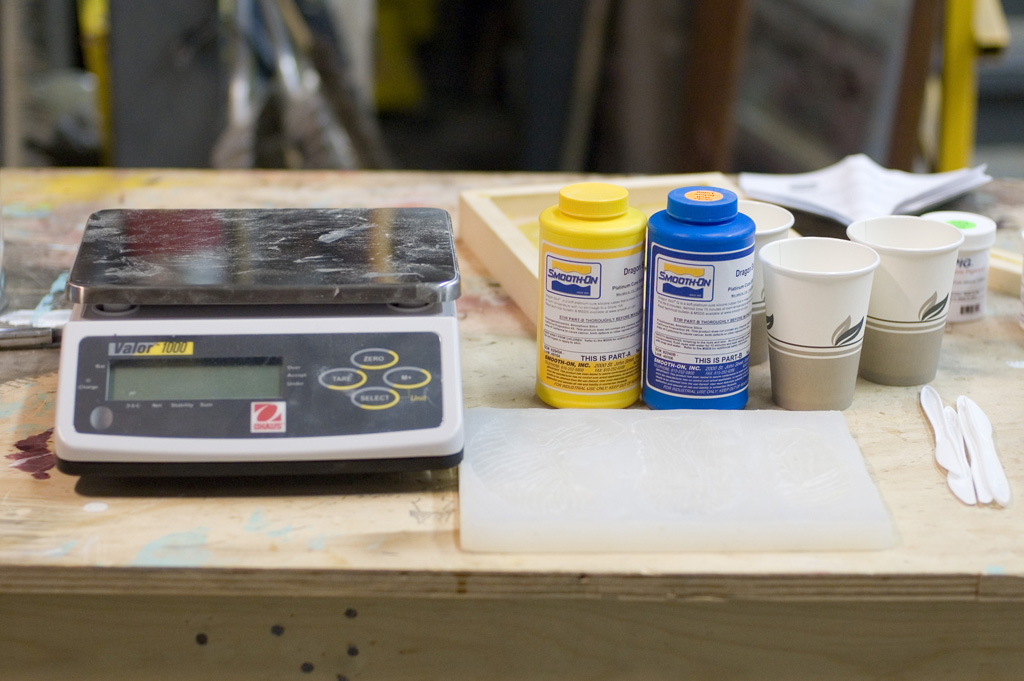
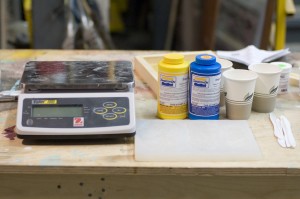
Jay Duckworth, the properties director at the Public Theatre, decided to use Dragon Skin, a silicone rubber product from Smooth-On, Inc. It comes in liquid form in two parts. You mix an equal amount of each part together, and you get a viscous liquid which can be cast or brushed on. After a little over an hour, it becomes a rubbery solid.

Getting ready to use Dragon Skin

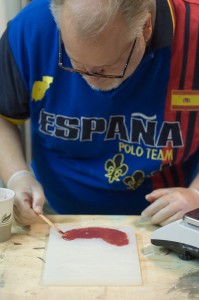
We began experimenting with casting these up into meat-shaped pieces. Dragon Skin can be colored with “Silc Pig”, a silcone pigment which comes in a number of colors. I found good results by mixing two batches up simultaneously with different levels of pigmentation. By pouring them into the mold at the same time, we could achieve random differences in color throughout the piece, which gave more realisic results.

Jay pours Dragon Skin into a mold

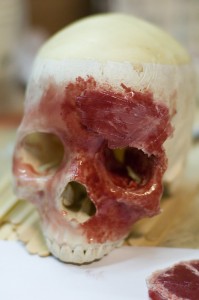
Jay found good results from painting the Dragon Skin directly onto the skeleton pieces.

Painting the Dragon Skin directly onto the skull

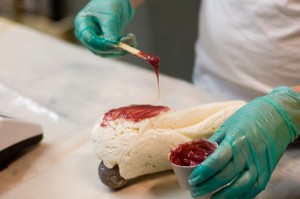
I suggested using spray-foam to build up chunks of muscle on the bones, and then painting the Dragon Skin onto that. Along with Michael Krikorian, we prototyped up a number of bones with a variety of techniques to compare them. We decided that overemphasizing the depth of the ridges and covering the foam with Rosco FoamCoat led to our favorite results.

Layering Dragon Skin on top of foam

“Silc Pig” comes in a number of different colors, so we mixed various batches of Dragon Skin to simulate fat, muscle, skin, and various other bits of chunky ooze on the bones.

There are a number of important things to keep in mind. First, silicone rubber reacts with certain chemicals, which keep it from curing. Most importantly is latex, so if you use latex gloves when working and touch the mixture, it will remain in liquid form. Use vinyl or nitrile gloves. We also found that hot glue will keep the Dragon Skin from curing. Also, use an accurate scale. The measurements need to be precise, and you cannot do it by sight alone.

Most importantly, as always, good research is the key to a realistic product. Everybody knows what muscle looks like until it comes time to actually carve it. Needless to say, doing research for this project was particularly vomit-inducting.

Now that we’ve come up with a repertoire of techniques to use, we can begin work on the actual prop. Keep watching this blog for more photographs of our progress.

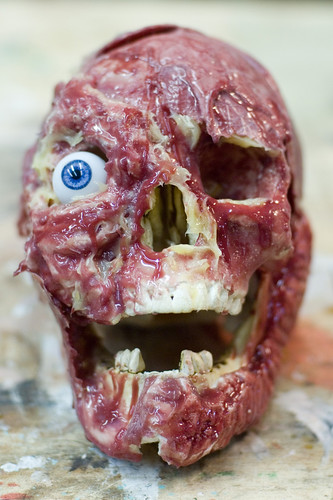
The final skull prototype. All photos by Eric Hart