Category Archives: How-to

Guides to building props or using certain techniques and materials

Wax Paper Transfer to Wood

Triad Stage just closed a production of Fences which I prop mastered. One of the set dressing items was a wooden plaque with a prayer written on it. I tried out a technique I saw where you print onto wax paper and transfer that to wood. It worked well, so I experimented with it some more, making this video in the process.

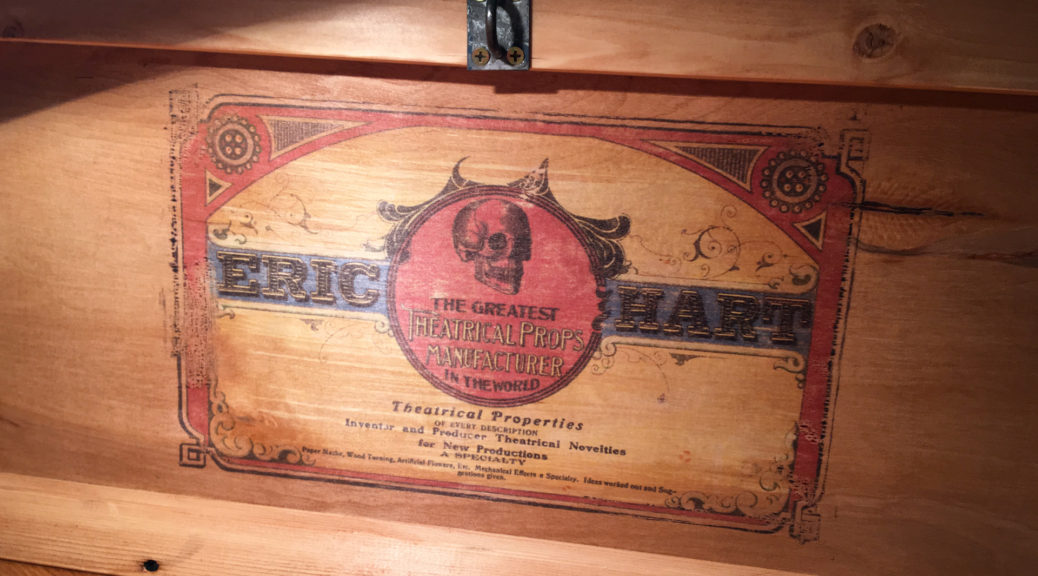
I wanted a crate to haul around the props I bring to Maker Faires, so I designed an old-timey crate label for it.

Wax paper transfer
Wax paper transfer

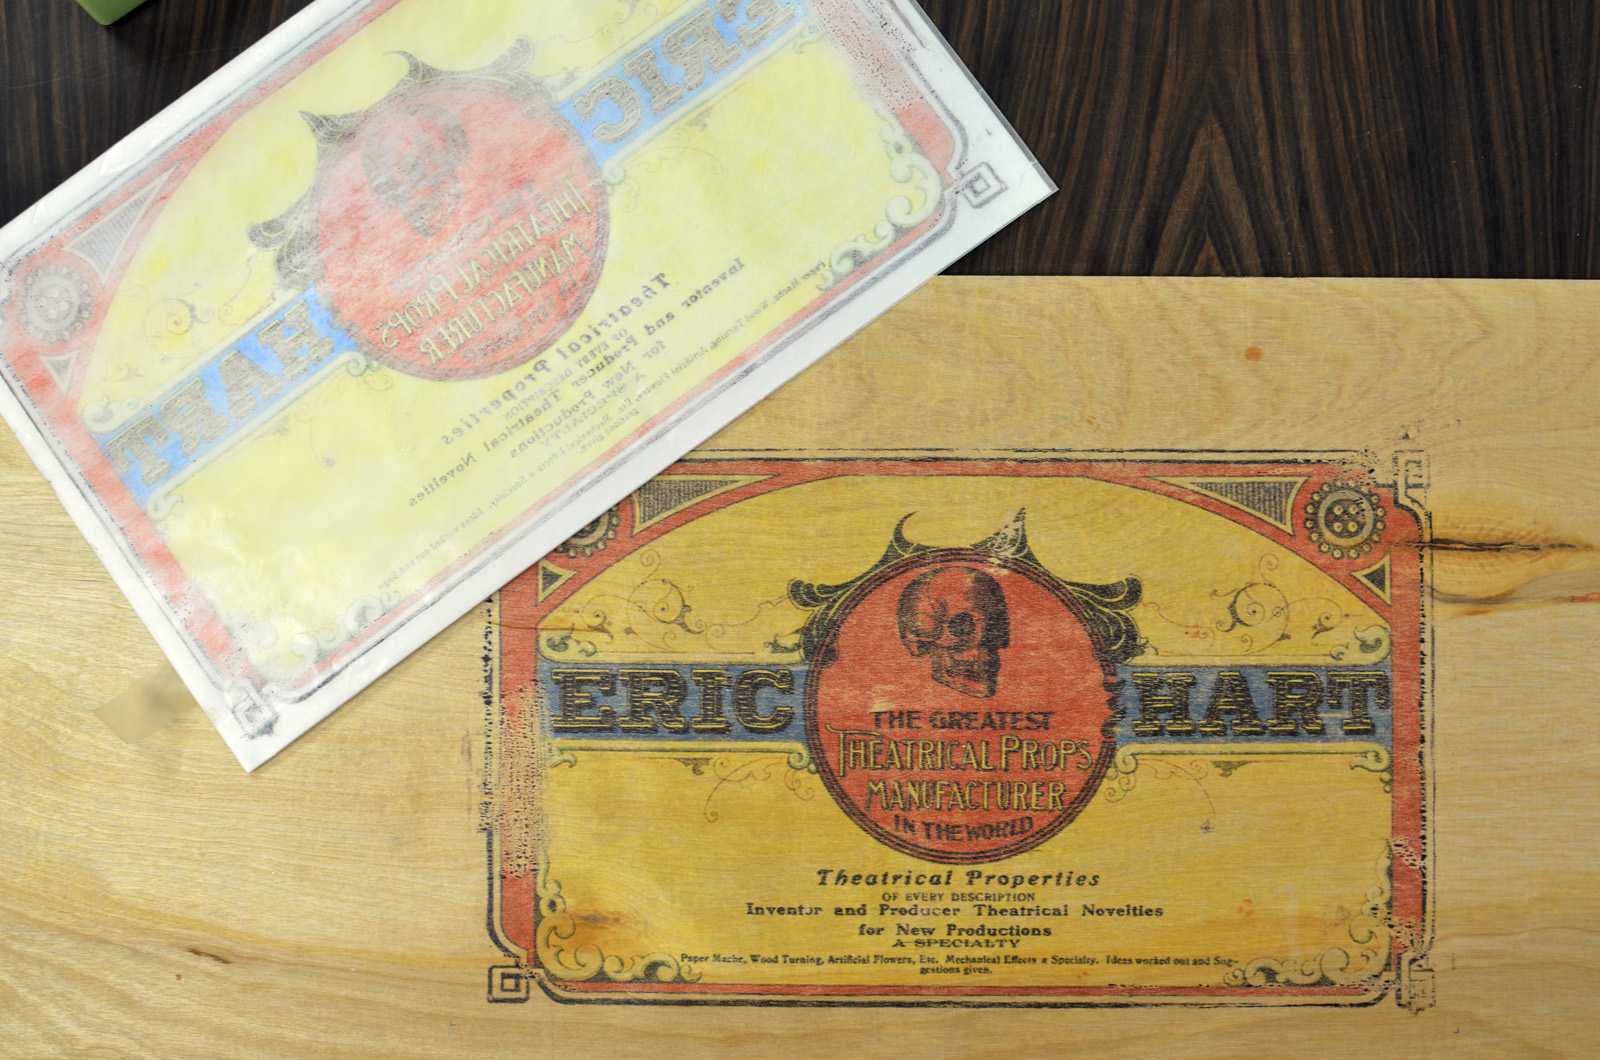
As you can see in the video, the process is very simple. Cut a piece of wax paper. Attach it to regular printer paper. Get an image on your computer and mirror it so it prints out in reverse. Send your wax paper through your inkjet printer. Lay it on your piece of wood and burnish the back of the paper so you rub all the ink off. Be careful not to move the wax paper around once it is on the wood.

In the picture above, you can see a few spots along the edges where the ink sort of blotted up and didn’t transfer as well. The wax paper wants to curl as it goes through the printer, and the ink will not sit right if it is too far or too close from the print head. The first time I tried this, I sent just the wax paper through, and most of the image ended up blotted. Attaching the wax paper to a piece of regular paper helps keep that from happening. The next time I do this, I may try using spray adhesive to attach the wax paper to regular paper, or just use an image that does not go so far to the edges of the page (the edges are where you get the most curling).

Elephant Puppet Heads

Last week I showed you the Lion Puppets I made for Triad Stage’s Beautiful Star. Today you can see how the Elephant Puppets were done.

The idea was similar; they were designed to look like a giant papier-mache head with a flowing fabric body made of silk.

Stack of foam
Stack of foam

I made this one from a stack of insulation foam sheets. I cut their outlines and did some beveling with the hot wire cutter before attaching them together. This helped establish the proportions and maintain some symmetry.

Someone in the shop told me that Spray 77 would work well to stick them together. I thought it would eat into the foam, but I was surprised when I tried it. It attacked the foam a little bit, but it made a pretty strong bond.

Shaping with a rasp
Shaping with a rasp

I began shaping the foam with a mix of snap-blade knives and surform tools. I also tried out one of my newer purchases, a saw file rasp. It is made up of a bunch of criss-crossing saw blades, making it very aggressive in removing material. It is completely open, though, so all the foam passes right through rather than clogging it up. Very nice.

Carved elephant head

The finished foam piece may look a little funny, but that is because it doesn’t have a trunk or tusks. The trunk was going to be a piece of silk which the actors can manipulate, and the tusks would be separate pieces of Wonderflex. This piece of foam was now ready to use to make Wonderflex shells for the head.

Wonderflex head
Wonderflex head

I covered the foam piece in aluminum foil so the Wonderflex would not stick to the foam. I’ve tried other methods, like coating the foam in plaster or using Vaseline as a mold release, but the aluminum foil is so much faster and easier. The Wonderflex does not pick up enough detail for the texture of the aluminum foil to show, and it peels off the back of the Wonderflex piece pretty easily.

Painted with tusks
Painted with tusks

I had a set of bull horns in stock which I used as a form to make the tusks out of Wonderflex.

Elephant puppet. Photo by Lisa Bledsoe.

My assistant Lisa made the ears, trunks, and legs out of China silk. During the performance, the elephants flew down on a line from the catwalks and hung there. The actors could grab a stick that was attached to their trunk to make the trunk dance around.

Lion Puppet Heads

Triad Stage’s holiday show this past year was Beautiful Star: An Appalachian Nativity. It was one of their most popular shows from before I started working there, so they decided to bring it back. It had a whole new design though, including some all new puppets. The lion puppets are the first ones I’ll show you.

Drawing the Lion
Drawing the Lion

Robin Vest, the scenic designer, made the drawings for the lion puppets in the photo above. They were for the Noah’s Ark scene, so we needed two. She wanted them to look like folksy papier-mâché puppet heads with floaty silk bodies. I decided to carve a head out of foam to use as a form for Wonderflex.

Using the hot wire
Using the hot wire

I used my favorite kind of foam: free. It was polystyrene foam and the pieces were fairly big, so I broke out our hot wire cutter to cut the initial shapes. I pieced it together from a few pieces since it was so big; it also made it easier to maintain symmetry.

Carved form
Carved form

The pieces were joined with Gorilla Glue, which works great on foam. The rest of the carving was pretty standard stuff; lots of Olfa snap blades and carving with the surformer. When it was finished, I had a form that I could use to make as many lion heads as I wanted.

Shaping the Wonderflex

Next up was the Wonderflex. If you’ve never used it, it’s a low-melting thermoplastic sheet with an embedded fabric mesh. You can heat it up with a hot air gun and it becomes flexible, but it is still cool enough to shape with your bare hands. I used it because I could quickly form a mask-like shell around the form that would retain its shape but remain light-weight. It also cools down and is ready to paint in just a few minutes, unlike papier-mâché, which can take a few days to dry.

Shaping the ears
Shaping the ears

I made the ears out of more Foamies. I still don’t know whether this is XLPE or EVA foam, but it doesn’t matter, it’s great stuff. It can be shaped with heat, too. I curved them over a PVC pipe, heated them up, and they maintained that little curl when they cooled down.

Painting the lion
Painting the lion

I ended up doing a single layer of papier-mâché on top of the Wonderflex to give it the right texture and to cover up some of the seams. I used butcher paper dipped in Rosco Flexbond so it would remain somewhat flexible when dry. That way, no matter how many times it got pulled in and out of its crate during the show, it would always bounce back to its proper shape.

Finished Lions. Photograph by Lisa Bledsoe.

My assistant, Lisa Bledsoe, cut and sewed the long silk bodies and made a fun mane for the male lion out of small pieces of silk. The show is coming back next holiday season if you wanted to see them in action!

Mace from Deathtrap

Anyone who has done Deathtrap knows that the “wall of weapons” could be a challenge. I was able to source most of what we needed, but the mace was a bit tricky. I had a flail, but when we got to tech, we decided it really needed to be a mace. It is never used, but the characters reference it a few times, and they would know the difference between a flail and a mace. I was pretty much out of money, so I decided to build one with whatever I had laying around while they worked on lighting and sound cues.

Mace parts
Mace parts

I printed out some research of a flanged mace that had a cool look but was not too intricate. The shaft was a length of PVC pipe. I attached a bit of wooden dowel on either end; one for the handle and one for the head. I cut the flanges out of craft foam. I drilled out the center of a few wooden toy wheels to make the various ridges, and a lamp finial finished off the top.

Painted pieces
Painted pieces

I attached the flanges to the head with some hot glue and sealed it all with some fiberglass resin. I only used one coat, which did not really stiffen the foam, but since it was just a wall-hanger, I figured it was enough. Everything got sprayed with various metallic spray paints before I attached it all together.

For the handle, I wrapped tape around it to give it more of a bulging cigar shape. I wrapped the final layer of tape in a spiral to make it look like a leather-wrapped handle.

Mace
Mace

I finished the whole thing off with some weathering and aging using acrylic paints. The end result looked pretty a-mace-ing.

Foam Firewood for Fighting

We just closed Deathtrap at Triad Stage. Anyone who has done or seen the show knows it has quite a few tricks, not to mention all the set dressing. One of the projects I made for the show was a piece of firewood that could safely be used to beat someone to death. I put together this video showing the process from start to finish.

I started off borrowing some techniques from LARPers; they build weapons out of foam intended for actual combat. I tried wrapping closed-cell foam around a piece of PVC, but that was too hard to hit someone with. I ended up using a core of polyurethane upholstery foam with three pieces of closed-cell foam around the outside.

The foam I used was a mix of anti-fatigue mats from Harbor Freight and Silly Winks foam from the craft store. Some people call this EVA foam. It’s more likely to be XLPE foam. I don’t think there’s enough of a difference to worry about, but it’s one of the things I’m investigating for the second edition of The Prop Building Guidebook.

Textured Foam
Textured Foam

To get the texture on the inside parts of the foam, I went over the whole surface with a wire wheel. Next, I scored the foam with a knife in the direction of the “grain” of the wood. One of the great tricks with this kind of foam is that when you score it, you can run a heat gun over the surface and the foam will open up, turning the scored lines into beveled grooves.

Bark
Bark

For the bark side of the log, I cut and tore apart chunks of thinner Silly Winks foam and hot glued them to the surface. I roughed them up with a surform and a knife; you can see that part of the process pretty well in the video.

Flexcoat
Flexcoat

Everything was coated with a layer of Rosco Flexcoat. This sealed everything in and gave a nice even layer to paint on. And as the name suggests, it remained flexible when dry.

When you watch the video, you will also see me adding some torn strips of paper towel with the Flexcoat on the bark side. This gave it a touch of texture and made it feel a bit more organic.

Finished Firewood
Finished Firewood

The whole thing was painted with a mix of scenic paint, acrylics, and Design Master, all of which remain pretty flexible when dry. We got the thing out on stage, and the lighting made it look very red, so I gave it another few coats of paint to make it look more realistic under the light.

Under natural lighting in the picture above, it looks very theatrical, but on stage it worked very well. The actor was able to beat the other actor without injuring him, and it produced a wonderful dull thud as he did so.