Category Archives: Features

In-depth articles written specifically for this blog.

When nothing is happening

It happens. It’s rare, but it happens. You get to work or your studio, and nothing is happening. You have no upcoming projects, the phone isn’t ringing, your emails are all answered, and you have no meetings. It is especially prevalent this time of the year, when half the country seems to be out of town or hunkered down in their homes for the holidays. You can spend all day watching Netflix, or you can take advantage of the downtime with some things you never have time for but which will improve your shop and skills in the long run. Here are some of my favorites.

Clean. I know you clean your shop every day (right?). And you probably do a big clean every week (when you have time). Still, there always seems to be something dirty in your shop no matter how often you clean, so here’s your chance to empty the vacuum cleaner, scrape the paint traps, and dust the tops of the chandeliers.

Maintenance. I’m talking about sharpening the chisels and oiling the pneumatic staplers. All tools require some maintenance, even if it’s only needed once or twice a year. If you don’t know the current state of your tools, now is a good time to check each one and make a list of what needs fixing and what needs replacing. It’s also a good time to get rid of those random tool parts from tools you no longer have that every shop somehow accumulates (or put them in your big bin of “found objects to use as prop parts”).

Organize. I don’t mean to imply that your shop isn’t already the paragon of proper organization. It doesn’t hurt to check all your bins of bolts to make sure they only contain the right sizes and cull out all the random bits that have found their way into the wrong drawers. While you’re at it, make sure you can close all the drawers; if one seems to be constantly overflowing, now is a good time to think of a way to divide up the contents and reorganize your hardware. It is also a good chance to take stock of how your supplies are faring and whether you need to order anything new (if your shop doesn’t have someone who does that).

Learn a new skill. This is one of my favorites. No matter how advanced you are, there is always something in the world of props that you’ve never quite mastered. Maybe it’s an artisan skill, such as welding or fabric draping, or maybe you just want to brush up on Excel or CAD. It’s your choice whether you want to just practice or if you want to take on a whole project utilizing your new skill so you have something to show for it at the end. If you’re feeling especially ambitious, you can undertake an improvement to your shop, such as building new shelves using a saw you haven’t used before.

Tinker. Closely related to learning a new skill is tinkering. Maybe you want to experiment with different ways to pull of an effect which didn’t quite work in your last show, or maybe you just want to check out some new blood recipes you found on the internet. The world of props has a whole host of tricks and effects which can always use improving. Perhaps you can finally solve the problem of making a cell phone ring on cue.

Read. If you know what shows are coming up in your season, you can get a jump on them by reading the scripts now. When we’re in the thick of it, it can be hard to read a script for fun without stressing over every prop that is mentioned in it (all the needles just fell off the Christmas tree at once! How am I going to pull that off?). Alternatively, you can peruse the books on your shelf or look up information in other places about the time period of your upcoming plays to make yourself more informed about the context. Even if you don’t have any shows you want to prepare for, the prop master has an endless supply of reading material which can inform his or her profession. And hey, if you’re really bored, why not look through the archives of my blog to catch up on any articles you may have missed?

Scout new sources. Maybe being in the shop is the last thing you want to do when there is nothing going on. If you don’t have to be there, now is a great time to check out stores, flea markets and other suppliers that you otherwise haven’t had the chance to. It is especially nice this time of the year, as the throngs of holiday shoppers have gone home and discounts can be found.

Portfolios. A props person should always have an up-to-date portfolio, even if one is not actively seeking employment. A lull between shows is a good time to make sure of this.The least you can do is gather all the photographs you can find of past shows. Portfolios aren’t just for individual artisans; it’s a good idea to have a “shop” portfolio as well.You can show off what your shop has done in the past to tours which come through, or in presentations to groups, or at conferences such as USITT. It also doesn’t hurt to brag on your accomplishments to your bosses and the higher-ups every once in awhile. Even if you can’t think of a specific reason to keep a portfolio, you don’t want to be caught in a situation where someone asks to see examples of your shop’s work and all you have is a dusty photograph from a 1982 production of Christmas Carol.

NYC Theatrical Weapons Permit

This week, The Great Game is playing. We had to rent a number of guns for the show, including some blank-firing ones. Now, New York City has some of the more strict gun-control laws in the US, and even blank-firing replica firearms require a “theatrical weapons permit” to rent and transport to the theatre. We’ve had a bit of turn-over in our production staff since the last time we had a show with such guns, and it turned out none of us were currently licensed. So I volunteered to be the one to bare my personal life and barter my soul to the New York City Police Department in exchange for permission to make a sound effect from a replica firearm.

As a caveat, what follows is not a “how-to”; using weapons on stage requires so much more than just having a certain license or permit. Your situation would certainly differ from mine, information becomes outdated quickly, and if you do not live or work in New York City, then this is all fairly irrelevant. As I was going through the licensing procedure though, I could not find much anecdotal information about what it’s like, so I thought I would share my tale. For those of you working in theatres outside of New York City, you may find it interesting to see what we have to go through here.

The first part was relatively easy. When we sent the list of firearms we needed to Weapons Specialists, one of our preferred–weapon rental vendors, they told us that whoever would pick-up and sign for the guns would need a theatrical weapons permit. They gave me the relevant information to get started and even have links on their website to the official instructions and forms from the NYPD. This is one of the benefits of using a supplier like Weapons Specialists; they will make sure you have all your legal ducks in a row. The kinds of prop and replica firearms that require a license to rent and transport are registered and tracked by the NYPD just like real guns, so you should never have to “guess” whether you should have a license or not; your supplier will tell you if you do. Still, it is a good idea to know what kinds of weapons require a license going into a new production so you can let the team know whether a gun they are requesting will require a license, which entails either hiring someone with a license, or allowing enough time and money in the budget to apply for one.

You can view the form here and the special instructions for the theatrical permit here. As you can see, you fill out the exact same form as if you were applying for a rifle/shotgun license; this might be confusing and even scary for the first-timer, but rest assured, you are getting an entirely different license. When I got mine, it was $140 for the license. You also have a number of forms you need to have notarized. We have our own in-house notary, so those costs were absorbed by the institution and did not come out of our budget, but otherwise you would need to be prepared to budget for those costs as well.

The proof of address was one of the trickier and more confusing parts. You need to bring your Social Security card and your passport or driver’s license, but you also need additional documentation for your address; they will not accept your driver’s license itself as proof. On the website, it says that can be a recent copy of a gas, electric or land-line telephone bill. If those are in someone else’s name, like a roommate or family member you can use a copy of their bill along with a form that is also notarized stating that person knows you are applying for a license.  I called the rifle/shotgun office to see what else they would accept. They’ve updated their rules as less and less people have land-line telephones; they will now accept a cable or internet bill in conjunction with your driver’s license, provided the addresses on each are the same. They will also take a notarized copy of your lease.

It took quite a while to get all the paperwork and documentation together, as there is a lot of pieces and parts, and you need to have other people fill out parts and write letters and what-not. Eventually, I had it all ready. I gave the NYPD permission to check my arrest record, as well as checking with mental institutions to make sure I was never officially crazy. I even had my supervisor agree that he would be responsible for my guns if I should die—on a form he had to sign in front of a witness. I felt like I was only one step away from having to gather three selectmen of good repute to forswear my strong character in front of a judge.

I left for my permit early one Friday morning. I needed to go out to a courthouse in Kew Gardens, Queens, where the NYPD’s rifle/shotgun division is located. It’s quite a distance from the Public Theater, but not terribly far from my apartment, so it made sense to do it first thing in the morning. Though the office says it is open from 8:30am to 4:00pm, the courthouse itself says it doesn’t open until 9:00am. Like every government building in New York City, I had to go through a metal detector upon entering—good thing I remembered to leave my work-knife at home! The office itself is found in the basement, where apparently nobody goes. Having dealt with jury duty, the DMV, the FDNY records department and other bureaucratic departments in the city, I was expecting more activity. Even when I got a copy of my birth certificate in Brooklyn, I had to wait in line. This place, on the other hand, was practically deserted. I struggled to follow the signs leading the way through the winding hallways underneath the courtroom. Finally, I saw the words “Rifle/Shotgun Licensing Division” in big block letters on a closed door at the end of a long passageway.

The woman looked through all my forms and paperwork one at a time to make sure they were complete and correct. She photocopied my passport, social security card, and utility bill before handing them back. Once she seemed satisfied, she asked me to wait outside for a few minutes.

The makeshift waiting room was actually just a vestibule created by various hallways joining together. I sat on the only bench in the small area, which was so long it covered half of one of the doors. I waited for about twenty minutes, completely alone except for the two times a janitor passed through. Eventually, I was called back in.

When you get a permit for a real rifle or shotgun, you hand in all your paperwork, get fingerprinted, and then come back three to six months later once your fingerprints have cleared all their background checks. For the theatrical permit, you walk off with the license on the same day. The woman had gathered all my paperwork into a single folder which I assumed they would keep on file there for eternity. She had me stand in front of a blank background, and a camera mounted to the wall took my picture. I signed my name on an electric pad so my signature showed up on her computer. The chain for the pen had long disappeared, and it had been replaced by a string of rubber-bands tied together. Finally, I placed my thumb on another device which scanned my thumb-print and saved it to the same computer. After the woman typed through a few more options, I heard the printer kick into action printing up my permit card. A few moments later, she showed me the card to check for accuracy. Satisfied, she photocopied the card and had me sign that copy, which she placed in my folder. All told, I was at the courthouse for about an hour.

The day came to pick up the guns from Weapons Specialists. We looked through the guns and checked to make sure everything was complete. For the three guns which required the license, he had to write down their serial numbers for another form. I had to fill out another form as well; this was a federal from from the ATF for the actual transfer of the firearms. This was similar to forms I had already completed, but it included a series of additional questions, some quite bizarre—I had to swear I had never renounced my citizenship to the US and that I never threatened a child, for example. Once the form was complete and my license was photocopied, he had to call in to the rifle/shotgun division and check my license against their records. All in all, I don’t think I’ve ever had my legitimacy as a law-abiding citizen so closely scrutinized.

Part of the application process includes getting a notarized letter from an officer of my production company listing the types of guns being used and for what purpose. The license itself is valid for a year. I asked Weapons Specialist whether the license is only valid for the guns I listed on that letter. He said that you need a specific reason to apply for the license, but once you have it, it can be used to rent and use other guns for other productions. Also, the license allows me to rent, buy, acquire, transport and possess special theatrical guns, but once at the venue, anyone can load and operate them.

A Common Error in Making Cutlists

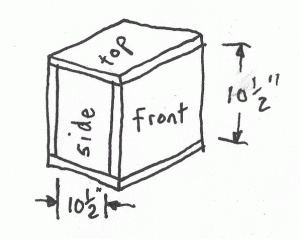
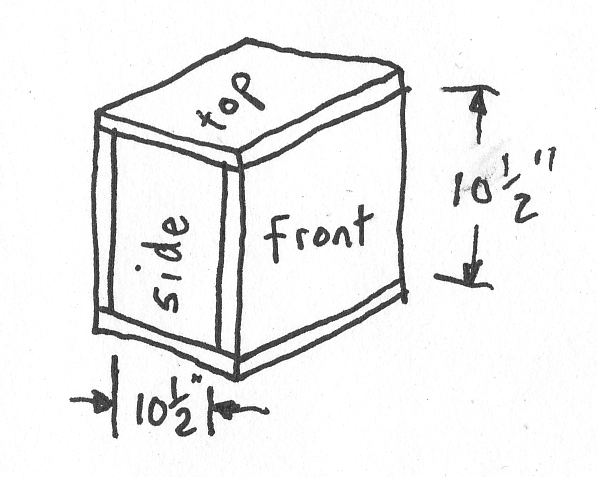
One way to begin with a carpentry project is to make a cut list. You break apart the drawing into all the parts, figure out the measurements for each of those parts, and draw up a list of how big each piece should be. Perhaps the most common error in developing a cut list is neglecting the thickness of the pieces. Let’s say you want to build a cube which is one foot on each side. A perfect cube. A solid cube will be built with six pieces of wood. For this exercise, let us say you will build it with scraps of ¾” plywood you have laying around the shop. If you make a drawing of a cube, you may assume you need to cut six pieces one foot long and one foot wide.

A one-foot cube
A one-foot cube

Wrong!

Let’s look at the drawing again.

The top and the bottom can be one foot by one foot. However, if you make the front and the back one foot by one foot, the cube will end up being one foot by one foot, one and a half inches. See? You need to subtract the thickness of both the top and bottom from the length of the front and the back. In this case, ¾” and ¾” is an inch and a half, so the length of the front and the back would be 10 ½ inches. The width remains one foot.

Revised drawing showing thicknesses

The sides need the thicknesses of the materials taken away from both the length and the width. In other words, it will be 10 ½” by 10 ½”. So our final cut list looks like this:

  • 2 pieces at 1′-0” x 1′-0”
  • 2 pieces at 10 ½” x 1′-0”
  • 2 pieces at 10 ½” x 10 ½”

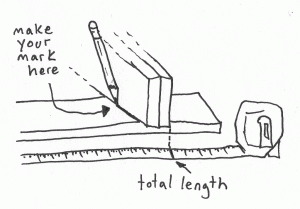
At this point I wish to add a caveat. Plywood does not come in exact measurements. While it is sold as ¾” thickness (or ½” or what have you), the actual measurements vary. Three quarter inch construction plywood is actually 23/32”. In some cases, you may not care about a thirty-second of an inch difference, though in others you may. One sure-proof method for accounting for the actual thicknesses of materials is to hold two pieces on the piece you are measuring and make your mark using them as a guide.

An easy way to account for thicknesses

Now, in props, there is no reason to try and create a cut list for all the parts at the beginning before you begin working. Sometimes, it is nearly impossible to do all the math to discern the measurements of every single piece. Other times, you need to build a section and look at it so you can visualize the next portion of what you are building. It is not always necessary to have a project completely mapped out in your head at the outset, because better solutions may become apparent as the prop comes into being.

I’ve posted before about the importance of precision in cut lists. You will also find a link to a wonderful series at Popular Woodworking which has a more in-depth look at cut lists.

Why make?

This is not an article about the existential question of why we make things? Rather, it is about the more concrete question of why you would build a prop rather than trying to buy, borrow or rent it.

The most obvious reason you would make a prop is because it is simply impossible to acquire otherwise. Imaginary objects or pieces designed to specifically fit into the world of the play fall into this category. For example, during this summer’s production of Merchant of Venice, my wife made a skull which was upholstered in black velvet and bedazzled with shiny jewels. This is not the type of item you can pick up at the local Wal-Mart. Furniture in an abnormal scale or from an invented world will also need to be built for this reason.

Closely related to this category is props which need to be specific in appearance or size. If you need an oil painting portrait of your lead actor in his costume, you are pretty much forced to make it. Likewise, props with specific dimensions or furniture built in forced perspective will not be found in stores.

You may wish to adapt store-bought pieces rather than building them fresh, but beware the consequences. An object from a store will already be finished, and if you cut into it, or add parts to it, you will need to match the color and texture of the original, which may be more challenging than just mixing a paint color from scratch. Likewise, a lot of modern furniture resists easy adaptation; when you cut into what looks like wood, you discover it is actually stress-skin filled with honeycomb paper, and you have no structure inside to attach things too. If you believe your prop is going to undergo many changes during the rehearsal period, it may be wiser to build a prop designed to be adapted, rather than using a store-bought item which undergoes degradation with every change made to it.

A fourth reason for building your props is if they need to perform some kind of technical function or undergo rough treatment. Most furniture you buy was never designed to be danced on, carried around, leaned on its side or otherwise mistreated in any number of creative ways an actor or director comes up with. When I say a prop must perform a technical function, I mean things like a porcelain vase that must fall to the ground without breaking, or a table which can fold up for a quick scene change. I’m going to mention fake body parts in this category, though they can also be considered part of the first category, in that they are impossible to acquire. Legal and moral issues aside, we don’t use real body parts because they rot and smell and attract vermin. You need to build fake ones which will not degrade over time and not make a mess on stage every time they are used.

Another reason to build a prop is because the actual item is too expensive to buy or rent. Shakespeare and opera frequently rely on gold objects littered about the stage, but it would be incredibly costly to buy real gold. Real furniture, especially antiques, is built with expensive hardwoods and labor-intensive finishes which can be indistinguishable from cheaper mimicry under stage lights and viewed from a distance. Likewise, fake food is often built because, if it is not eaten, the cost of buying and preparing real food every night for every show for several weeks (or months or years) just to be thrown away is so much more expensive and wasteful than spending the time to construct a facsimile.

Finally, you may wish to give your artisans a nice project, to help their portfolio, or to give them a sense of “belonging” to the theatre. Building something beautiful or clever gives an artisan pride, and helps instill a feeling of ownership in the show which will help their morale and motivation when it comes to tech and notes and all the fiddly nonsense that nobody wants to do. If they know you will give them exciting and challenging projects throughout the season, they will be more forgiving when the “clean the paint trap” jobs inevitably come up.

The Gore of Grand Guignol

The fan of both horror and theatre is sure to have heard of Grand Guignol. Though a producer of a variety of works, the infamous Parisian theatre is best known for its horror plays performed in the years leading up to World War II. Founded in 1894 by Oscar Méténier, Le Théâtre du Grand-Guignol offered up stories such as Le Laboratoire des Hallucinations, by André de Lorde: A doctor performs gruesome brain surgery his wife’s new-found lover. The man is turned into an insane zombie and plunges a chisel into the doctor’s brain. Anyone familiar with EC Comics will recognize the kind of plots this theatre performed.

When a theatre regularly displays amputations, burning in acid, eviscerations, stabbings and all other manner of violent actions, a prop person may ask: how realistic were these effects, and how were they pulled off?

Perhaps one of the best kept secrets of the Grand Guignol was their fake blood. Many sources speak in fascination that it would congeal after a few minutes like real blood. Mel Gordon, a theatre Professor at U.C. Berkeley and Grand Guignol expert, says that the base is made of a heated mixture of equal parts carmine and glycerin (Callboard magazine, April, 1996). Carmine is a bright red pigment made by boiling dried insects; you can find paints which use that pigment, though finding it in its pure form is more difficult and necessitates looking for specialty online stores. You can still buy glycerin at drug stores and online. It is often added to stage blood to give it a bit of sheen under the lights. Further justification for this theory is found in a Time Magazine article entitled “The Theater: Murders in the Rue Chaptal” from March, 1947:

The theater has a secret recipe for blood; when the stuff cools it coagulates and makes scabs. Thrill-hungry customers in the small auditorium get a dividend when they overhear the hoarse backstage whisper: “Vite [tr: quickly], Edmond! Warm up the blood.”

Edmond Beauvais was the chief propman of the theatre in the mid-1940s. The last director of the theatre, Charles Nonon, personally mixed nine different shades of blood daily (Time Magazine, November 30, 1962). We learn more about the possible ingredients of this fake blood from two articles about the tour of Grand Guignol which hit San Francisco in 1950. Director Robert T. Eley called on local druggist Barnes-Hind for a 2 percent solution of “methyd cellulose” (Five Star Final, April 10, 1950) and (Pace, Michael Farriday, March 1951). I’m going to make the assumption that both of these articles are actually talking about “methyl-cellulose”. It thickens in cold water and gels when heat is added. You can buy it in its pure form or find it in popular constipation medications; it was used to make the ectoplasm in Ghostbusters. Blood which did not need to flow could be made from currant jelly (“The Relationship between Le Théâtre du Grand Guignol and the Cinema 1897-1962”, Sean J. O’Leary, 2005).

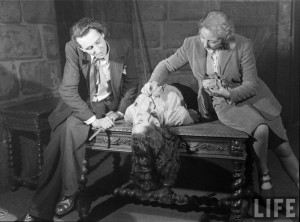
Eva Berkson applies blood to an actress' neck before a scene from "The Hussy". Photograph by Hans Wild, 1947

Nonon also made viscera from red rubber hose and sponges soaked in blood. Taxidermists supplied animal eyeballs, which he coated in aspic (a clear jelly made from meat stock) and stuffed with anchovies marinated in blood (Time, 1962). Sheep’s eyes were popular, but any animal would suffice because then the eyeball could bounce when dropped (Callboard, 1996). Edible eyeballs were made by a local confectioner’s shop (Pace, 1951). A tongue that was ripped out was made of rubber (Five Star Final, 1950) and (Pace, 1951). According to The Columbia encyclopedia of modern drama, Paul Ratineau, the stage manager, depended on the daily delivery of fresh animal parts by local butchers.

In order to deliver the goods, a variety of devices and trick props were required. These included rubber knives, concealed bladders, tubes and small, strategically located steam pipes (See Magazine, March, 1950), a dagger squirting “blood” from a vial hidden in an actor’s hand, quick flaming powders, a table with props hidden in upstage drawers (The New York Times Magazine, P.E. Schneider, March 1957). Daggers with retractable blades could also squirt blood from the handles; Mel Gordon explains that “a turkey baster, rubber ball, or an eye dropper could provide a good base for building a blood squirting knife” (Callboard, 1996).

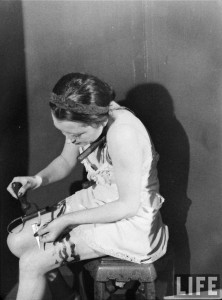
In the photograph below, we see how some trick knives are like the classic “arrow-through-the-head” gag prop, where the two halves are separated by a metal clasp which fits around the actor’s limb.

Simone Gérard demonstrates a trick knife. Photograph by Hans Wild, 1947

Gordon also explains how the Guignol-eurs chopped off a man’s hand:

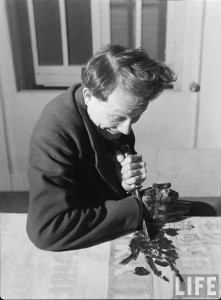
An actor cuts off his hand. Photograph by Hans Wild, 1947.

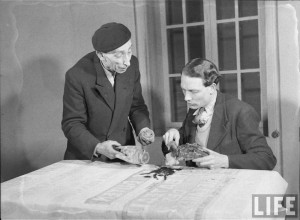
Cutting off a man’s hand is easier than it sounds. Stiffen a glove with glue water so it holds it’s shape and paint it like a real hand. The actor wearing the glove should still be able to move his fingers a bit. When the hand is chopped off the “chopper” removes the glove and the “chopee” moves his hand up into his cuff which is reinforced with a cardboard tube and fitted with a blood pack. The stiffened glove should hold it’s shape perfectly as the unwilling amputee writhes in pain (Callboard, 1996).

Edmond Beauvais, prop master, prepares a removable hand with the actor

Another eye-popping effect involves hiding a fake eye in the hollowed-out handle of a spoon. Conversely, an actress could wear a plaster or latex quarter mask which holds a fake (sheep’s) eye, lactose powder, and a blood capsule. If she wears her hair over that half of her face (“Veronica Lake” style), the effect would be quite flawless (Callboard, 1996). Mel Gordon describes a more complicated eye-gouging device:

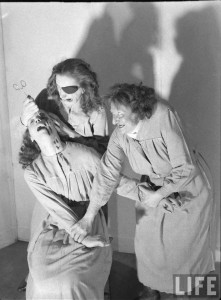
The retractable blade of the knife moves into the handle which squirts blood when pressed against the victim’s face. Affixed to the end of the handle is a piece of adhesive “skin” (latex or lamb skin) with a slit to allow the blade to move through it. As the handle is pressed against the victims eye the sticky “skin” is pressed to the eyelid leaving a gory empty eye socket. When the knife handle is pulled away the blade is released back into position. The actor with the knife squeezes a air pump in the handle and a rubber eyeball on the end of the knife inflates. The eye appears to be impaled on the tip of the knife. Many magic shops sell an inflatable ball and pump mechanism that could work as a base for this prop (Callboard, 1996).

Crime in a Madhouse. Photograph by Hans Wilder, 1947

Much of the development of the theatre’s effects are due to the above-mentioned Paul Ratineau. Many of the tricks were secret; some were even patented. Most were devilishly simple though. Their power and Ratineau’s cleverness did not come solely from the tricks though. He overcame a number of challenges. First, the stage itself was only twenty feet by twenty feet large, with the audience close enough to shake hands with the actors (“Theatre du Grand Guignol,” The Drama Review. Frantisek Deak, 1974). Second, the tricks needed to work consistently, in full view of the audience, and while the actors performed in character with other actors in the height of often-crazed emotions.

It should be no surprise then, that Ratineau also developed much of the Grand Guignol’s characteristic lighting. Besides setting the mood, the lighting could hide the imperfections in the prop trickery as well as guide the audience’s eyes to where it was desired. Similarly, the arrangement of the scenery and objects on stage combined with the blocking served to direct or misdirect the audience’s attention (O’Leary, 2005). Sound effects (also pioneered by Ratineau) were critical in bridging the gap between what an audience sees and what they imagine they are witnessing. Finally, dramatic tension and the power of marketing helped sell the bloodshed portrayed on stage by warming the audience up to a heightened level of expectation. The mystery of the special effects themselves added to the legend surrounding the Grand Guignol. In other words, the actual trick props, while clever, might seem crude and unrefined when studied under normal light and out of the context of the performances.

When money became tight, the theatre would prefer to stab women rather than men, because their smaller costumes were cheaper to clean. For head wounds, men were the victims because their short hair was easier to wash (Schneider, 1957). Schneider goes on to recount some of the more serious mishaps and accidents:

Naturally, all this gruesomeness is sheer illusion, but the sham is not always devoid of risk. Once, during an actress’ simulated hanging, the protective device broke and she almost did get hanged. Another recently was burned by the flame of a revolver. In “Orgy in the Lighthouse,” the heroine suffered even more; on one night, she almost caught fire; on another, her male partner began to live his part a bit too much and beat her up in earnest, so that she was forced to go off to the country to nurse a nervous breakdown.

See? Gore and horror aren’t always happy fun times.