Inside the One-ton, History-making King Kong Broadway Musical – Where does a 2000 pound gorilla puppet sit? Wherever he wants! Find out all the technical wizardry that went into creating one of the largest and most expressive puppets to ever grace Broadway.
Secrets of the Solo: a Star Wars Story Creature Shop – Despite its unimpressive cinema run, Solo was actually one of the most expensive Star Wars films made, and was packed to the gills with practical creature effects. Puppeteer Brian Herring talks about how they brought all those crazy aliens to life.
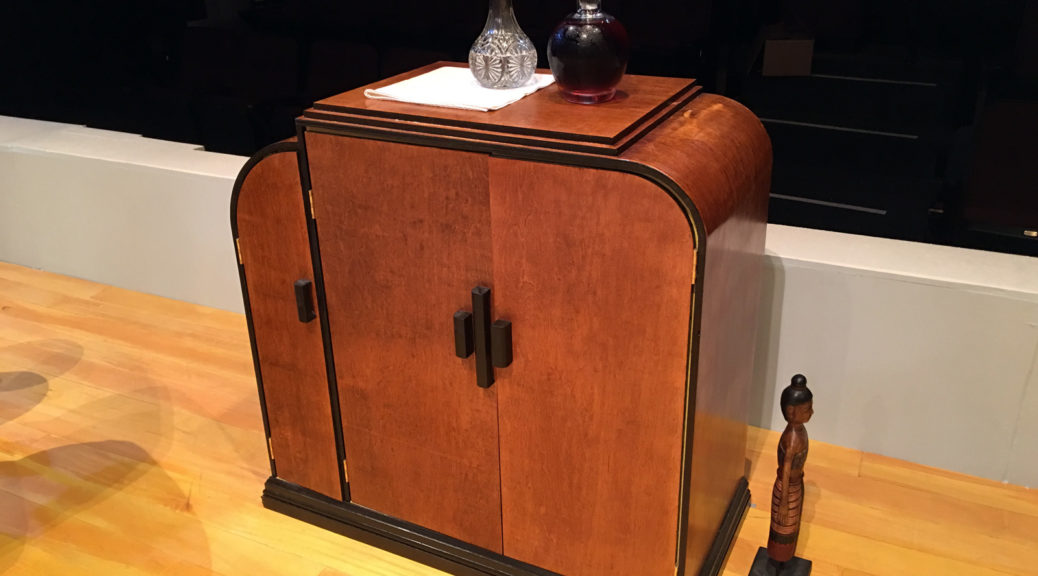
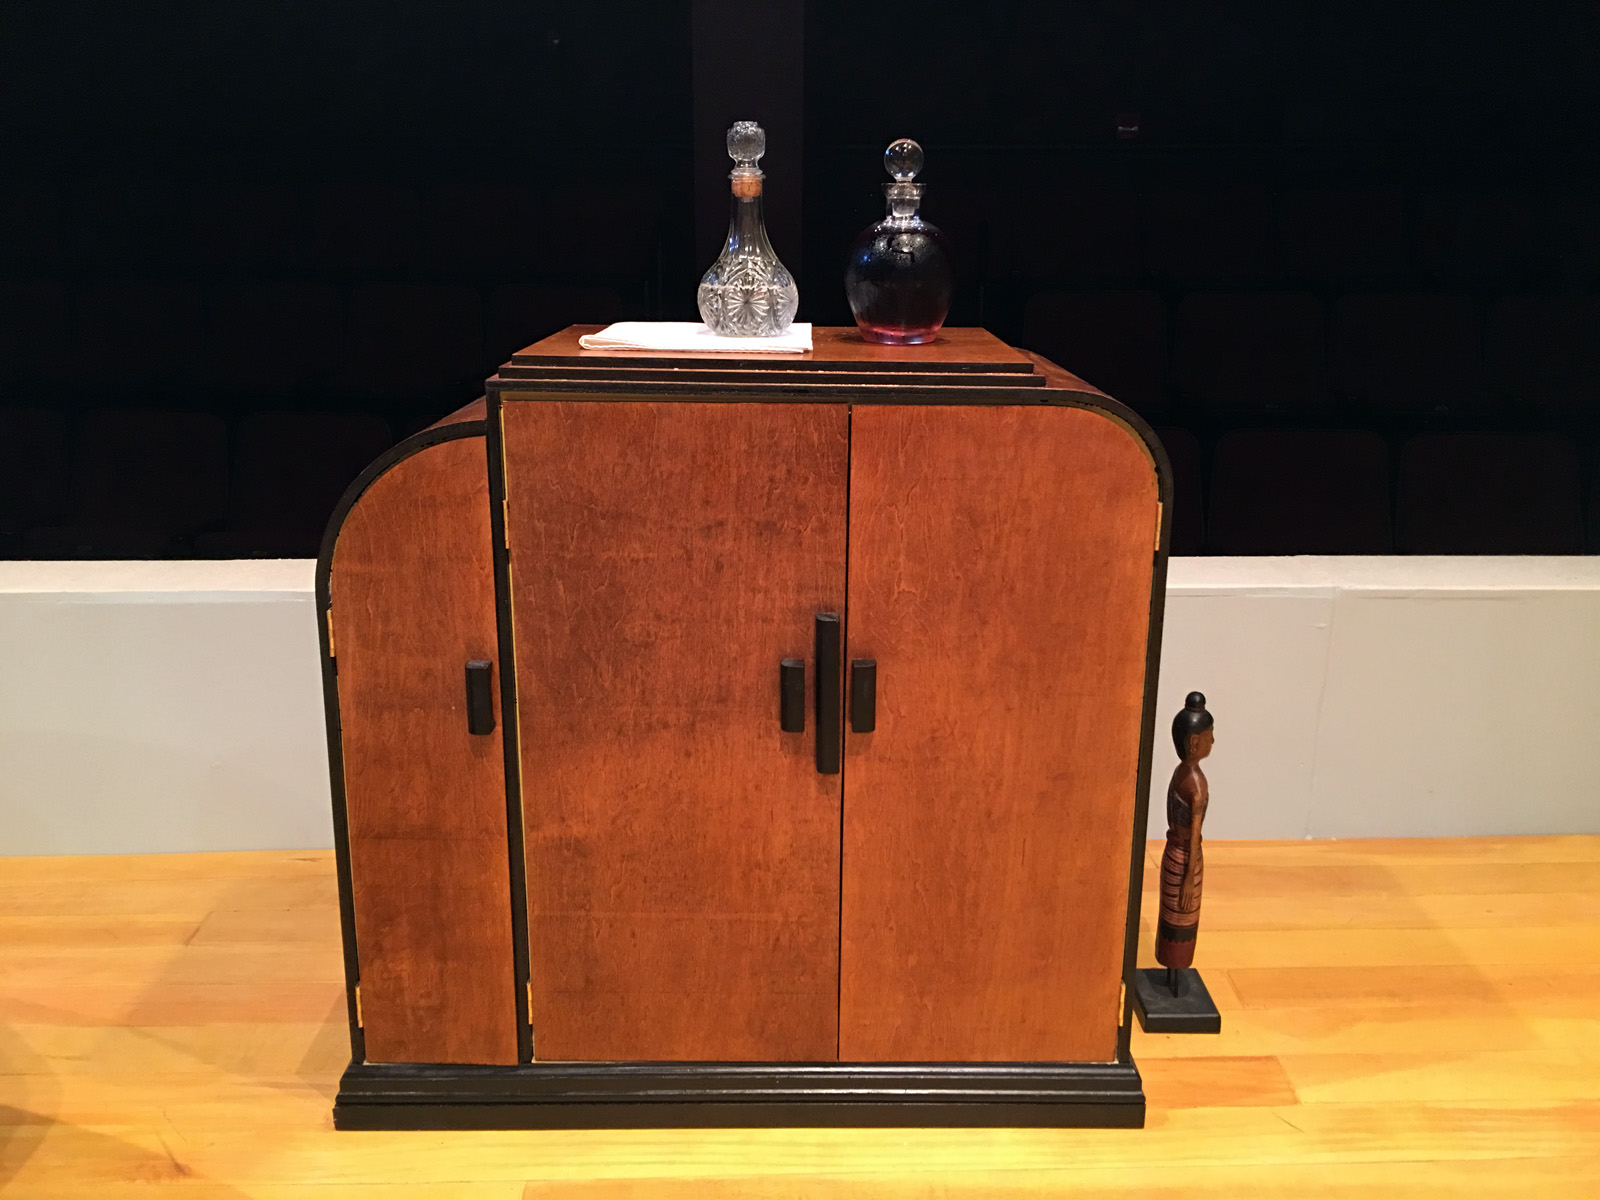
The set for Triad Stage’s And Then There Were None called for a posh, but stark, Art Deco design. One of the key furniture pieces is a liquor cabinet, since each of the ten characters has at least three drinks through the course of the play.
I had no luck sourcing an Art Deco liquor cabinet in this part of the country, so I decided to build it. Having a very distinctly Deco piece on stage would help the other less-distinctly Deco pieces feel at home in the period. Robin Vest (the scenic designer), and I passed around some research images and landed on a piece that had all the right elements but was still achievable with my equipment and time.
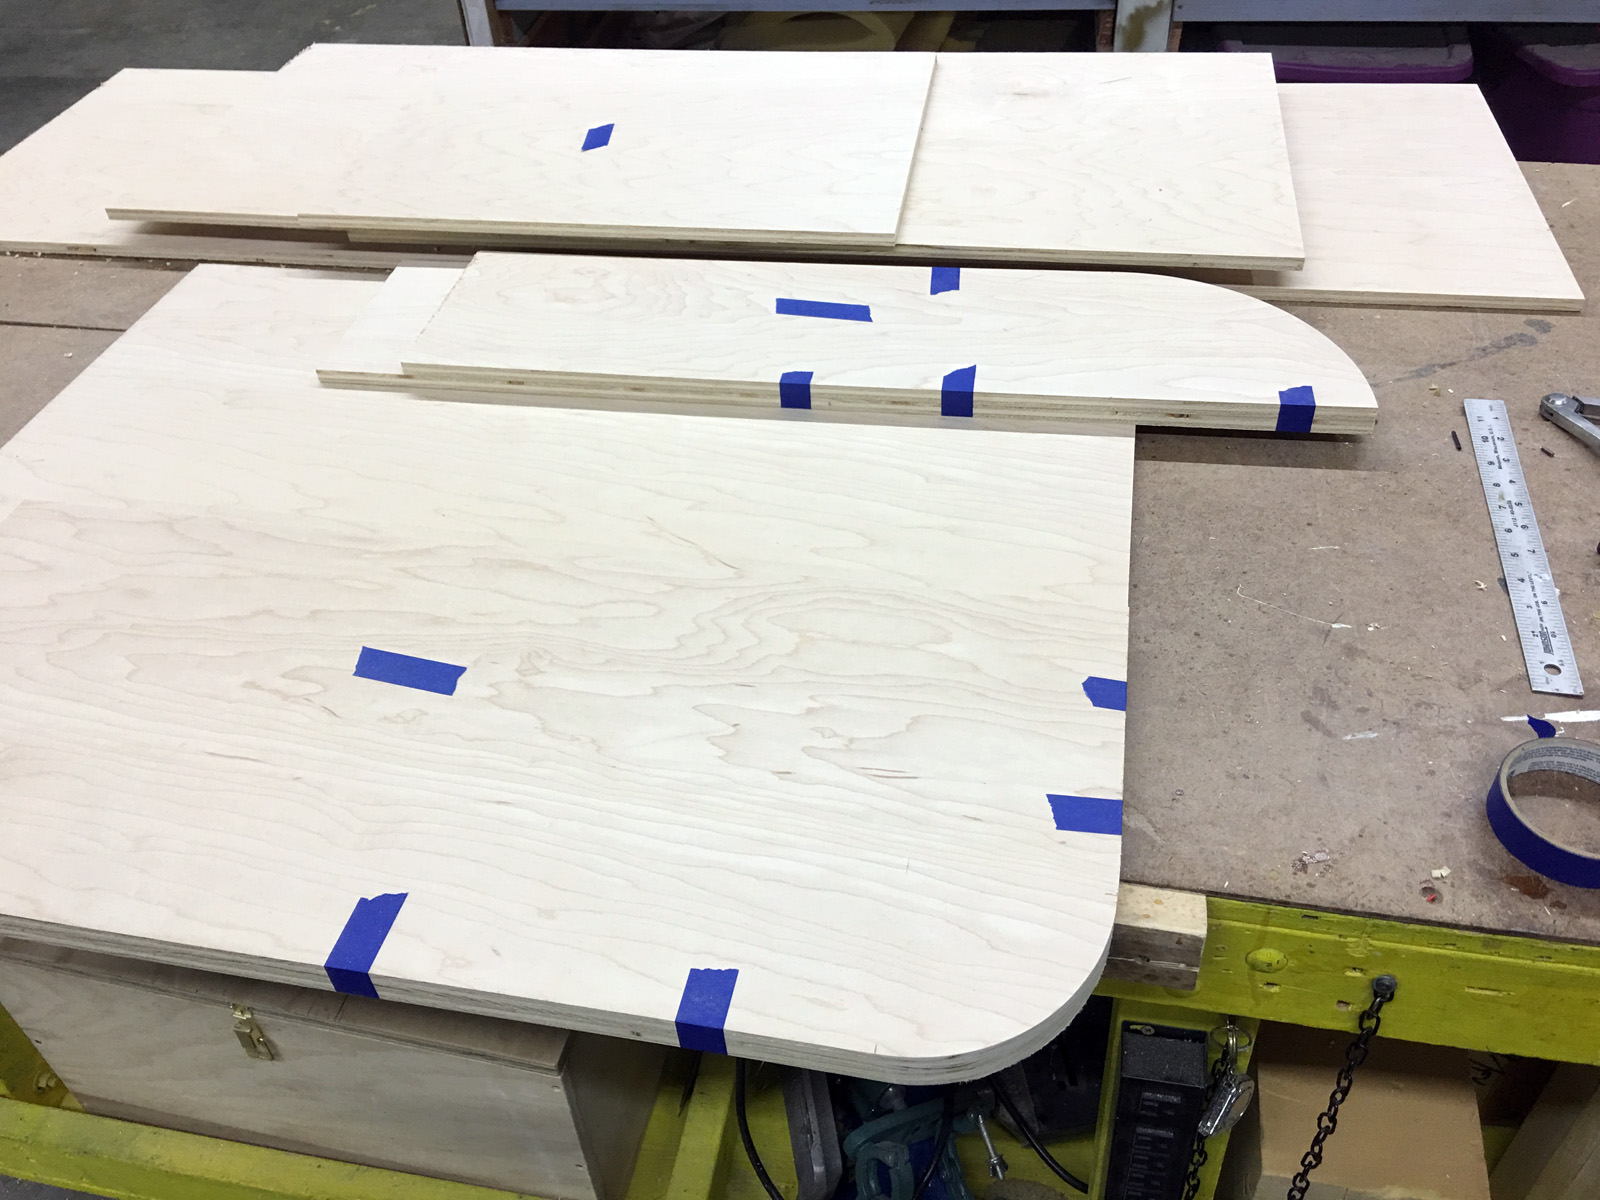
Making the cuts
One defining element for this style of furniture is the bold, sweeping curves. These were traditionally made by bending thin sheets of wood and laminating them together to create a curved piece of plywood, then adding a highly-figured veneer on top. That was beyond my budget, but I had previously bent plywood by cutting kerfs, and thought I could do it again. The design of the cabinet was specifically chosen to easily hide the kerf cuts.
I chose some nice maple plywood from the big box store. The back of the cabinet and the doors would establish the curves, so I taped them together when gang-cutting them on the band saw.
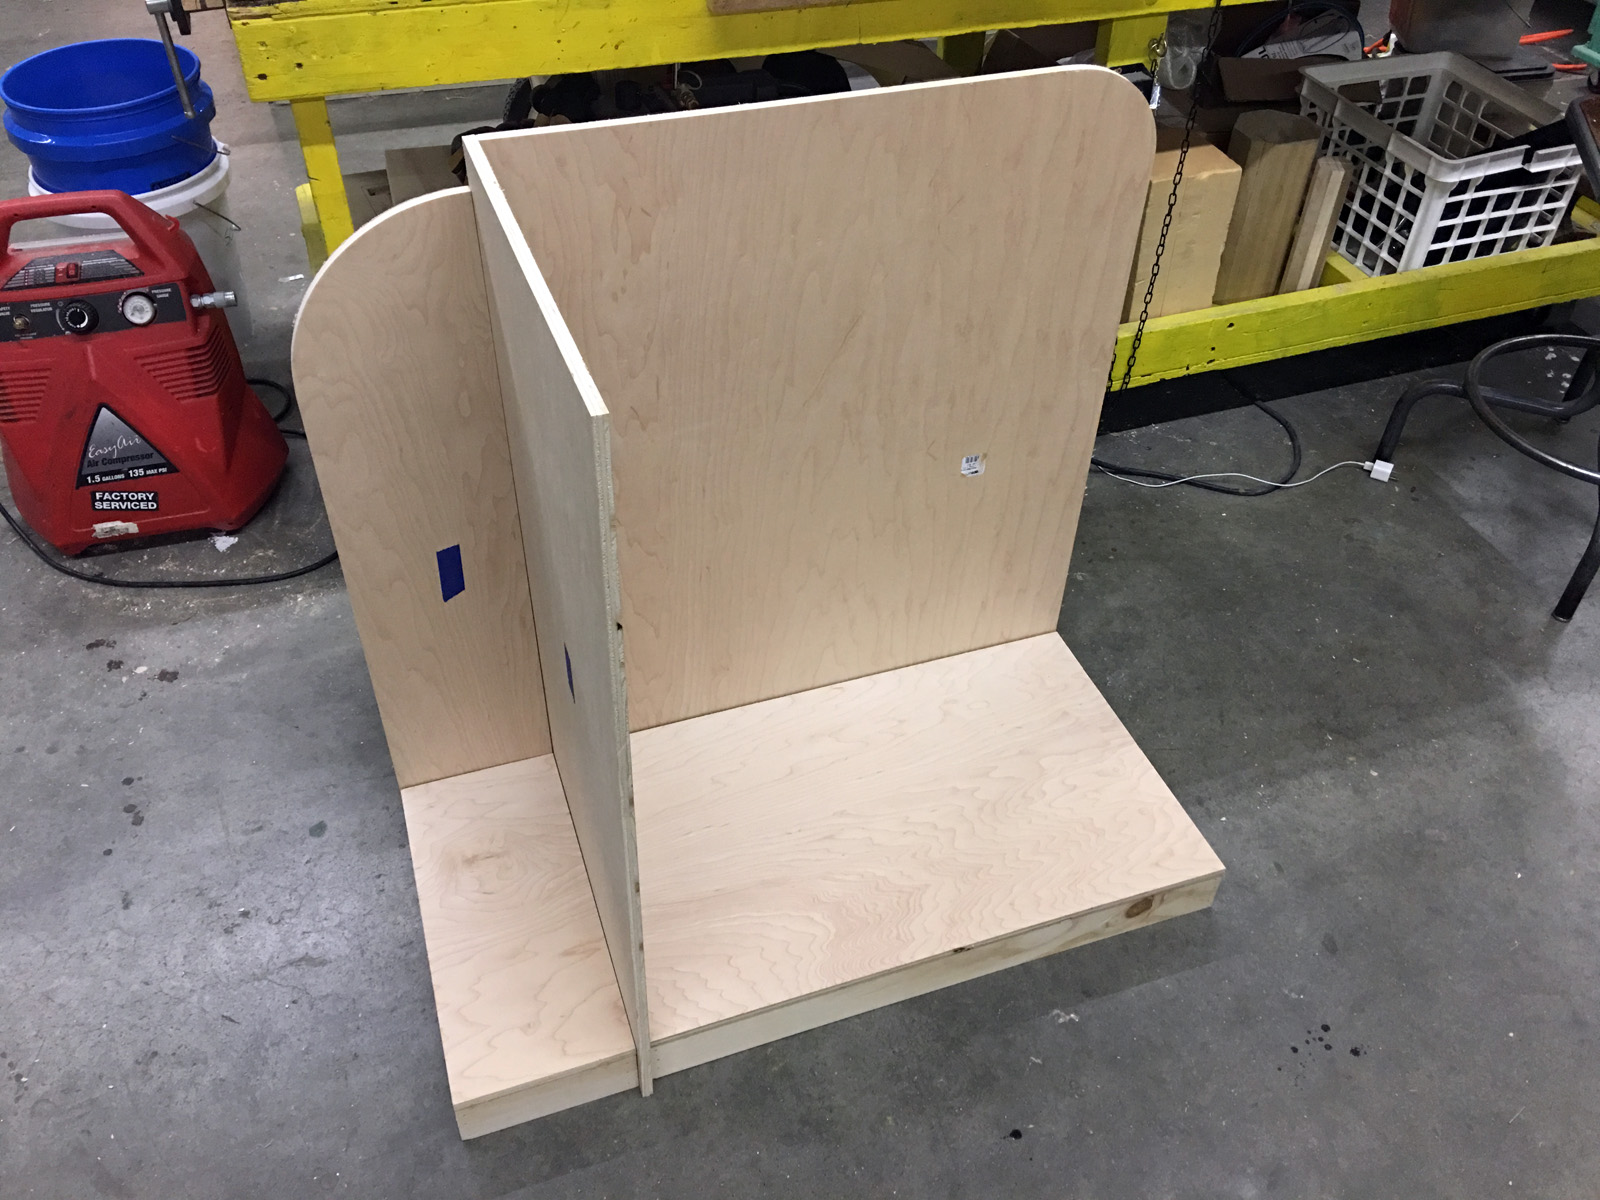
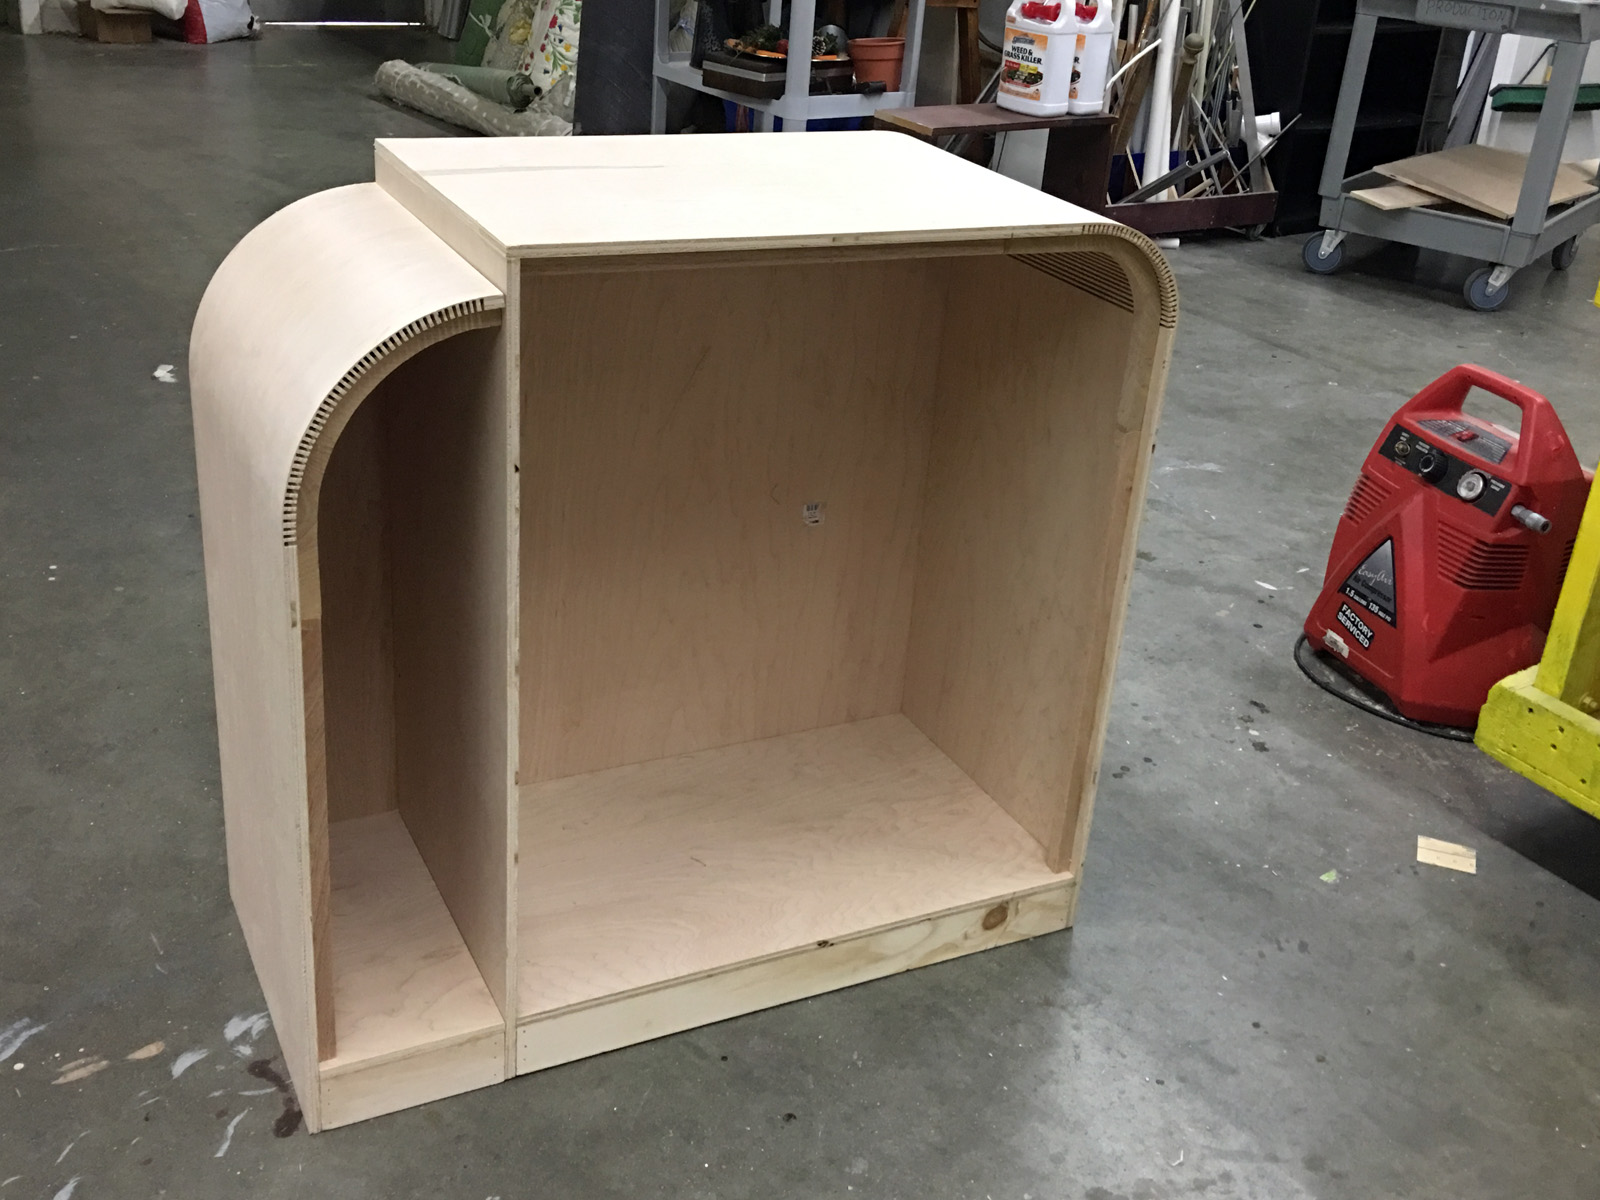
Assembling the carcass
When all the flat, fixed pieces were cut, I assembled it together without glue to make sure everything was measured correctly. The cabinet was basically two parts with a door on each side.
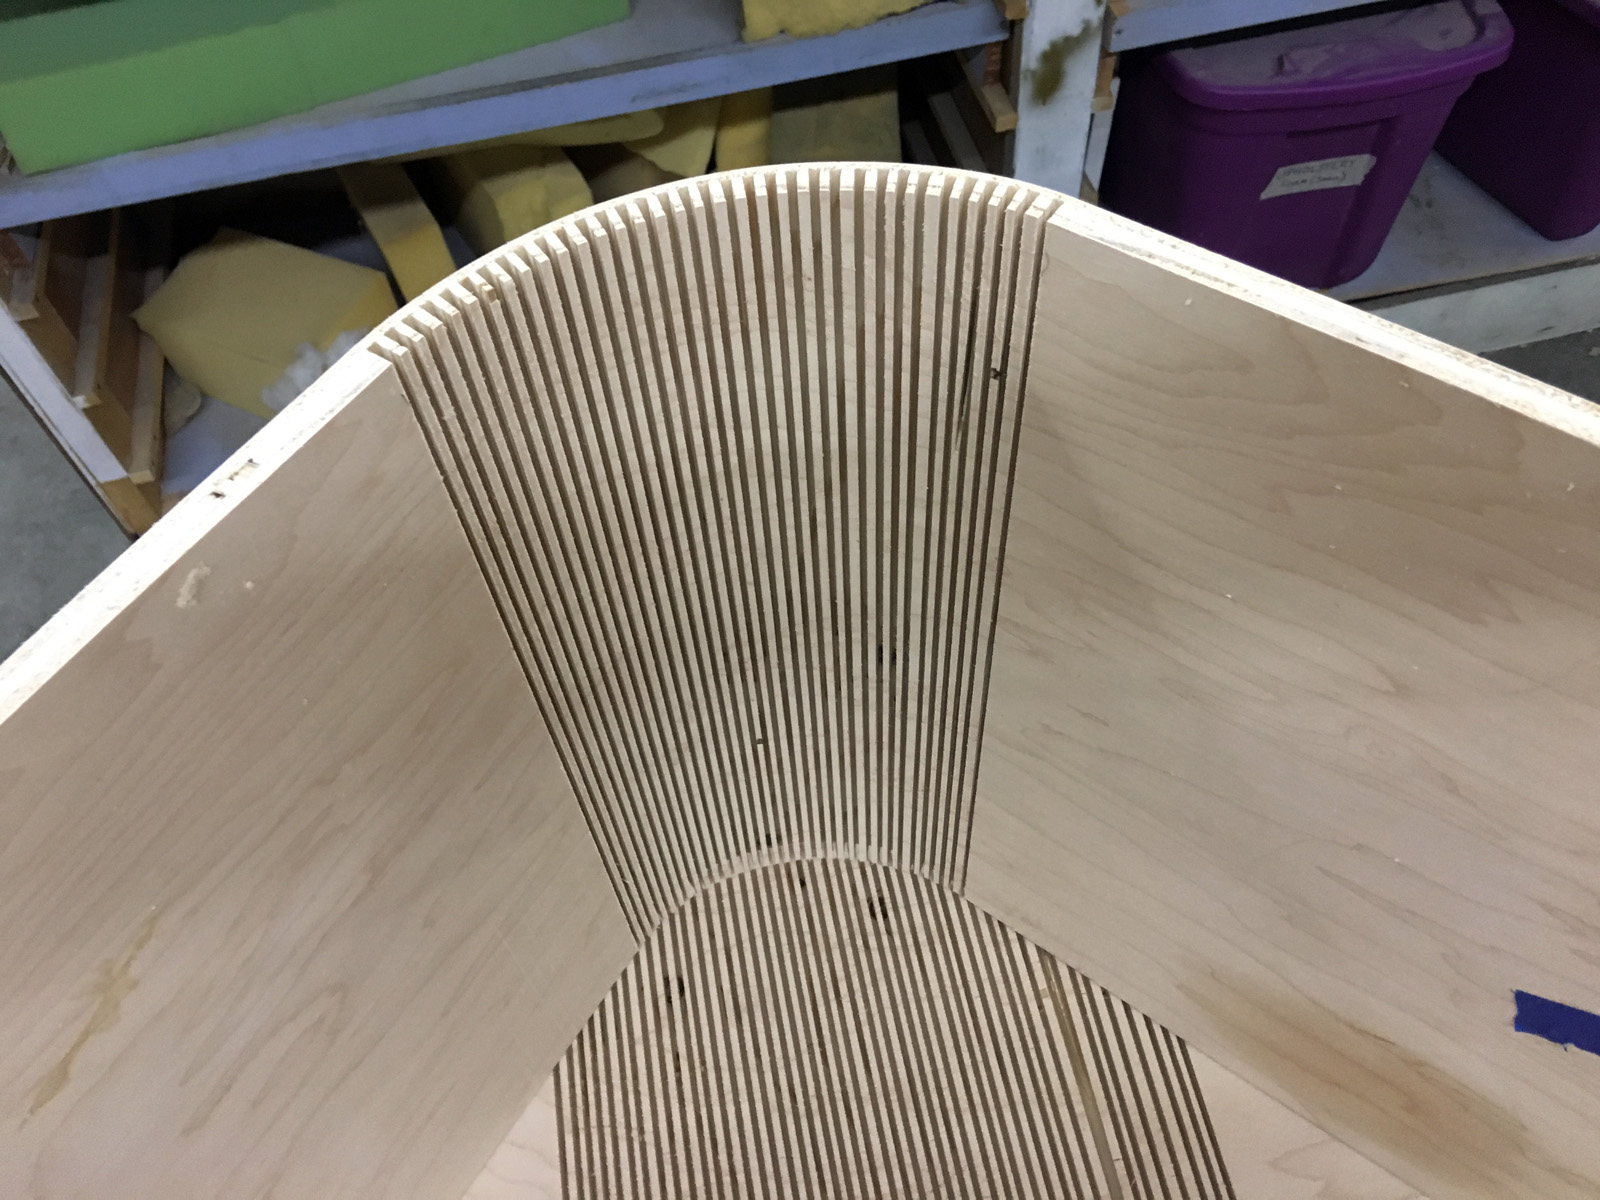
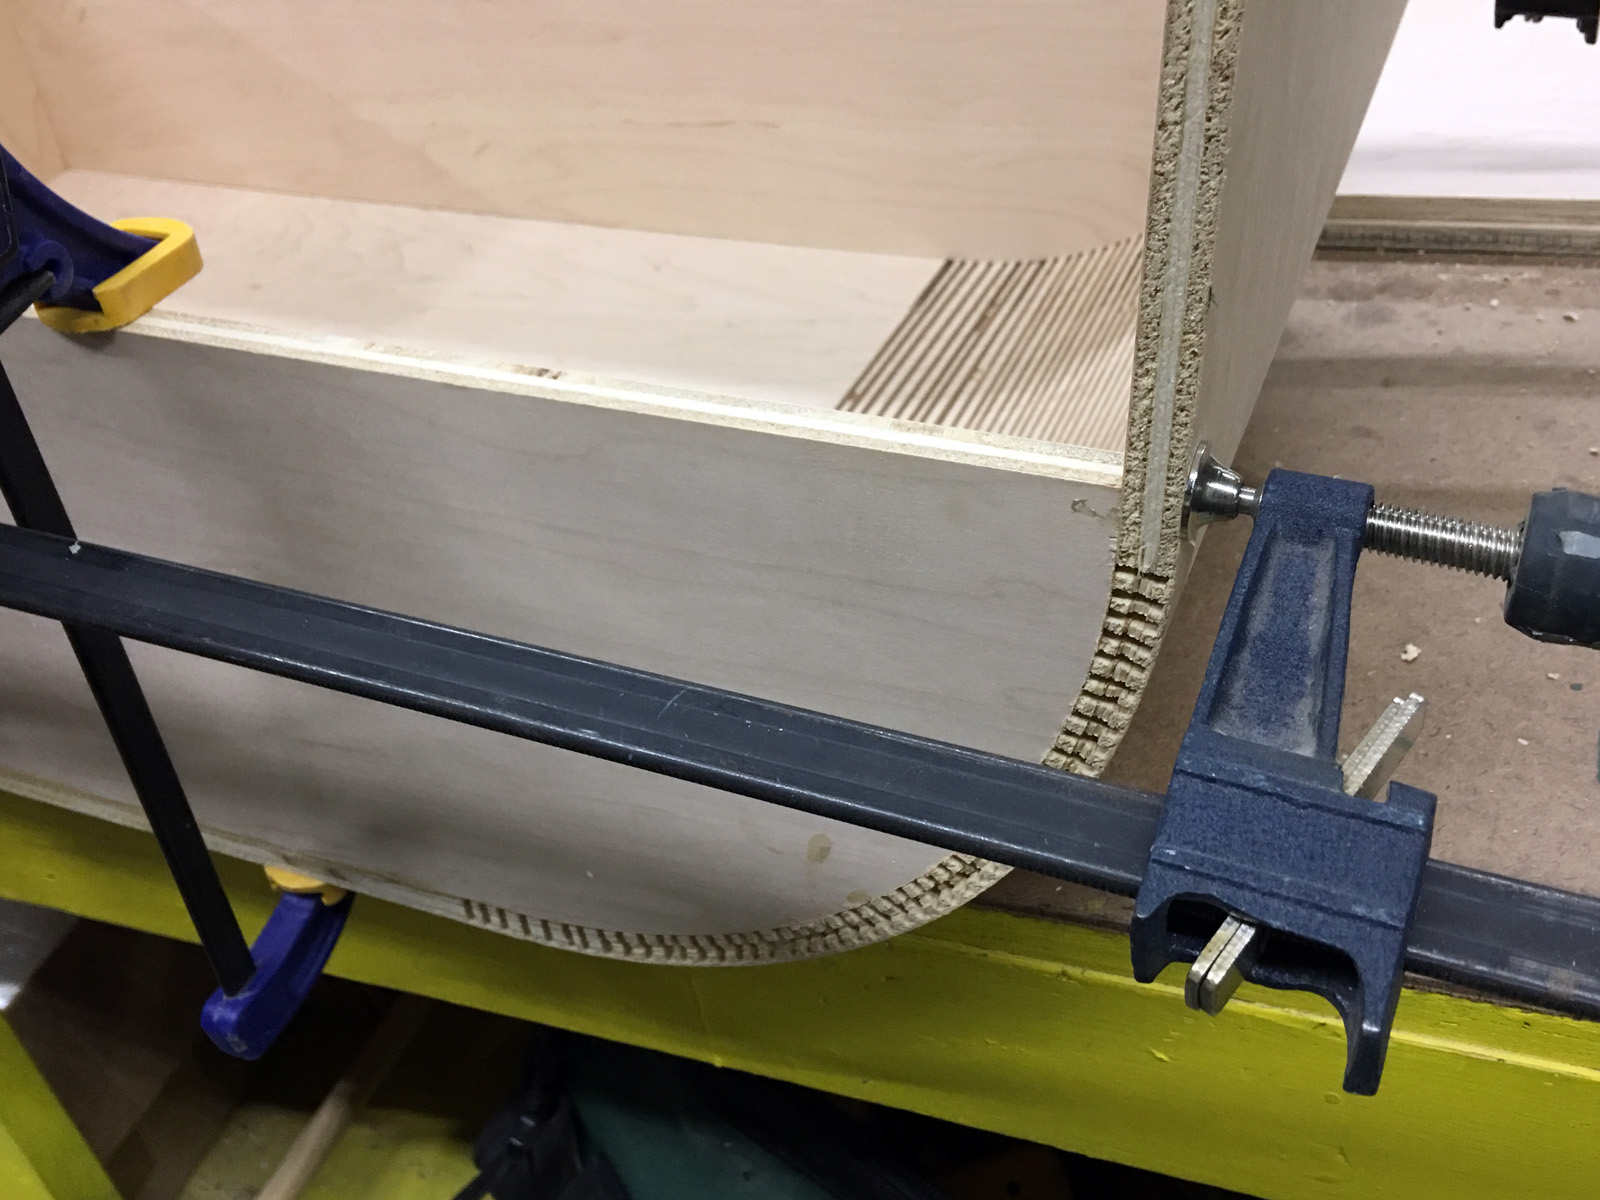
Cutting the kerfs
To cut the kerfs, I first measured where the curve would begin and where, roughly, it would end. I left the piece a bit long, intending to trim it to the exact size once the kerfs were all cut. You can never calculate exactly how long a piece should be when you add a curve to it; the material behaves differently than how the math predicts.
I set the blade height on the table saw so it would cut through all but the last layer of ply on my plywood. I used a sled to cross cut the groove through the length of the wood. I had a marking on the table saw so that after each cut, I could slide the wood down to make the next cut, and each cut would be evenly spaced.
I’m sure there is some formula to calculate how far apart each cut should be, but I just used a test piece of wood to make sure I was achieving the curve I needed.
Attaching the curved pieces
When all the kerfs were cut, I was ready to attach the bent pieces to the frame. They were glued to the back of the cabinet, while the front would be open for the doors. I clamped the doors in place so the plywood was held in the correct shape while the glue dried.
While everything was still clamped, I filled the kerf cuts with a mix of sawdust and wood glue to sort of “lock” it in place. A curved piece of wood like this can move if it is not fully supported.
The cabinet body
The curved pieces were a bit springy without any front supports, so I added an oak frame. It was inset so the doors would still be flush with the front when mounted; it also helped serve as a door jamb to prevent the doors from swinging inside.
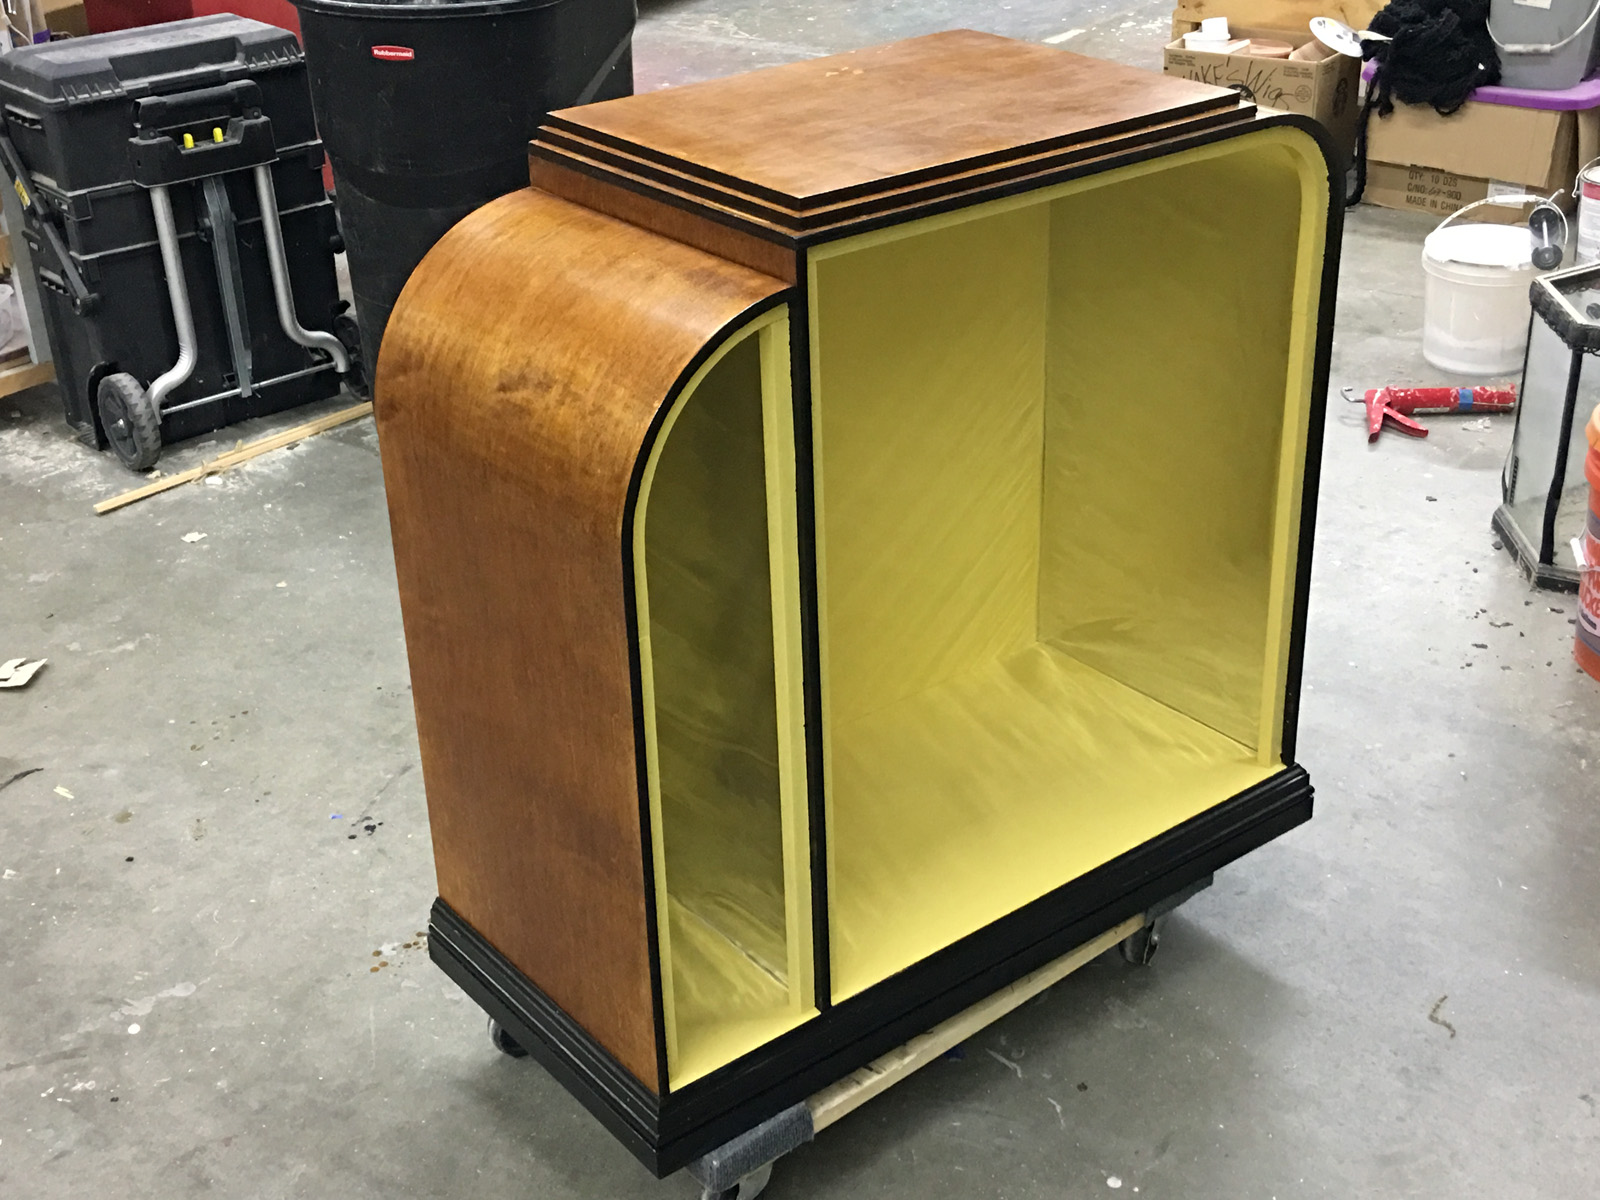
Stained and shellacked
I stained the outside of the cabinet with one coat of English Chestnut stain. All the plywood edges were sanded smooth and filled, then painted black. The curved edges needed a lot of filling to close the gaps from the kerfs. Everything then got two coats of amber shellac, sanded down with some #000 steel wool after each coat.
Painted interior
For the sides of the interior, I laid in some thick mirrored mylar I had left over from another project. A lot of liquor cabinets in this style had mirrored interiors. It also allowed me to cover the kerfs on the inside of the curves, which would have taken forever to sand smooth. The remaining interior surfaces were painted with some bright yellow I had gotten for another 1930s-inspired piece.
I also added some molding to the bottom and two more panels to the top to create the stepped design that is another characteristic of this style.
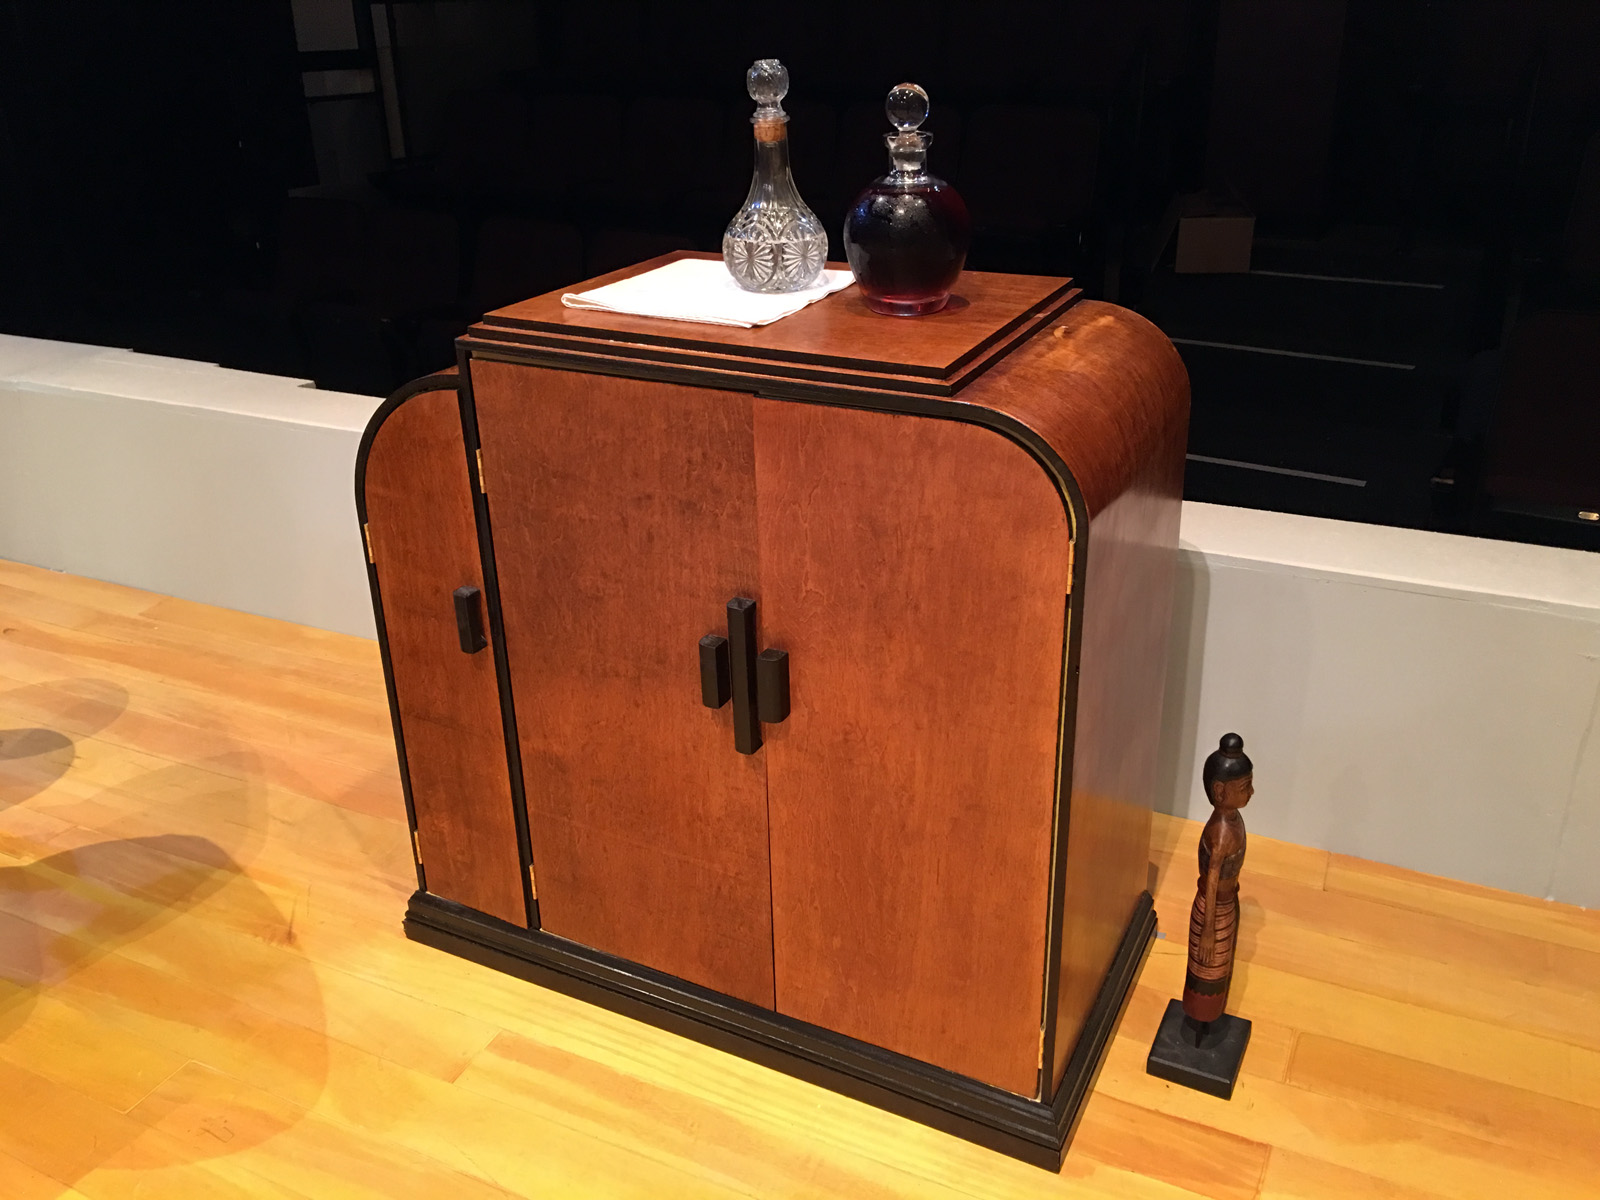
Art Deco Cabinet
After mounting the doors, the final step was adding the handles. I cut and shaped some basic handles out of a piece of two-by-four. I added them after the doors were mounted because they all needed to line up visually with each other, even if the doors were not precisely straight and even.
Cabinet front view
I was very proud of this piece. Even though its flaws and theatrical construction were apparent up close, it looked stunning from only a few feet away.
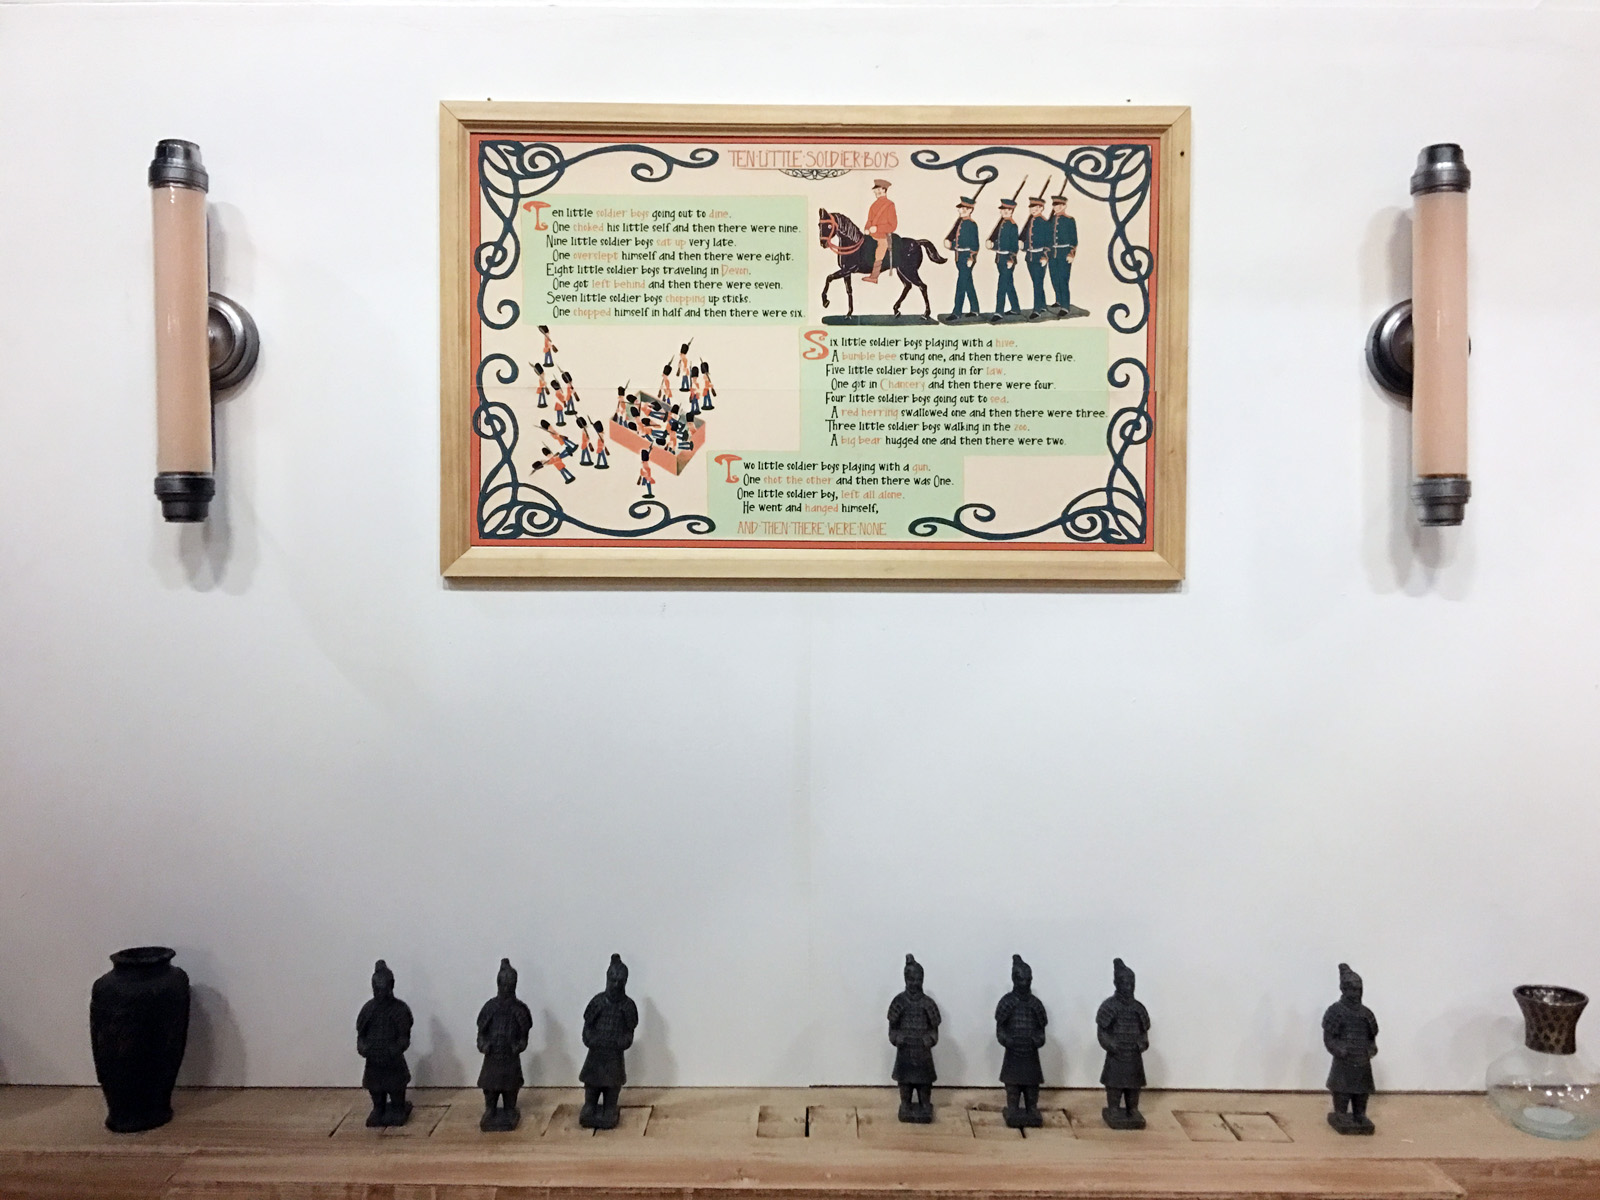
We recently opened “And Then There Were None” at Triad Stage in Greensboro, NC. Agatha Christie’s classic murder mystery takes place in 1930’s England in a sleek, unique seaside home. Robin Vest’s scenic design gave us a sparse, Art Deco-inspired interior populated with a few trappings of a world traveler.
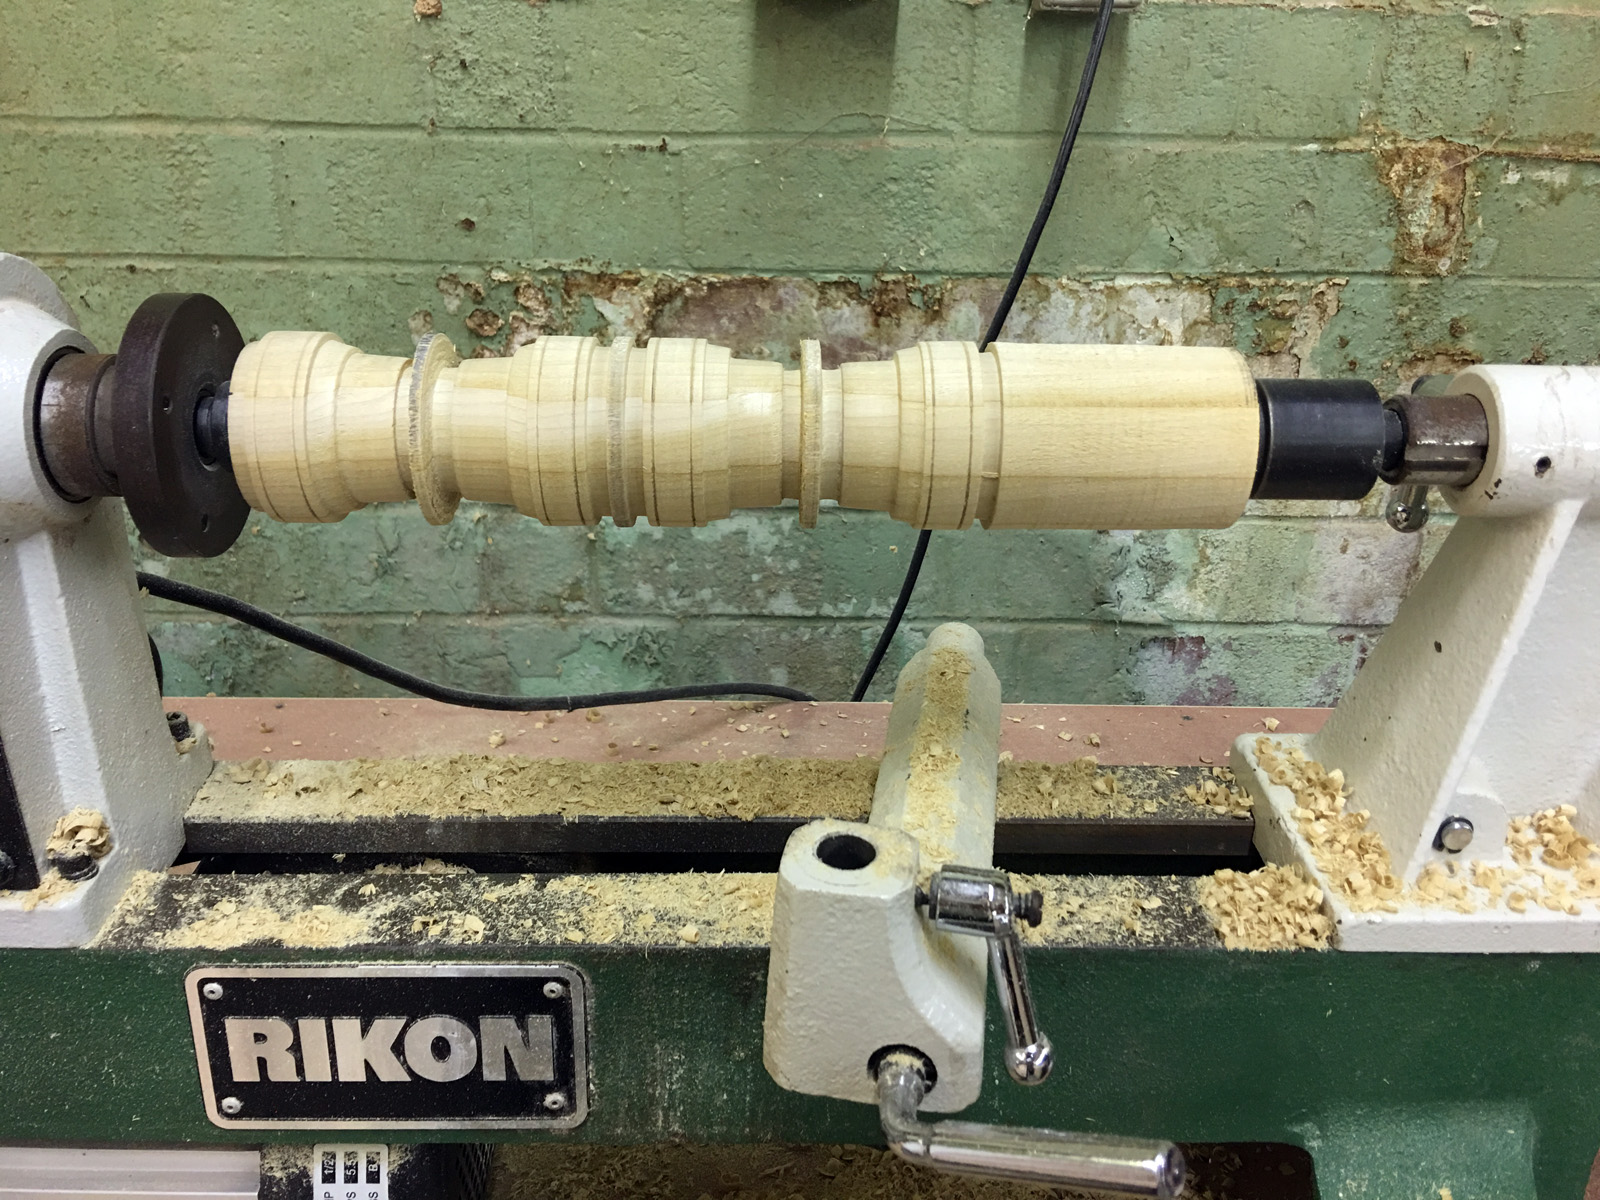
Flanking the fireplace were two tube sconces. Finding an appropriate vintage pair was proving to be too expensive, so I decided to make them.
Turning the End Caps
I turned the top and bottom caps out of poplar on my lathe. I think this was the first project I personally used the shop’s lathe for, even though I purchased it last year.
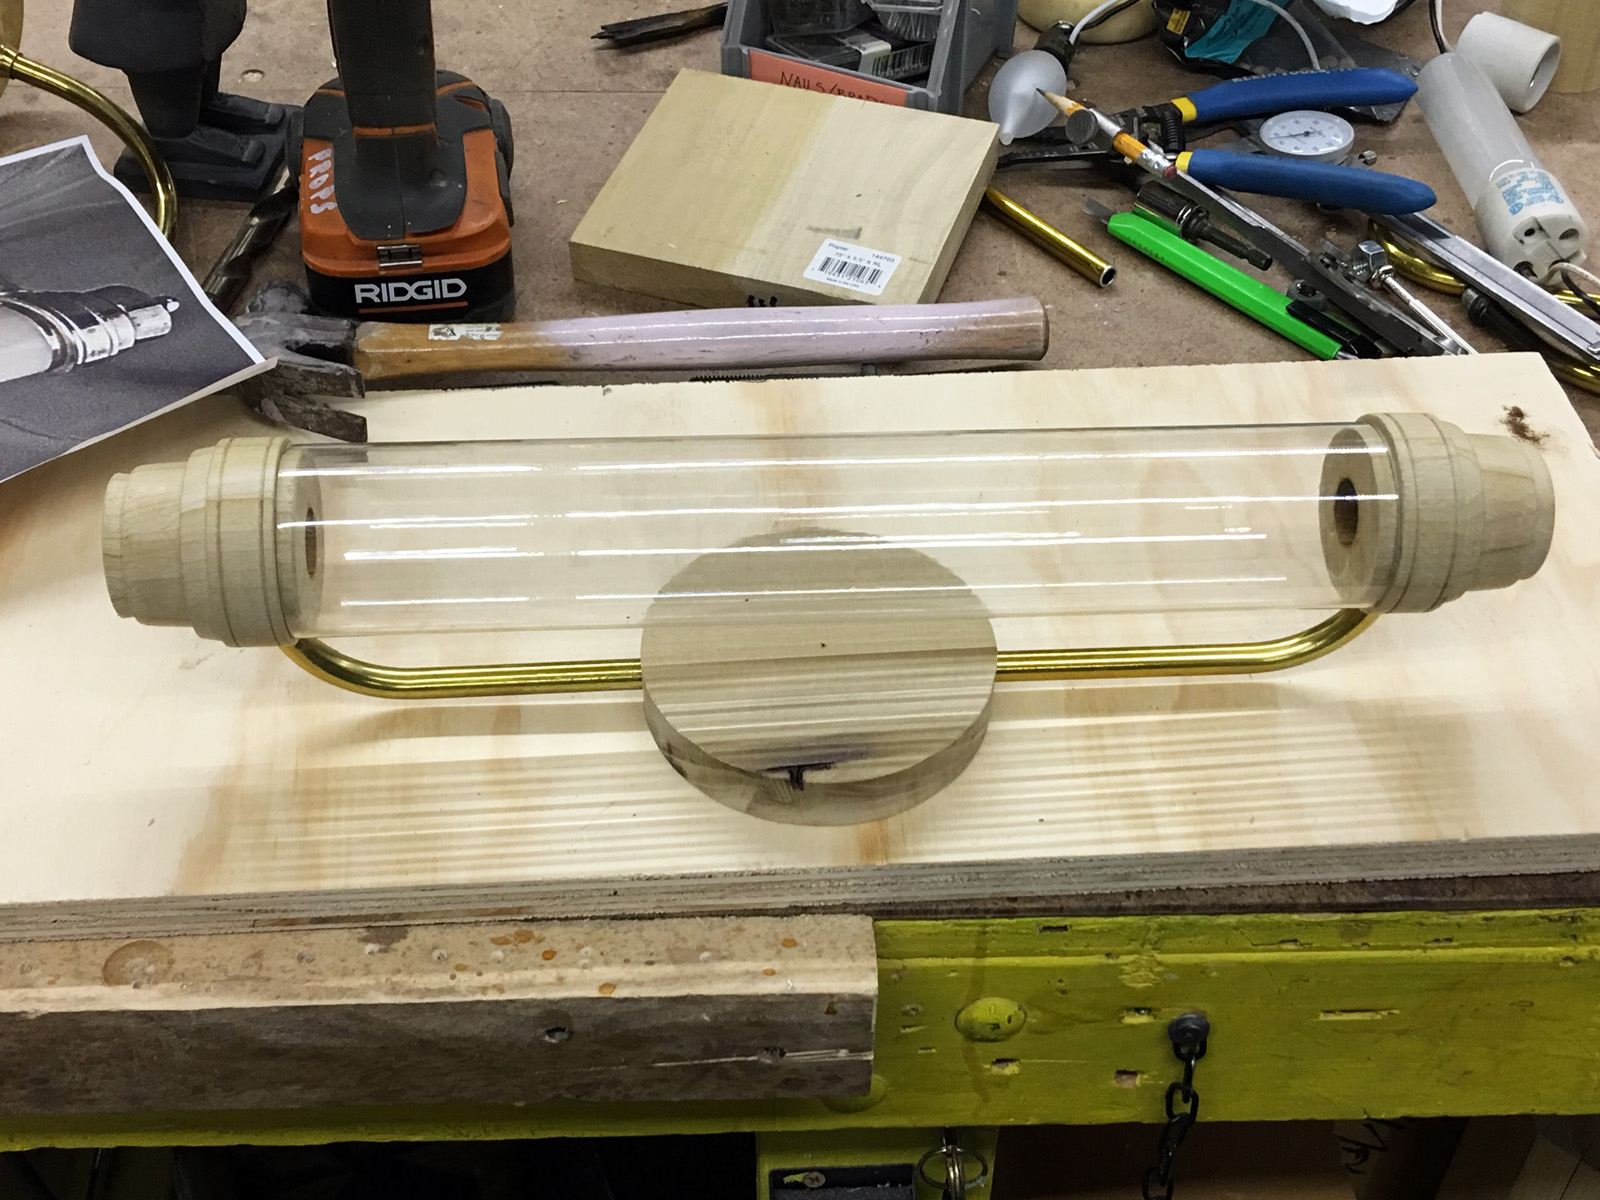
I bought some plastic mailing tubes for the lamp shades. Glass tubes were pricey and difficult to find in the right size. I measured their inner and outer diameter and turned the end caps so the tubes would slide onto them snugly.
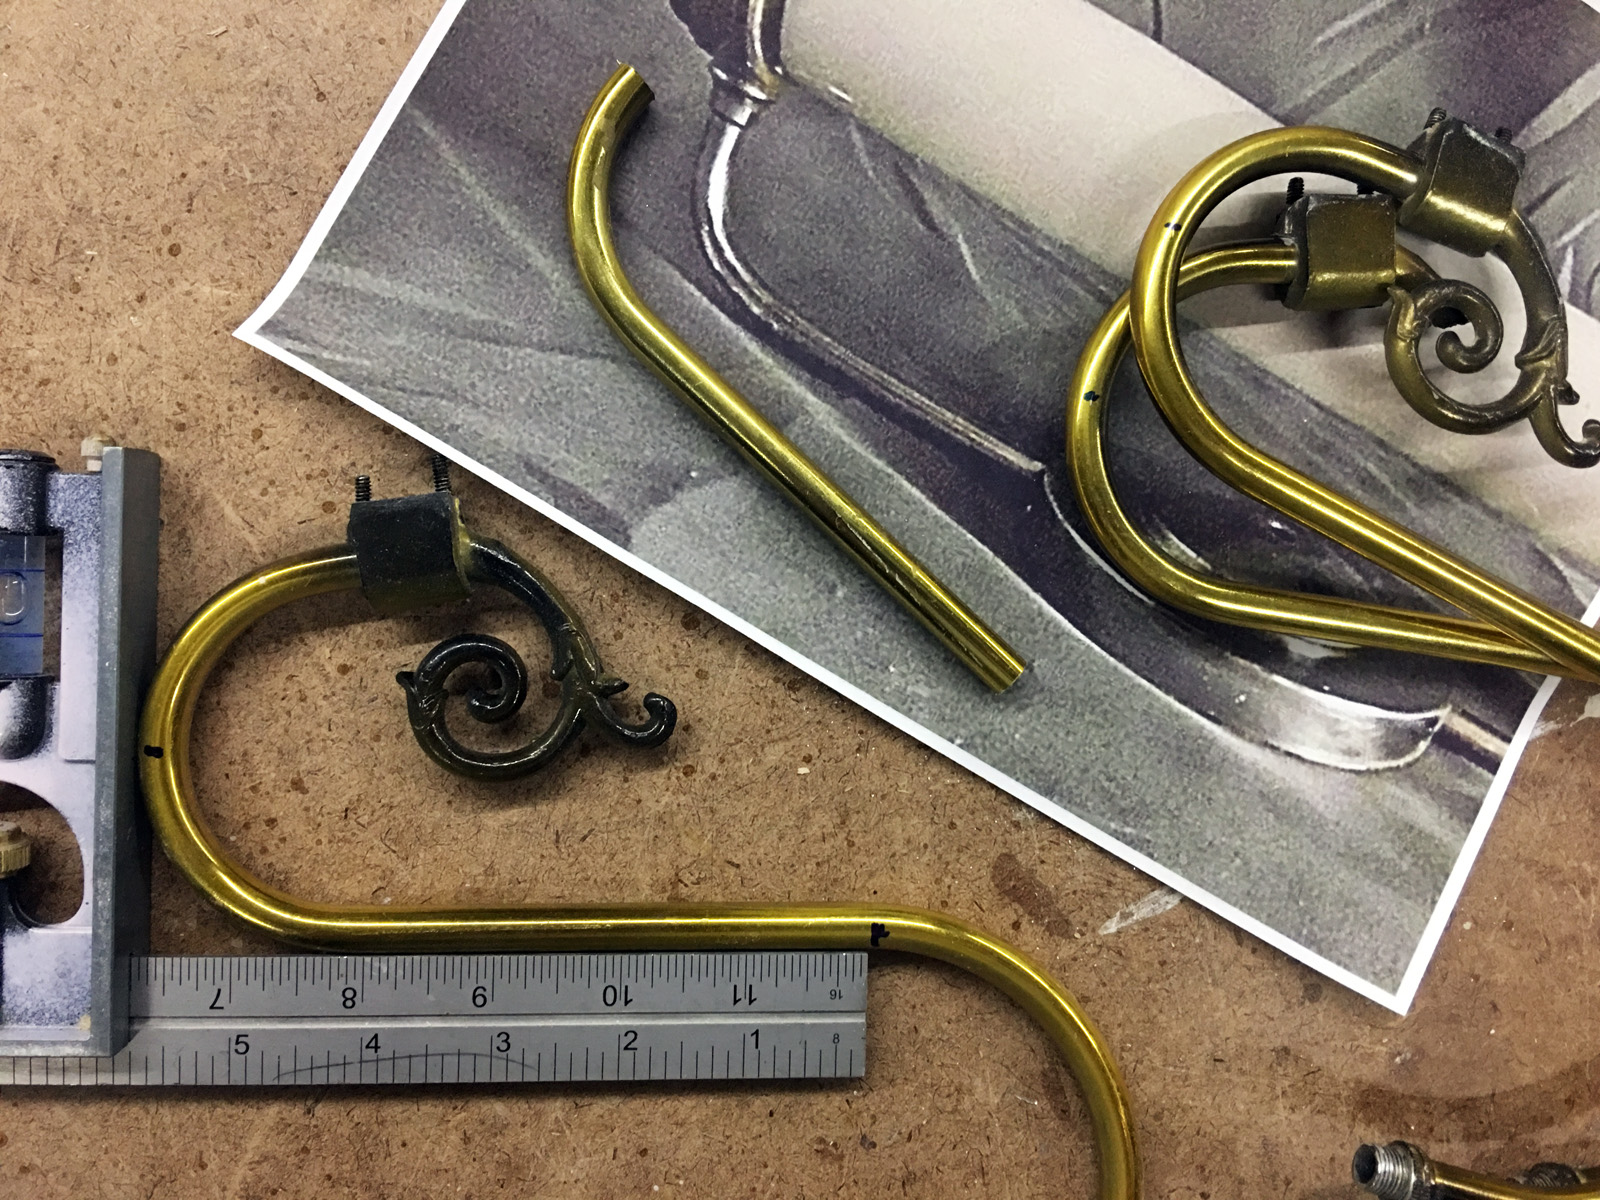
Cutting lamp parts for the arms
I needed some curved metal arms to hold the end caps, and they needed to be hollow so I could feed the wires through. I had some spare chandelier arms in my bin of lamp parts which I cut to size. It was a lot easier than attempting to bend a metal tube without kinking it.
Unpainted assembly
Above is all the pieces mostly assembled. I drilled holes in the end caps to feed the metal arms in, and used epoxy clay to secure them. I cut a disc out of poplar for the wall plate and drilled two more holes to hold the metal arms. The bottom arm was epoxied in place, but the top arm was only bolted to the plate. I wanted to be able to disassemble the sconce in case I needed access to the interior of the tube.
I added a decorative disc of metal to the wall plates that also came from my lamp parts bin, which you can see in subsequent photos.
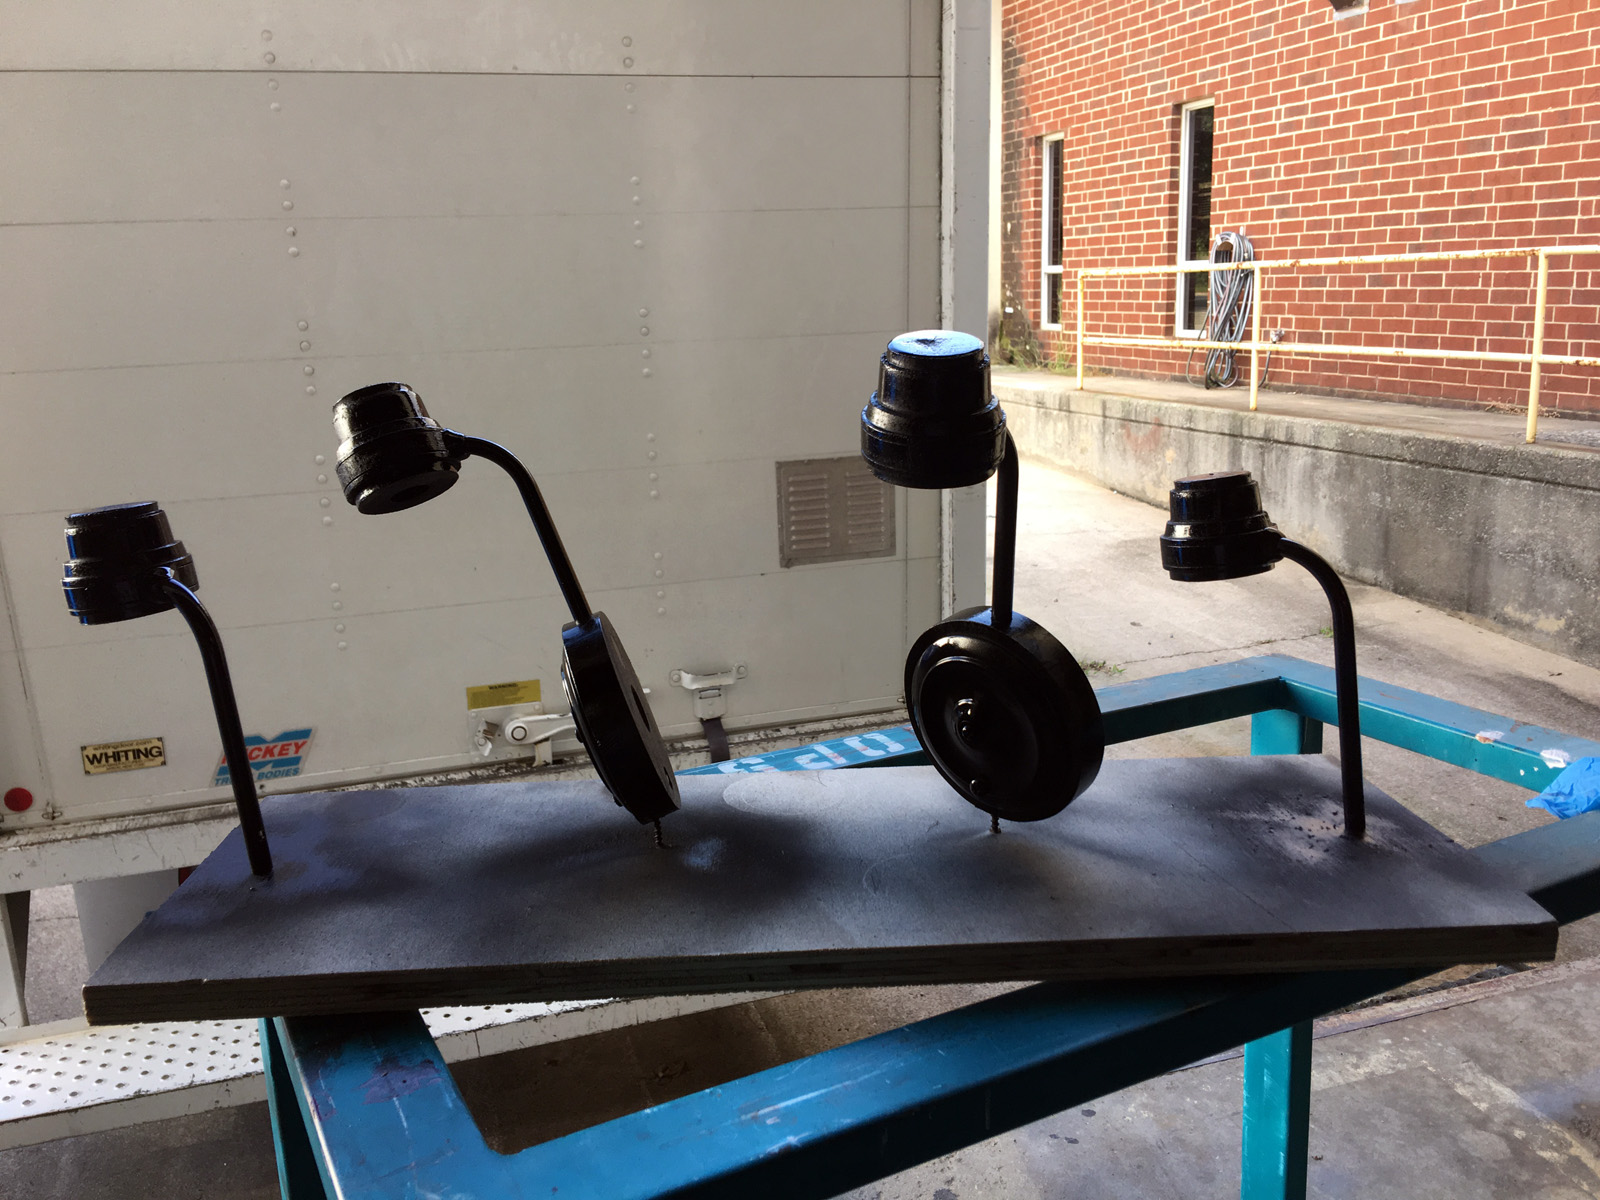
Base coat
With all the pieces fitting together as they should, and sanded smooth, I took them apart and painted them. I used a variety of spray cans. First was a sandable primer, followed by two coats of gloss black, than two very light coats of chrome, finished off with an extremely light dusting of the gloss black again. I only waited about half an hour between coats, so the whole process was finished in a morning. If you wait too long between coats, the paint may develop that dreaded “orange peel” appearance.
Adding the LED tape
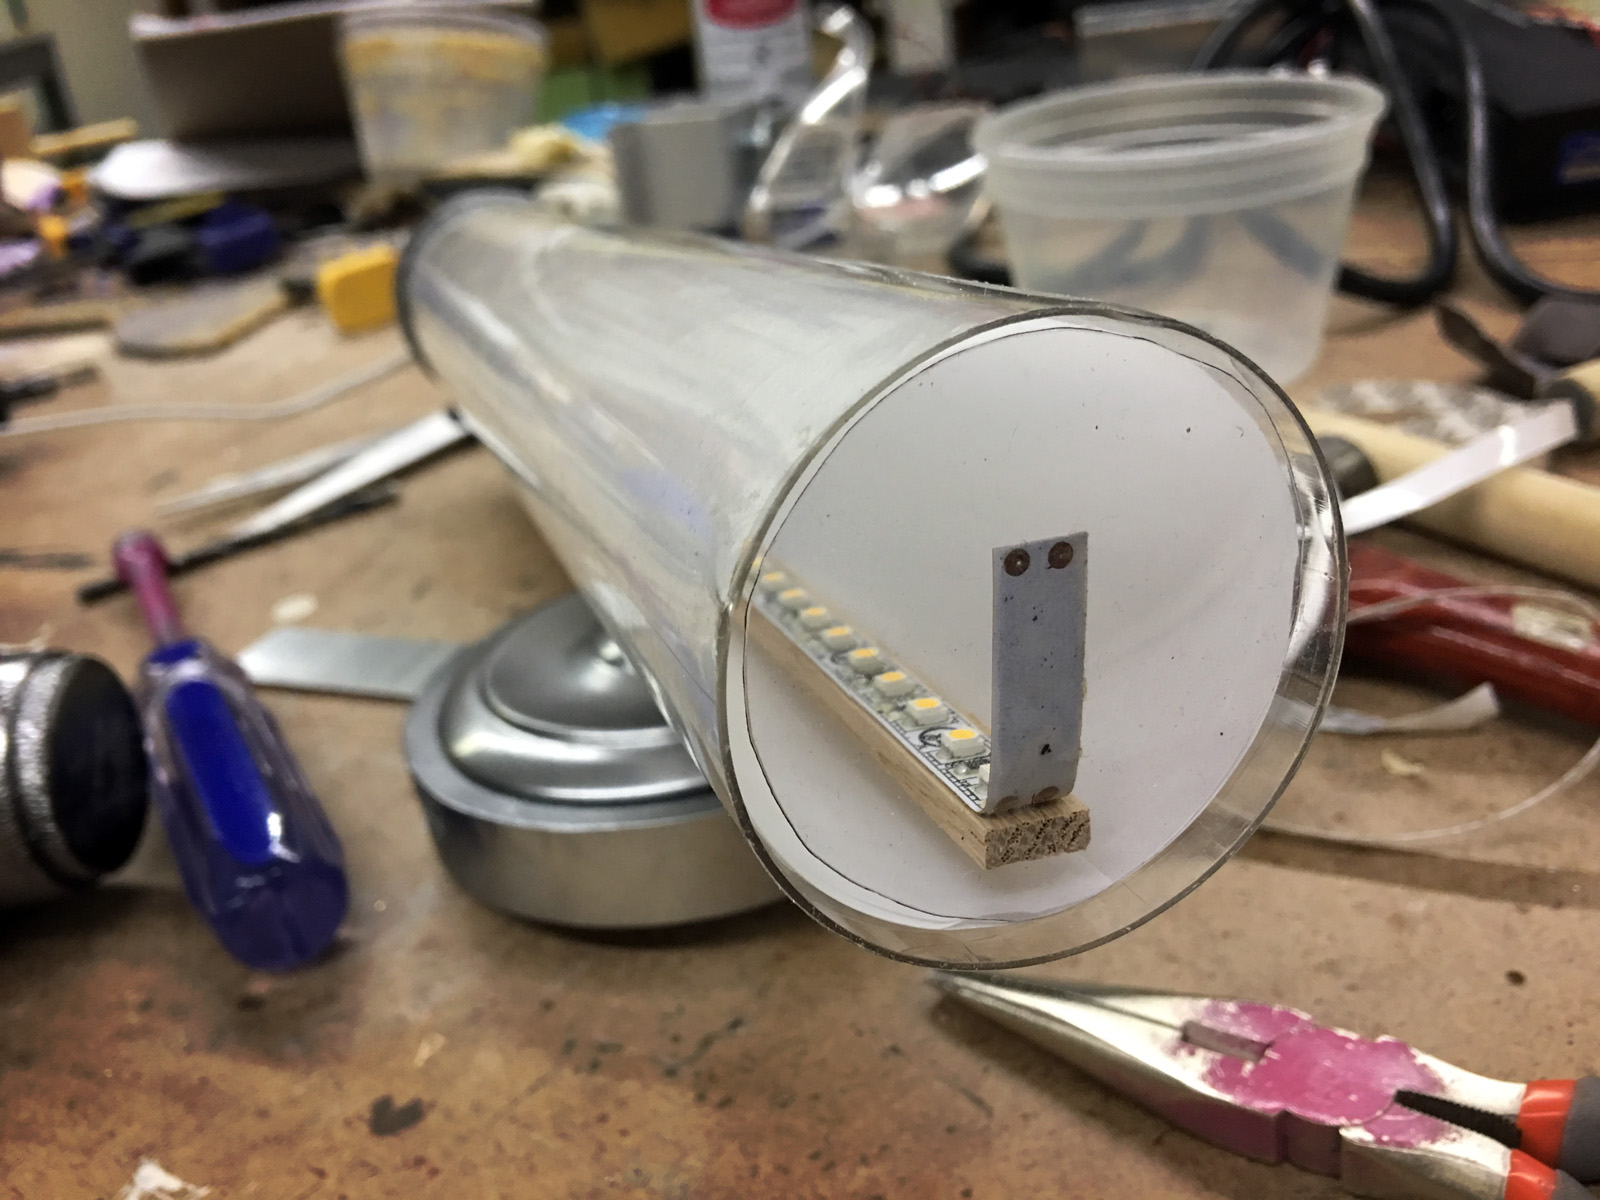
Because the tubes were plastic, I could not use any incandescent or halogen bulbs. The heat would build up and melt everything. I bought some warm white LED tape and mounted it to a small stick of wood to hold it straight against the back of the tube. The wires ran through the arms and out the back to a transformer and DMX controller, where it could hook up to the theater’s light board.
I cut a piece of thick vellum to line the inside of the tube and provide some diffusion.
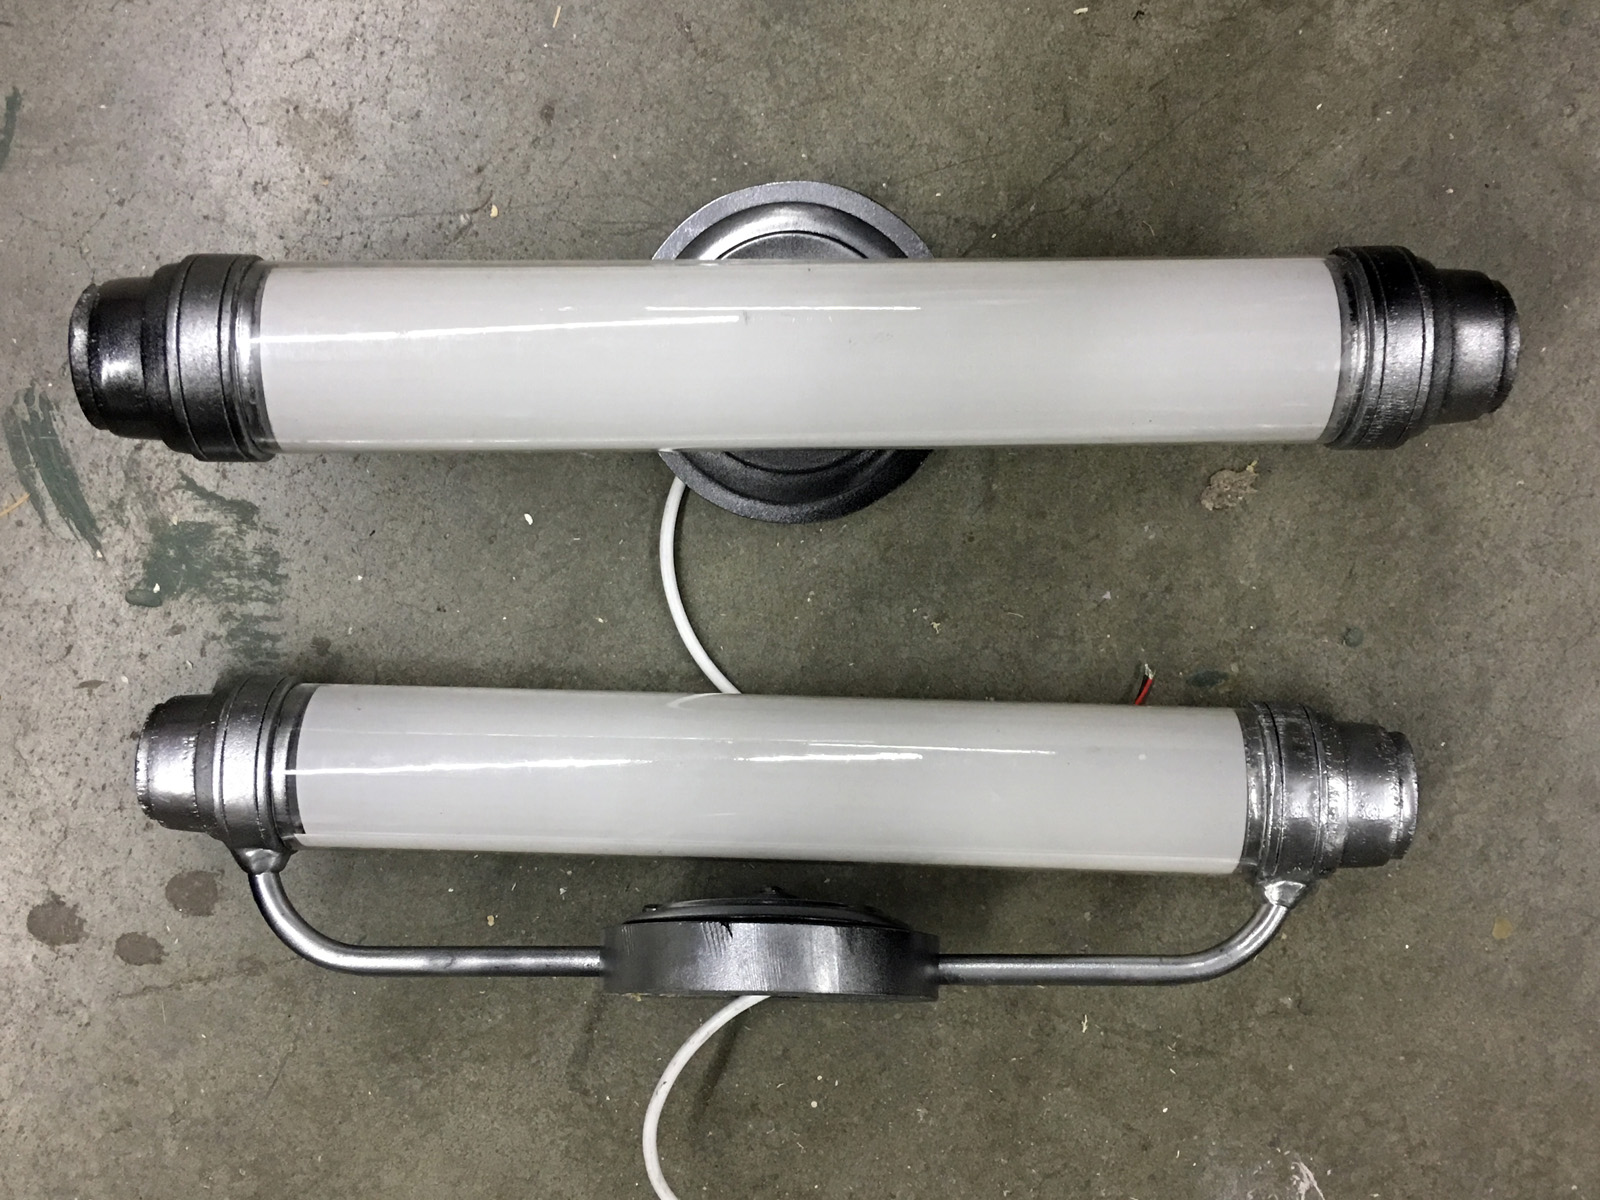
Finished sconces
Here they are, fully assembled and ready to go. Even though these LEDs were the warmest white I could find, they were much cooler than every other practical light fixture on stage when we got in the space. I opened the tubes and added a piece of orange gel from my lighting designer to warm them up.
Sconces on stage
Here they are on stage. While they are very similar to modern tube sconces, they have just enough subtle period detail to help create the world on stage.
It’s the middle of a hurricane here in North Carolina, as well as Opening Night for my first show of the season, but I still found some great stories and videos on props that you can check out:
Broadway’s Biggest Debut: King Kong – Ugh, this puppet is so amazing. It is controlled by 14 puppeteers and it contains a ton of animatronics as well. Be sure to see some of the videos of Kong in motion.
TAIT Take Over – Karla Ramsey – Scenic artists at TAIT Towers create the proscenium arch for the Elton John concert. It is a combination of foam carving and clay sculpting, with everything molded and cast for the final piece. A few of my friends and colleagues spent the summer up here working on this, and the results are spectacular.
Cosplay Shines At DragonCon – Make Magazine has a great round-up of cosplay photographs from the recent DragonCon in Atlanta, GA. Yes, there is a whole convention just for dragons.
Modeling and 3D-Printing Wonder Woman’s Tiara for Cosplay! -Â Darrell Maloney made this video to show us how he modeled a digital version of Wonder Woman’s tiara from the recent film. He then 3D printed it, and shows us how he finished and painted it as well.
Submit Your Role Call-ers! – American Theatre Magazine has a regular segment where they highlight theatre workers that more people should know about. This December, they will be profiling twenty folks that should be known outside their discipline. You can nominate people you think they should highlight; let’s see some props people up in there!
How Sharp Objects Made Amma’s Creepy Dollhouse – Don’t read this if you haven’t watched the show yet, since it contains major spoilers for the season finale. But the exquisite detail (and six-figure budget) that went into this dollhouse is stunning, and really shows off the craftsmanship that the props team is capable of.
Cinefex Vault #14 – Troy – Remember that movie, Troy? Wolfgang Petersen’s epic tale of Ancient Greece was filled with extremely accurate period detail, so when they needed boats, they built real boats. Marine coordinator Mike Turk’s business has been building ships in London since 1710 and supplying boats for film since 1938.
The Chair Maker: Lawrence Neal – Lawrence Neal is a fifth-generation chair maker. Watch him work his magic in this stunning short video.
When Damage Is Done – American Theatre recently covered the spate of harassment stories which have unfolded in several theaters over the past year. From Long Wharf, to the Guthrie, to the Alley, these otherwise-renowned institutions represent just the tip of the iceberg of bullying, harassment, and sexism that has long been brushed off in our industry.
Making and finding props for theatre, film, and hobbies