Chairs for Tea

Back in 2007 when I was working at the Santa Fe Opera, we were mounting a new opera called Tea: A Mirror of Soul. It had a heavy Asian influence, with scenes taking place both in Japan and in China. I was given a drawing of a chair, which they needed nine copies of.
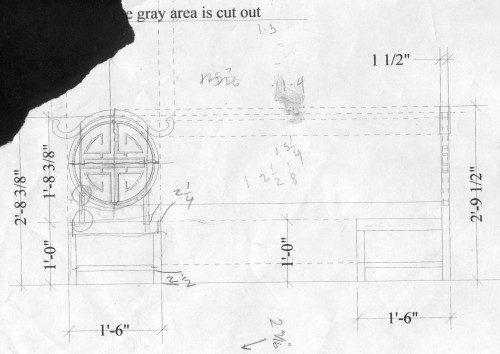
drafting of a prop chair

If you study the drawing, you’d notice a few things. First, it’s rather small. Normally, a chair is eighteen inches off the ground; this is only twelve. Second, the back stiles for the circular back are offset from the back legs (if you don’t know what a stile is, check out my “parts of a chair” diagram).  Wooden chairs usually have a single piece of wood running from top to bottom in the back for strength. Where the back meets the seat is the point where a lot of stress is placed on the chair, so relying on the strength of a joint rather than a solid length of wood is inviting trouble. Finally, you may notice that the back has pieces floating in the air. That’s always an engineering challenge.
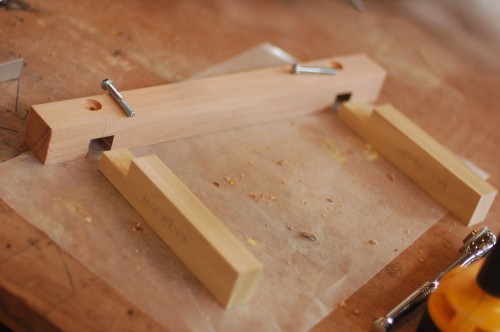
attaching the back stiles

The seat of the chair was two and a quarter inches thick. I decided to skin the top with a piece of quarter-inch plywood and the bottom with eighth-inch lauan, so the interior frame had to be one and seven-eighths inches thick. That gave me a nice big chunk in the back to attach my back stiles to. I also added some bolts through the joint for extra reinforcement.
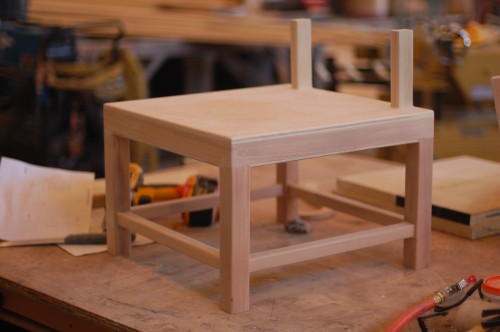
Bottom of the chair
Bottom of the chair

The rest of the joints were glued and doweled.

Next came the fun part: the back. We (the props master, master carpenter, and I) needed to figure out a way to make the back pieces appear to be floating. As I mentioned above, I was making nine of these chairs, so the process had to be repeatable as well. The master carpenter was also making a throne with this same cut-out design in it, so he began developing a jig so we could rout the design out of a solid piece of wood. We had discussed using plexiglass in the middle so the pieces would actually look like they were floating, but that would not be strong enough. Instead, we would hide a steel frame inside and have small pieces of steel connecting the pieces. Between the distance of the audience, the sightlines, and the smallness of the gaps, a few pieces of quarter-inch rod steel painted black would be as close to invisible as we could make it.
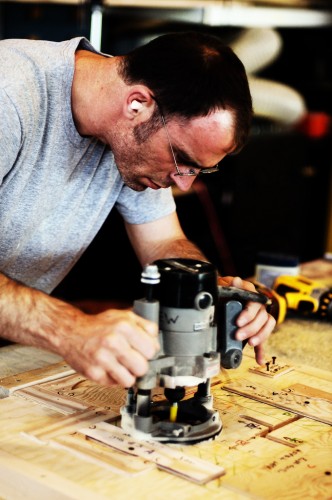
Dave making a routing jig

The photograph above shows David Levine, the master carpenter, working out the jig. Note that he’s not actually cutting yet, which is why his dust mask and goggles are off. It was a complicated, multi-piece jig with several steps involved, but the results were beautiful and consistent.

For the back ring, I sandwiched poplar boards on either side of a piece of quarter-inch plywood, with the grain of each side running perpendicularly to the other. In other words, I made a giant Oreo cookie out of poplar, with a creamy plywood center. The interior back pieces were cut out of a solid piece of poplar,  made by gluing several boards together. I put this in the jig and cut my design out.
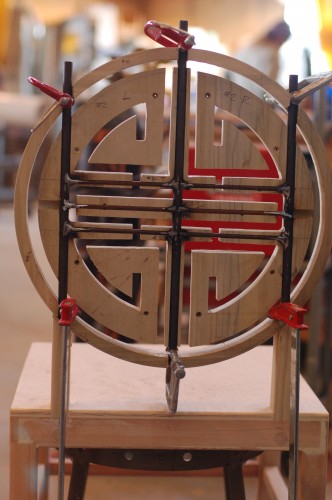
steel reinforcement in the back

Before I had cut out the back pieces, I had routed the channels in where I would hide the steel rod. The channels were as deep as the diameter of the rod, so once they were in, the whole back could get a coat of Bondo and be sanded smooth, and no one would be the wiser. The steel rod continued sown into the stiles and up into the “horn” at the top so the whole back could be tied together with the same steel structure.

I cut the top horn piece out of a solid chunk of poplar, which I made by laminating two boards with their grains running in different directions.
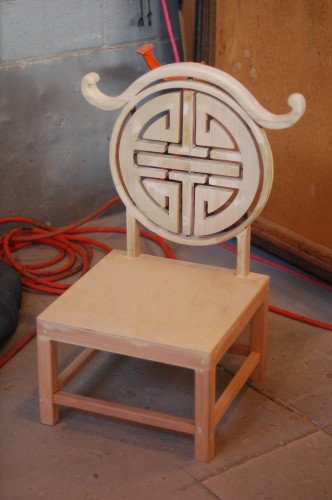
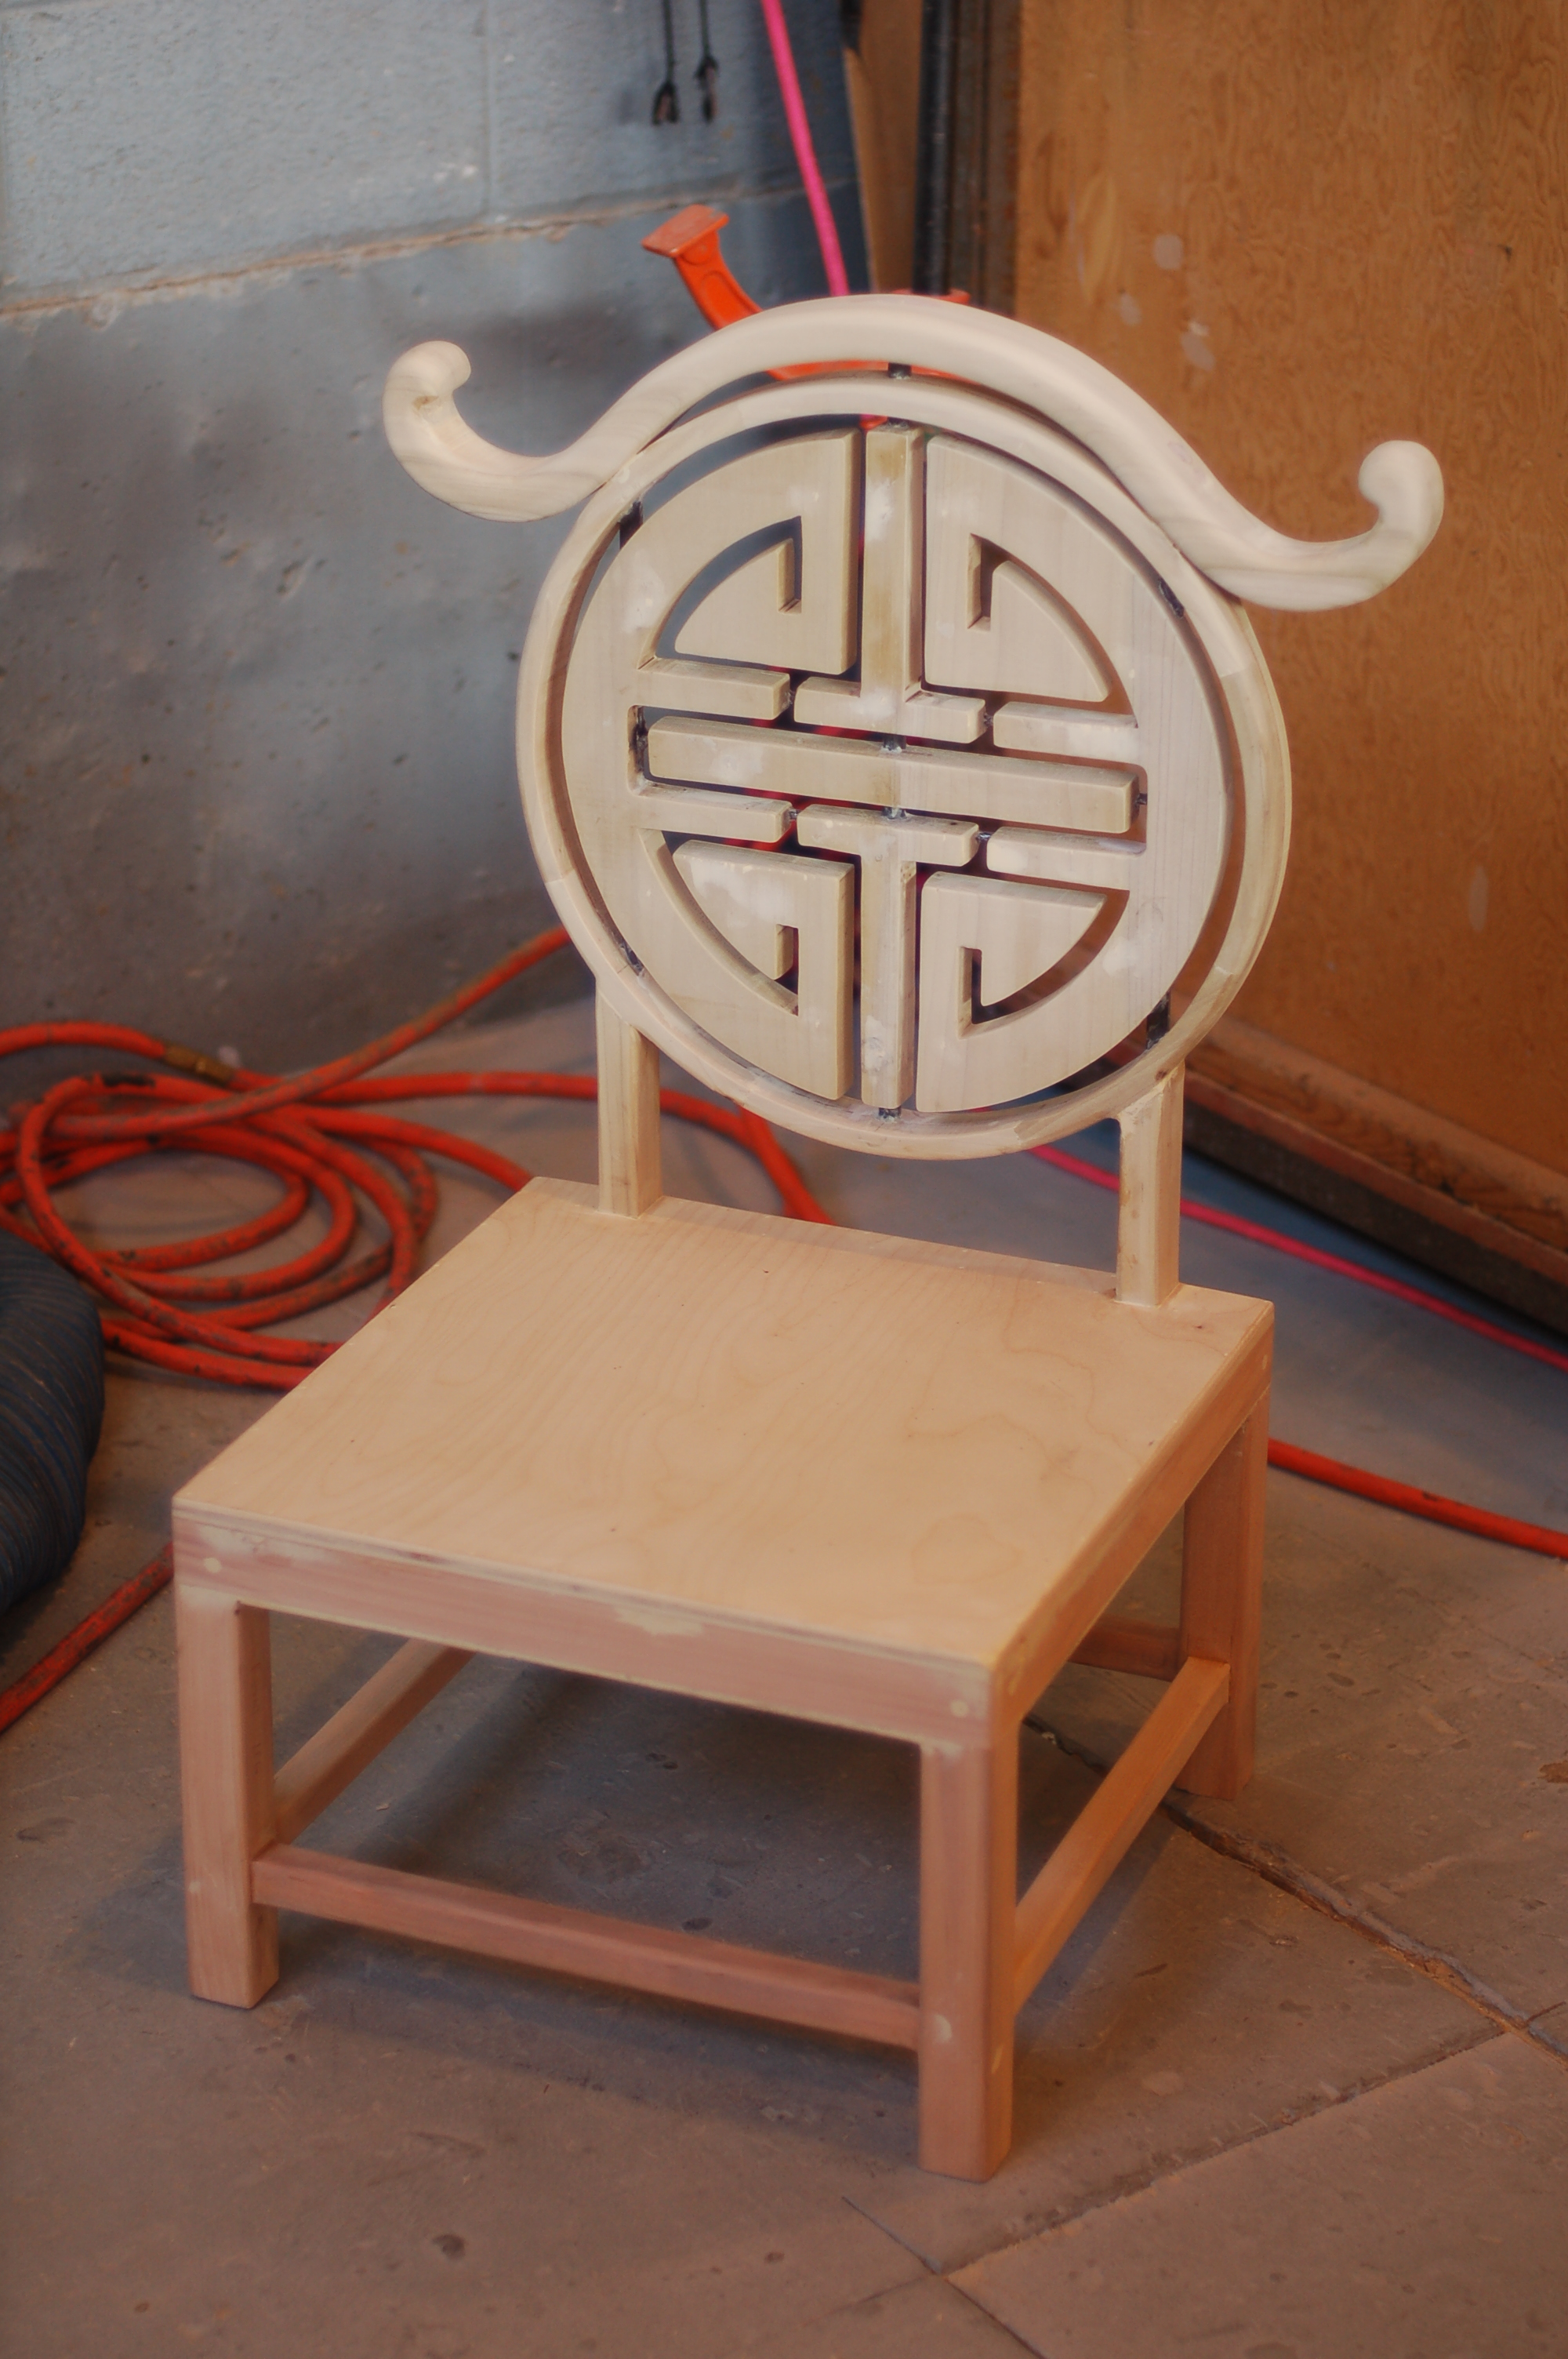
finished chair for Tea

Looking back, even as I write this article, I see a number of things I would do differently, or at least experiment with to see the results. As with any complicated prop, you learn a lot just by building it, but because you will never build the exact same prop again, it can be hard to assimilate that learning into your overall experience. As it turned out with this prop, I had only finished three of the nine chairs by the time they were cut from the show. It seems the stage was getting too cluttered, and the chairs were one of the more extraneous elements, so away they went.

That meant I got to keep two of the chairs, which let me test just how long my construction would actually hold up. The back on one of them did eventually break away from the seat, though not where I thought it would. I contemplated building more of a steel structure, but worried that the extra weight would either make it too heavy to carry, or even make it more likely to break; picture using a crowbar versus a stick of wood. The crowbar is extremely good at separating two pieces of wood from each other, where a stick of wood is just as likely to break itself before pulling the wood apart. Now look at a chair. The point where the back meets the seat is the focal point of a lever formed by somebody leaning back in the chair. If the stiles were metal (like a crowbar), it might tear the seat apart if you leaned back too hard.

But I digress and ruminate too much. Enjoy the pictures of the chair.

Valentines Day Links

I just finished up tech this past weekend for Timon of Athens at the Public Theatre; it’s the first show at the Public where I’m officially the “prop master”, so let the crowd go wild. But Eric, you say, didn’t you say you had tech just the other week? Yes, but that was a different show. What, you don’t tech a show every other week? Don’t you care about theatre? Anyways, while I do have some new articles I’ve been working on, there are also some links I’ve been collecting that I’ve been dying to share. Also, Happy Valentines Day to my wonderful wife!

First, I’d be remiss if I didn’t mention my latest magazine article in this month’s Stage Directions magazine, called “From Agave to Zeus.” It’s about the head I made for The Bacchae in 2009; I’ve certainly written a lot about it on this blog, but the article covers the whole shebang in one compact story, and features some new photographs as well.

Here is a list of “Huntorials“; tutorials on sculpting, casting, armor-making, weapon-making and painting, focused on making replicas from the Predator canon. By that, I mean the movies with the monsters versus future US governors, not the remote-control drones.

On the “Definitive Costume and Propmaking Tutorials” page is a small selection of technique guides, like vacuumforming and weathering; useful, but far from definitive.

The Replica Prop Forum had an interesting and insightful thread discussing more general prop making methods. How do you work, what materials do you use, and why?

On the other side of the pond, The Association of British Theatre Technicians has a FAQ pertaining to props.

And finally, “How to Solve It,” a step-by-step guide on how to solve problems, easily pertainable to all those tricky prop conundrums (you want this to do what?).

Property Resources, 1916

The following comes from a book written in 1916 by Arthur Edwin Krows, called “Play production in America.” It’s short, but provides a rare example from this time period on how props were acquired, rather than built.

Confessedly, it is not a simple matter to provide pertinent items for a stage scene, either those adapted to actual use in the action, or those merely for atmosphere. Consequently, most producers are found covertly making collections of articles they are likely to need. Belasco has an amazing amount of such things stored away. It is said, too, that every time he goes out of town to open a new production, a certain ” second-hand” man will ship a carload of “antiques” on ahead, open a store in the town, and contrive to have the distinguished manager informed of the opportunity for bargains.

When they wanted furniture in the old days, they frequently manufactured the unused, purely decorative pieces of papier-mache, when they didn’t paint them on the scenery; but all that is gone by now. Fannie Brice once told me how in the early days of her career, she used to borrow the window curtain of her hotel room to help dress the set. The efficient property man maintains a list of sources where he may procure any and all of the manifold portable objects in any scene. In Winthrop Ames’s production of “Children of Earth,” in New York, chairs were gathered from old houses in New Jersey and Connecticut, and from old curiosity shops, the pewter from an old New England farmhouse through a dealer, a saw, saw-buck, and some rainbarrels from Mr. Ames’s farm in Massachusetts, and so on through a long list of objects quite as imposing as that of art miscellany in “The High Road.”

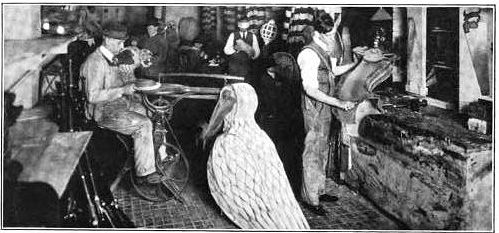
The property room at the New York Hippodrome, 1916

Scenic Dope and Monster Mud

Scenic dope is a general term for a number of materials used for a number of techniques. In the late 19th and early 20th centuries, a ceiling paint known as calcimine was popular. It was essentially whiting mixed with animal glue and a bit of water. Whiting is powdered and washed white chalk, aka calcium carbonate. Set builders used it to prime flats for painting, or a thicker form to adhere muslin to flats. Along the way, it evolved into recipes and formulations which could be used for all sorts of texturing.

If you add linseed oil to whiting, you can make a simple caulk. If you mix whiting with casein (milk protein used as a binder in casein paint) and water (and borax if you want anti-fungal qualities) you can also make a simple joint compound. With the introduction of latex paint (really, acrylic paint, as it contains no actual latex), we now have the modern equivalents for the building blocks of scenic dope.

As it is a material which undergoes frequent experimentation and improvisation, no set recipe exists. A good place to begin your own experimenting is with a gallon of latex paint, 2–5 tubes of painter’s latex caulk, and 1–2 cups of joint compound. The thinner recipes (more paint, less caulk and joint compound) make good coatings for foam, while the thicker recipes (some push the ratio to equal parts paint and joint compound) can hold some heavy texture as it dries, almost to the point of being sculpt-able.

Note that the recipe calls for latex caulk and not silicone caulk. Silicone caulk is more common and easier to find in hardware and home improvement stores, but silicone does not bond with anything, which makes it impossible to mix into a recipe.

For a more flexible recipe, you can mix joint compound with glue (animal, or PVA). This is especially helpful when you are coating surfaces that have a bit of “give”. The harder dope recipes may crack under strain, whereas this one will bend.

You can add any number of additives to your recipe. Water putty and plaster allows it to dry harder but more brittle. Paper pulp really thickens the mix, and it can become almost like a thin clay, which is great for sculpting bark or rough stone on your surfaces. Sand can be added for a, well, sandy surface. Really, if you want a chunky texture, you can add almost anything chunky that you have laying around. In addition to mixing materials like sand into the mix, you can also sprinkle or dust it onto the surface while the dope is still wet. This will give it a coating, or crust, that you may find to your liking.

Theatrical suppliers make any number of products which mimic scenic dope, each with slightly different properties, but formulated to give consistent results. Rosco’s Foamcoat and Sculptural Arts’ Sculpt or Coat are just a few.

Because the recipe consists of latex paint and joint compound, both of which are water soluble, the resulting surface needs to be water-proofed if it will be outside or around moisture.

The properties of dope are similar to the wheatpaste used in papier-mache, and it is frequently used in conjunction with fabric. Strips of fabric are coated with dope and lain over a surface to create textures.

“Monster mud” is a term which began to appear in the late twentieth century to describe a mixture used frequently in the haunted house industry. You mix five gallons of joint compound with one gallon of latex paint. You can then submerge cloth—a large weave like burlap works best, though clothing or other fabric works as well—into the mixture, squeeze the excess mud out, and shape it. You may also spread the mud on straight to add texture. It may take up to several days to dry, but it becomes rock-hard (though not water-proof). It’s a clever way to mimic sculpted fabric, though any kind of flowing surface lends itself to this technique.

Hammer Time

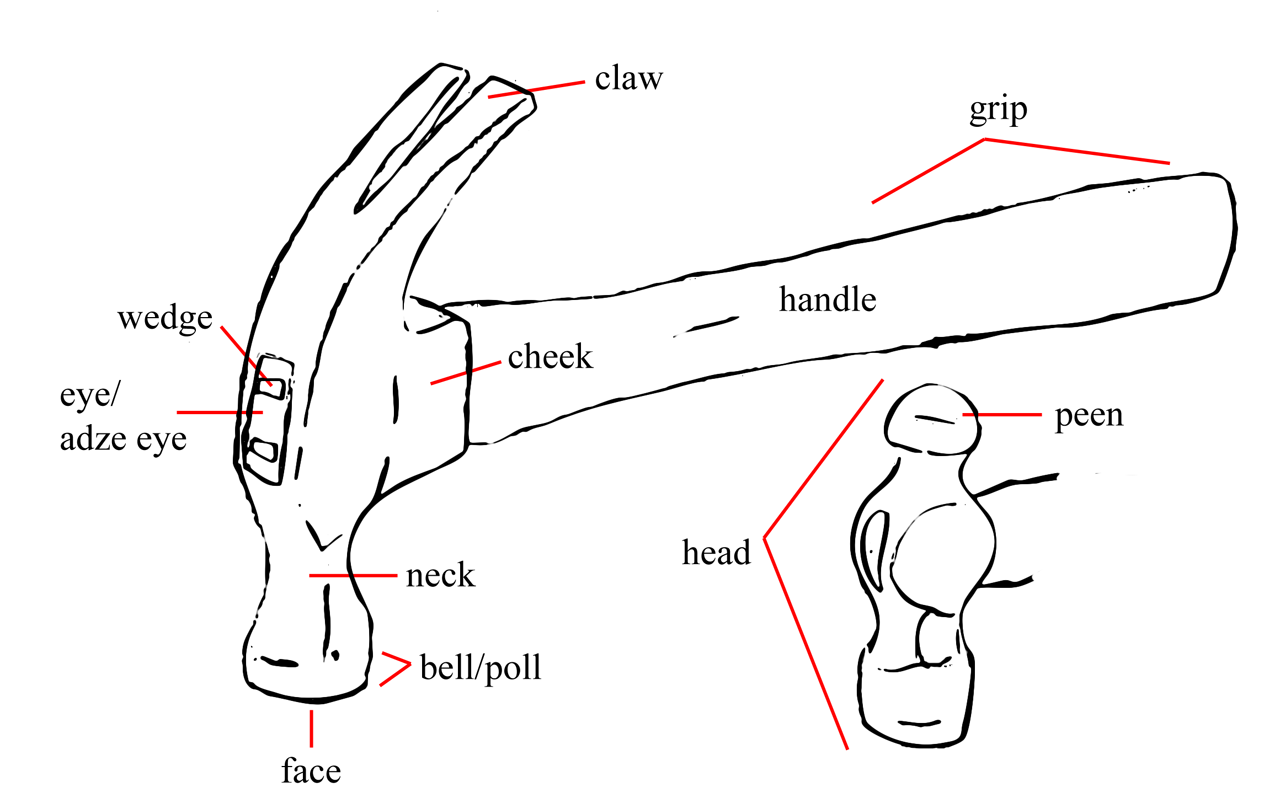
Parts of a hammer
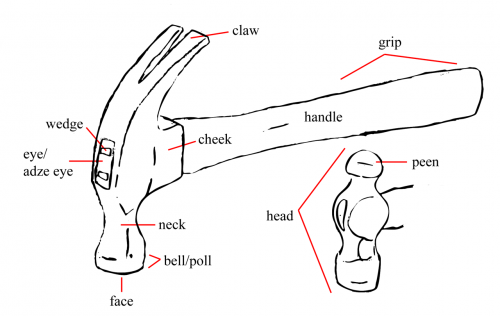
Parts of a hammer

Your basic hammer is made of two parts: the handle and the head. The handle fits through a hole in the head known as the eye (or adze eye), and is held in place with a wedge. On newer hammers, the grip may be wrapped in rubber for greater comfort. The face is what strikes the nail or other surface you are hammering. Hammers used for peening, or shaping metal come in a number of varieties. A ball peen hammer has a peen with a hemisphere shape. A claw hammer has a claw used for removing nails or separating two pieces of wood.

Types of hammers
Types of hammers

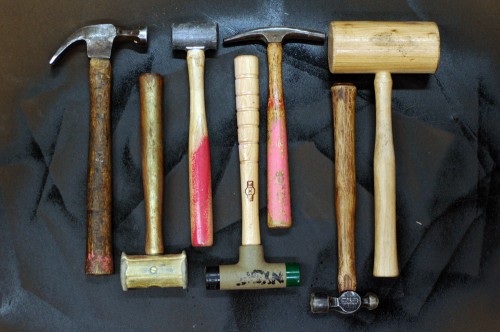
I gathered some of the hammers we have in our shop, which represent some of the more common types which are useful to the props artisan. From left to right, we have:

Claw hammer: Your basic carpentry hammer is useful for driving and removing nails into wood. It’s also the go-to-hammer for basic “hitting stuff”; I kind of cringe every time I see someone grab a ball peen hammer to knock something loose.

Rawhide mallet: Useful for non-marring blows, especially when working with leather, jewelery or other softer and delicate metals.

Lead mallet: These are used to hit steel without the risk of creating sparks. You can also get copper mallets for the same purpose.

Soft-faced hammer: The faces are made of soft materials, such as rubber or plastic, and are often removable and replaceable. These are used when you are hammering on or around decorative or finished wood to keep from marring the surface.

Tack hammer: Used in upholstery to drive tacks. One end is split and often magnetic to help hold the tiny tacks while driving them in.

Ball peen hammer: Peen hammers are used for shaping metal. Besides the ball peen, you may also find straight peen, cross peen, and point peen, among others.

Wooden mallet: Or carpenter’s mallet, used for furniture assembly or driving in dowels when non-marring blows are needed.

You can of course find any number of other types of hammers and mallets, with many variations in between. Prop shops will often carry rubber mallets, rip hammers and sledge hammers. Other types of hammers, such as bricklayer hammers or drywall hammers may also find their way into shops. Check out the Science and Engineering Encyclopedia for a comprehensive list of hammers.